
Arduino UNO Controlled Irrigation System with Soil Moisture Sensing and Water Pump Automation
View and Edit Project In Cirkit Designer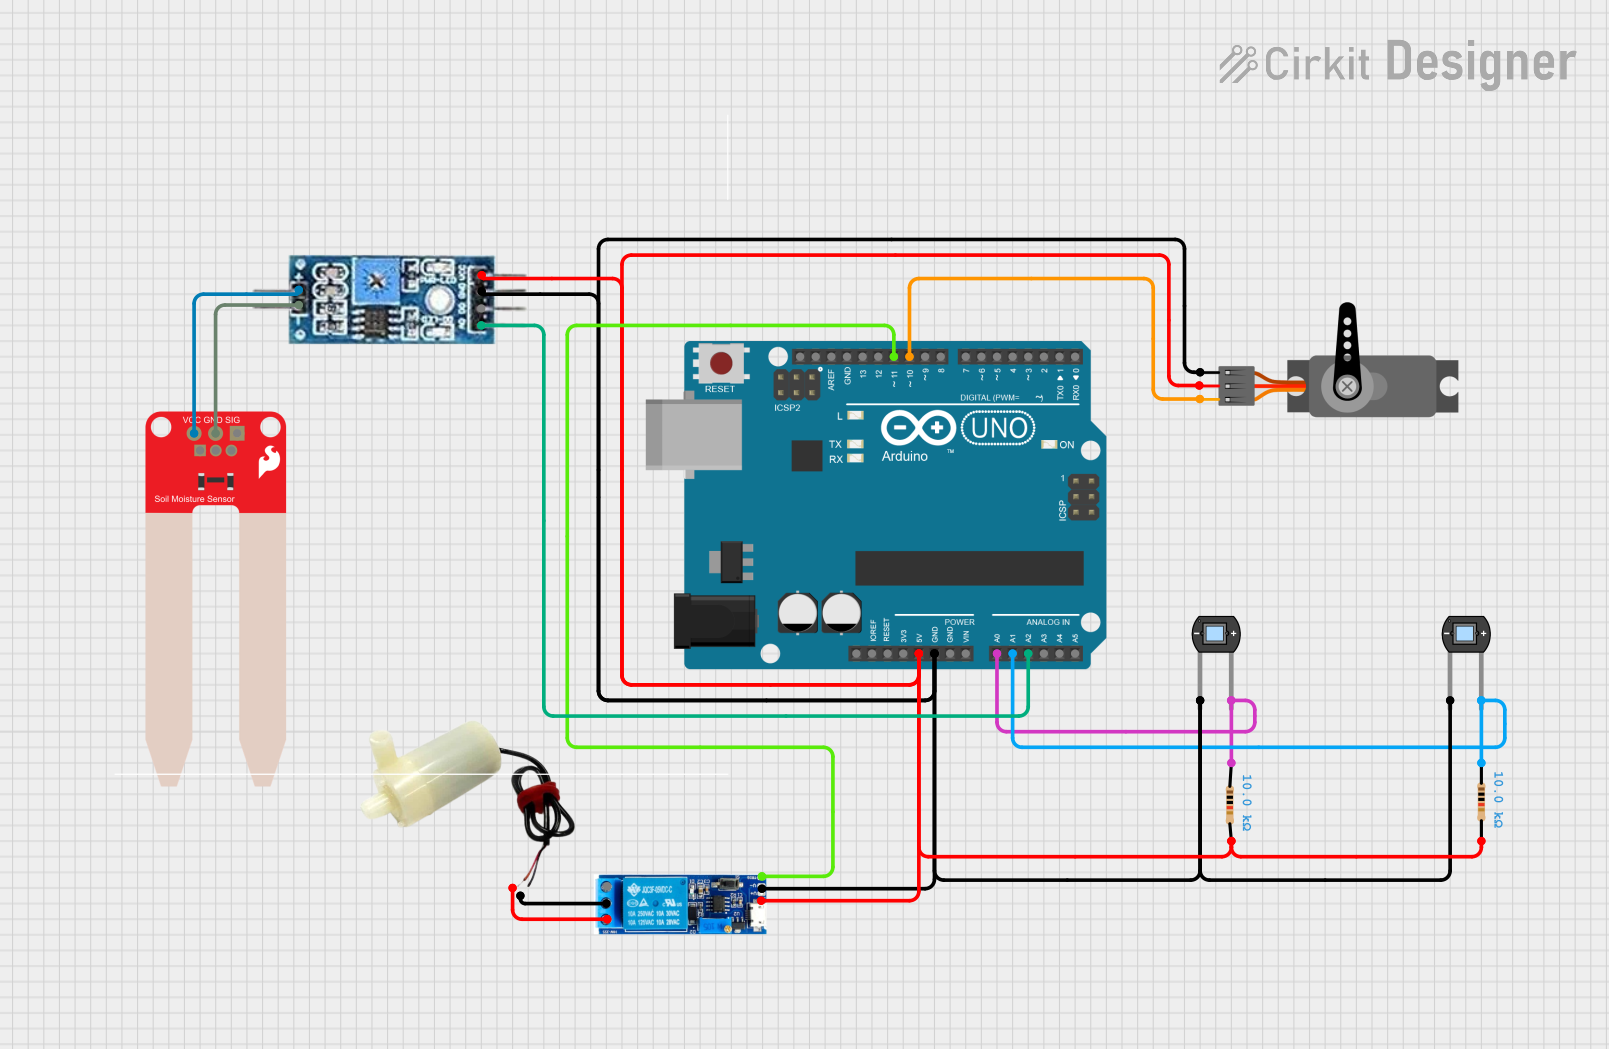
Circuit Documentation
Summary
The circuit in question appears to be designed for environmental monitoring and control, possibly for applications such as automated plant watering. It includes an Arduino UNO as the central microcontroller, interfacing with various sensors and actuators. The sensors include photodiodes for light detection and a soil moisture sensor for monitoring soil conditions. The actuators include a servo motor and a relay module connected to a mini water pump. The circuit uses resistors for current limiting and voltage division.
Component List
Arduino UNO
- Microcontroller board based on the ATmega328P
- Provides a range of digital and analog I/O pins
Photodiode (x2)
- Light-sensitive component
- Converts light into an electrical current
Resistor (x2)
- Passive two-terminal electrical component
- Implements electrical resistance as a circuit element
Servo
- Rotary actuator or linear actuator
- Allows for precise control of angular or linear position
Relay Module 5V-30V
- Electrically operated switch
- Allows a low-power signal to control a higher power circuit
5V Mini Water Pump
- Small pump powered by 5V
- Used for pumping water in small-scale applications
SparkFun Soil Moisture Sensor
- Measures the volumetric content of water in soil
- Outputs an analog signal that can be read by the Arduino
Soil Moisture Interceptor
- Additional soil moisture sensing component
- Provides both analog and digital outputs
Wiring Details
Arduino UNO
- 5V pin connected to V+ of Relay Module, VCC of Servo, VCC of Soil Moisture Interceptor, and pin2 of both Resistors
- GND pin connected to V- of Relay Module, GND of Servo, GND of Soil Moisture Interceptor, and cathode of both Photodiodes
- A0 pin connected to anode of one Photodiode through a Resistor
- A1 pin connected to anode of the other Photodiode through a Resistor
- A2 pin connected to AO of Soil Moisture Interceptor
- D11 pin connected to trigger of Relay Module
- D10 pin connected to PWM of Servo
Photodiode
- Anode connected to A0 or A1 on the Arduino UNO through a Resistor
- Cathode connected to GND on the Arduino UNO
Resistor
- One pin connected to anode of Photodiode
- Other pin connected to A0 or A1 on the Arduino UNO
Servo
- VCC connected to 5V on the Arduino UNO
- GND connected to GND on the Arduino UNO
- PWM connected to D10 on the Arduino UNO
Relay Module 5V-30V
- V+ connected to 5V on the Arduino UNO
- V- connected to GND on the Arduino UNO
- Trigger connected to D11 on the Arduino UNO
- Common contact connected to negative pin of 5V Mini Water Pump
- Normally closed connected to positive pin of 5V Mini Water Pump
5V Mini Water Pump
- Positive pin connected to normally closed on Relay Module
- Negative pin connected to common contact on Relay Module
SparkFun Soil Moisture Sensor
- GND connected to GND of Soil Moisture Interceptor
- VCC connected to VCC of Soil Moisture Interceptor
Soil Moisture Interceptor
- AO connected to A2 on the Arduino UNO
- DO not connected
- GND connected to GND on the Arduino UNO
- VCC connected to 5V on the Arduino UNO
Documented Code
Arduino UNO Code (sketch.ino)
void setup() {
  // put your setup code here, to run once:

}

void loop() {
  // put your main code here, to run repeatedly:

}
Additional Notes (documentation.txt)
The provided code is a template and does not contain any functional implementation. The user is expected to fill in the setup and loop functions with code that initializes the components and contains the main logic for the circuit's operation. This may include reading sensor values, controlling the servo, and activating the water pump via the relay module based on certain conditions such as soil moisture level or light intensity.