
Arduino UNO Controlled LED Sequence with Pushbutton Activation
View and Edit Project In Cirkit Designer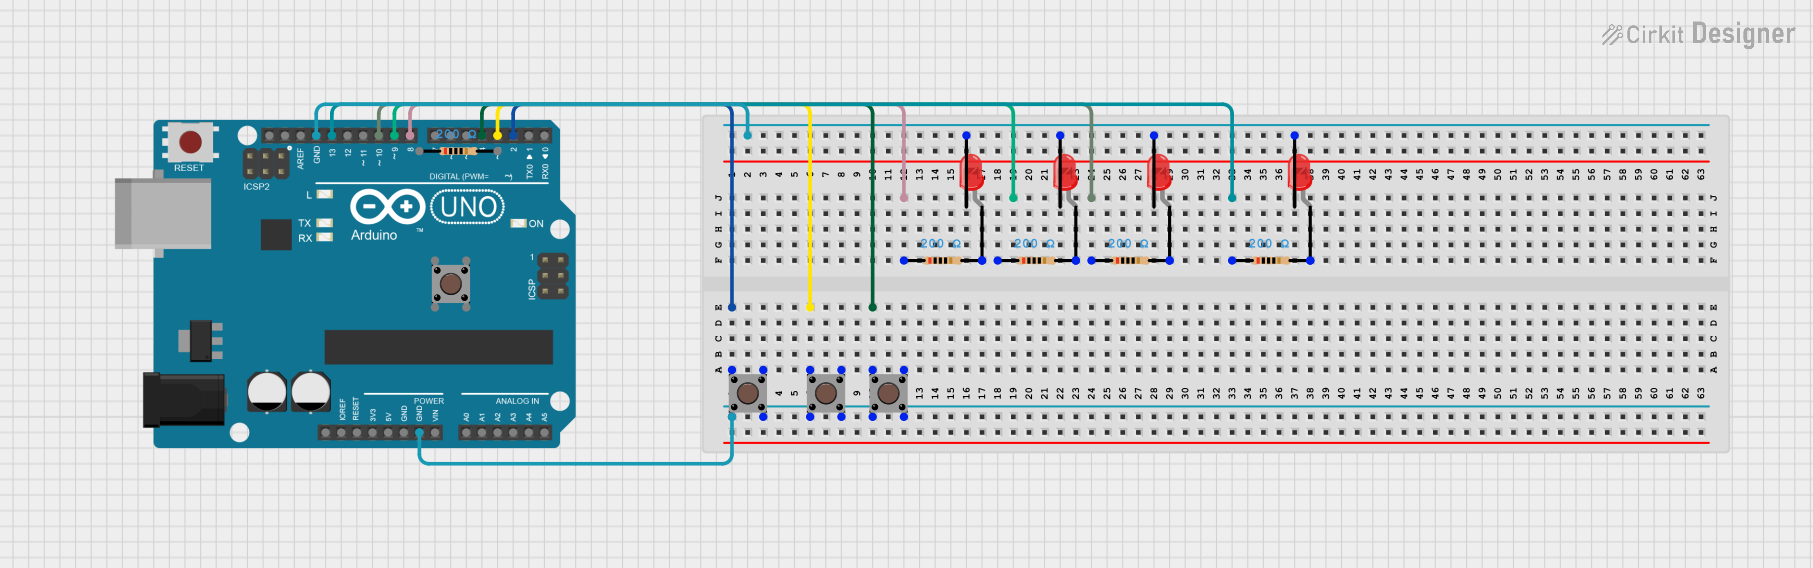
Circuit Documentation
Summary of the Circuit
This circuit is designed around an Arduino UNO microcontroller and includes several pushbuttons and LEDs. The pushbuttons are used as digital inputs to the Arduino, and the LEDs serve as visual indicators that are controlled by the Arduino's digital output pins. Each LED is connected in series with a resistor to limit the current through the LED. The circuit is programmed to light up specific LEDs when corresponding pushbuttons are pressed.
Component List
Arduino UNO
- Microcontroller board based on the ATmega328P
- It has 14 digital input/output pins, 6 analog inputs, a USB connection, a power jack, an ICSP header, and a reset button.
Pushbutton
- A simple switch mechanism for controlling some aspect of a machine or a process. Buttons are typically made out of hard material, usually plastic or metal.
LED: Two Pin (red)
- A light-emitting diode (LED) that emits red light when a voltage is applied to its anode and cathode.
- Requires a current-limiting resistor to prevent damage.
Resistor
- A passive two-terminal electrical component that implements electrical resistance as a circuit element.
- In this circuit, resistors are used to limit the current through the LEDs.
Wiring Details
Arduino UNO
- Digital pins D2, D3, and D4 are connected to pushbuttons.
- Digital pins D8, D9, D10, and D13 are connected to the anodes of LEDs through resistors.
- GND pin is connected to one side of each pushbutton and to the cathodes of all LEDs.
Pushbutton
- One side (Pin 1) is connected to an Arduino digital input pin (D2, D3, or D4).
- The other side (Pin 2) is connected to GND.
LED: Two Pin (red)
- The anode is connected to an Arduino digital output pin (D8, D9, D10, or D13) through a resistor.
- The cathode is connected to GND.
Resistor
- One pin (pin1) is connected to an Arduino digital output pin (D8, D9, D10, or D13).
- The other pin (pin2) is connected to the anode of an LED.
Documented Code
// Define pin numbers
const int buttonPin2 = 2;
const int buttonPin3 = 3;
const int buttonPin4 = 4;

const int ledPin8 = 8;
const int ledPin9 = 9;
const int ledPin10 = 10;
const int ledPin13 = 13;

// Set up pins
void setup() {
  pinMode(buttonPin2, INPUT_PULLUP); // Button pin 2
  pinMode(buttonPin3, INPUT_PULLUP); // Button pin 3
  pinMode(buttonPin4, INPUT_PULLUP); // Button pin 4

  pinMode(ledPin8, OUTPUT); // LED pin 8
  pinMode(ledPin9, OUTPUT); // LED pin 9
  pinMode(ledPin10, OUTPUT); // LED pin 10
  pinMode(ledPin13, OUTPUT); // LED pin 13
}

void loop() {
  // Check if button 2 is pressed
  if (digitalRead(buttonPin2) == LOW) {
    lightUpLeds(ledPin8);
    lightUpLeds(ledPin13);
  }

  // Check if button 3 is pressed
  if (digitalRead(buttonPin3) == LOW) {
    lightUpLeds(ledPin9);
    lightUpLeds(ledPin13);
  }

  // Check if button 4 is pressed
  if (digitalRead(buttonPin4) == LOW) {
    lightUpLeds(ledPin10);
    lightUpLeds(ledPin13);
  }
}

// Function to light up LEDs for 0.5 seconds
void lightUpLeds(int ledPin) {
  digitalWrite(ledPin, HIGH);  // Turn on the LED
  delay(500);                   // Wait for 0.5 seconds
  digitalWrite(ledPin, LOW);   // Turn off the LED
}
This code is designed to read the state of three pushbuttons. When a button is pressed, it triggers the corresponding LED(s) to light up for half a second. The INPUT_PULLUP configuration for the button pins enables the internal pull-up resistors, which means the button is normally HIGH and goes LOW when pressed. The lightUpLeds function is a utility to turn on an LED, wait for 500 milliseconds, and then turn it off.