Arduino UNO Sound Level Meter with MAX4466 Microphone Amplifier
Circuit Documentation
Summary of the Circuit
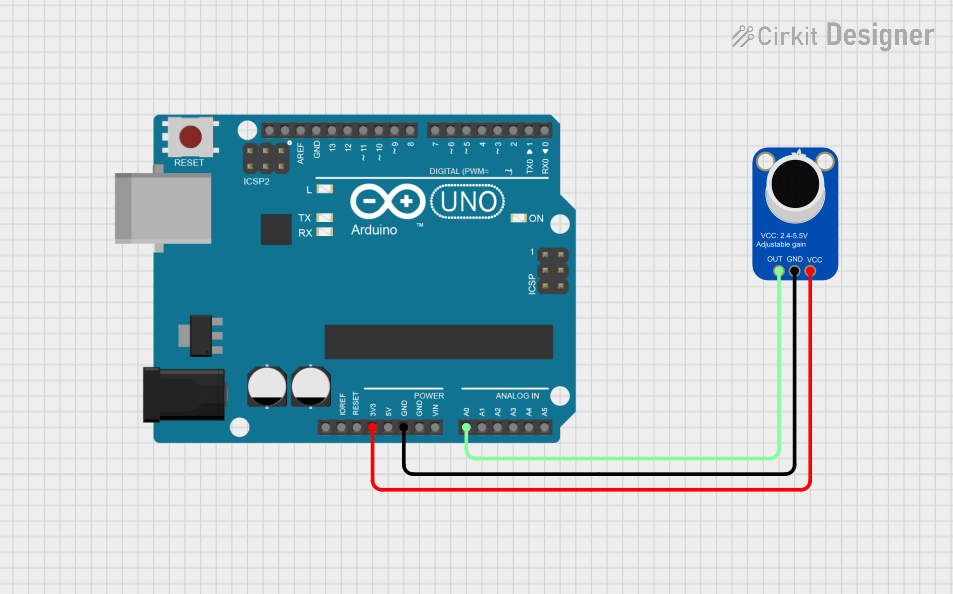
This circuit is designed to measure the sound level in an environment using an Adafruit MAX4466 Electret Microphone Amplifier and an Arduino UNO microcontroller. The MAX4466 amplifier boosts the signal from an electret microphone, which is then read by one of the analog input pins on the Arduino. The Arduino processes the signal and outputs the peak-to-peak amplitude of the sound wave, which can be used to gauge the loudness of the ambient environment.
Component List
Adafruit MAX4466 Electret Microphone Amplifier
- VCC: Power supply input.
- GND: Ground connection.
- OUT: Amplified signal output.
Arduino UNO
- IOREF: This pin on the Arduino board provides the voltage reference with which the microcontroller operates.
- Reset: Used to reset the microcontroller.
- 3.3V: 3.3 volts power output.
- 5V: 5 volts power output.
- GND: Ground.
- Vin: Input voltage to Arduino when using an external power source.
- A0 - A5: Analog input pins.
- SCL: Serial Clock Line for I2C communication.
- SDA: Serial Data Line for I2C communication.
- AREF: Analog reference pin for the ADC.
- D0 - D13: Digital pins, which can be used as input or output pins.
- UNUSED: Not connected.
Wiring Details
Adafruit MAX4466 Electret Microphone Amplifier
- VCC connected to Arduino UNO 3.3V.
- GND connected to Arduino UNO GND.
- OUT connected to Arduino UNO A0.
Arduino UNO
- 3.3V connected to MAX4466 VCC.
- GND connected to MAX4466 GND.
- A0 connected to MAX4466 OUT.
Documented Code
/*
  Sound Level Measurement using Arduino and MAX4466 Amplifier

  This code reads the amplified output from an Adafruit MAX4466 Electret Microphone
  Amplifier connected to the A0 pin of an Arduino UNO. It measures the peak-to-peak
  amplitude of the signal within a 50ms window, which corresponds to a sampling rate
  of 20Hz. The peak-to-peak value is then printed to the serial monitor. This can be
  used to gauge the loudness of the ambient environment. Spurious readings above 1023
  are ignored to ensure data integrity.
*/

const int sampleWindow = 50; // Sample window width in mS (50 mS = 20Hz)
const int AMP_PIN = A0;      // Preamp output pin connected to A0
unsigned int sample;

void setup() {
  Serial.begin(9600);
}

void loop() {
  unsigned long startMillis = millis(); // Start of sample window
  unsigned int peakToPeak = 0;         // peak-to-peak level

  unsigned int signalMax = 0;
  unsigned int signalMin = 1024;

  // Collect data for 50 mS and then plot data
  while (millis() - startMillis < sampleWindow) {
    sample = analogRead(AMP_PIN);
    if (sample < 1024) {  // Toss out spurious readings
      if (sample > signalMax) {
        signalMax = sample;  // Save just the max levels
      } else if (sample < signalMin) {
        signalMin = sample;  // Save just the min levels
      }
    }
  }
  peakToPeak = signalMax - signalMin;  // max - min = peak-peak amplitude
  Serial.println(peakToPeak);
  // Uncomment to convert the peak-to-peak amplitude to volts
  // double volts = (peakToPeak * 5.0) / 1024;  // Convert to volts
  // Serial.println(volts);
}
This code is designed to be uploaded to the Arduino UNO microcontroller. It initializes the serial communication, reads the amplified signal from the microphone amplifier, calculates the peak-to-peak amplitude of the signal, and prints the result to the serial monitor. The code includes a provision to ignore any spurious readings that exceed the maximum value of the analog-to-digital converter.