
Battery-Powered Weather Station with SparkFun Pro Micro and NRF24L01
View and Edit Project In Cirkit Designer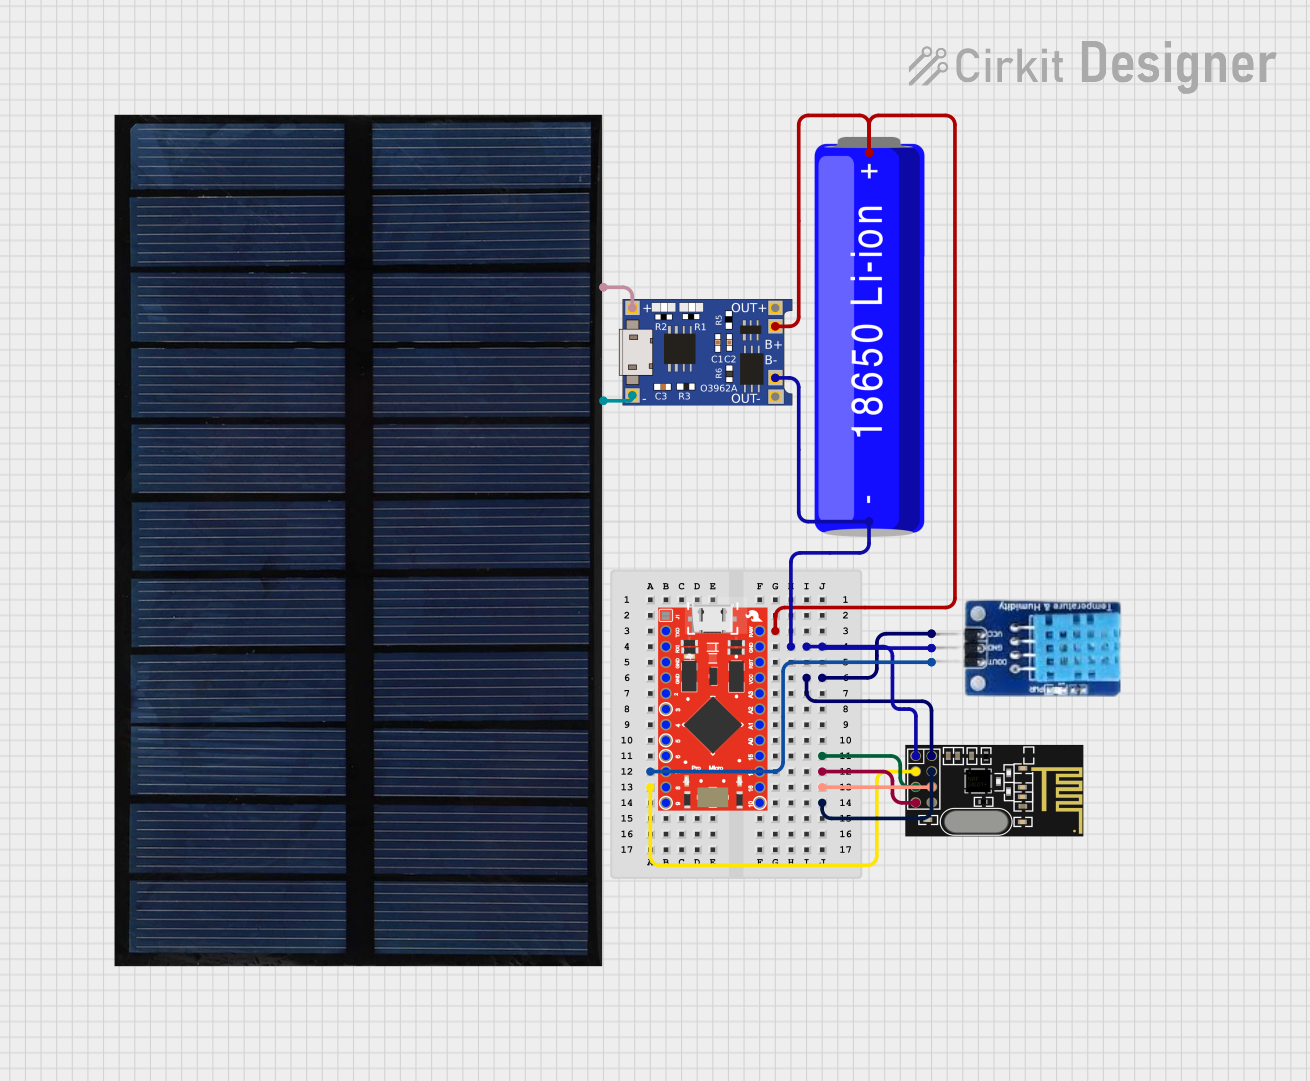
Circuit Documentation
Summary
This circuit is designed to read temperature and humidity data using a DHT11 sensor and transmit the data wirelessly using an NRF24L01 module. The system is powered by a 18650 Li-ion battery, which is charged using a TP4056 module connected to a solar cell. The main controller for the circuit is a SparkFun Pro Micro.
Component List
SparkFun Pro Micro
- Description: A compact microcontroller board based on the ATmega32U4.
- Pins: RAW, GND, RESET, VCC, A3, A2, A1, A0, SCK, MISO, MOSI, D10, D9, D8, D7, D6, D5, D4, D3, D2, RXI, TXO
DHT11
- Description: A basic, low-cost digital temperature and humidity sensor.
- Pins: DATA, GND, VCC
NRF24L01
- Description: A 2.4GHz wireless transceiver module.
- Pins: IRQ (not used), MOSI, CSN, VCC (3V), GND, CE, SCK, MISO
18650 Li-ion Battery
- Description: A rechargeable lithium-ion battery.
- Pins: -, +
TP4056
- Description: A lithium battery charger module with overcharge protection.
- Pins: OUT-, B-, B+, OUT+, IN-, IN+
Solar Cell
- Description: A solar panel used to charge the 18650 Li-ion battery.
- Pins: +, -
Wiring Details
SparkFun Pro Micro
- RAW: Connected to B+ of TP4056 and + of 18650 Li-ion Battery
- GND: Connected to GND of NRF24L01, B- of TP4056, - of 18650 Li-ion Battery, and GND of DHT11
- VCC: Connected to VCC (3V) of NRF24L01 and VCC of DHT11
- SCK: Connected to SCK of NRF24L01
- D7: Connected to DATA of DHT11
- MISO: Connected to MISO of NRF24L01
- D8: Connected to CE of NRF24L01
- MOSI: Connected to MOSI of NRF24L01
- D10: Connected to CSN of NRF24L01
DHT11
- DATA: Connected to D7 of SparkFun Pro Micro
- GND: Connected to GND of SparkFun Pro Micro
- VCC: Connected to VCC of SparkFun Pro Micro
NRF24L01
- GND: Connected to GND of SparkFun Pro Micro
- VCC (3V): Connected to VCC of SparkFun Pro Micro
- SCK: Connected to SCK of SparkFun Pro Micro
- MISO: Connected to MISO of SparkFun Pro Micro
- CE: Connected to D8 of SparkFun Pro Micro
- MOSI: Connected to MOSI of SparkFun Pro Micro
- CSN: Connected to D10 of SparkFun Pro Micro
18650 Li-ion Battery
- +: Connected to B+ of TP4056 and RAW of SparkFun Pro Micro
- -: Connected to B- of TP4056 and GND of SparkFun Pro Micro
TP4056
- B+: Connected to + of 18650 Li-ion Battery and RAW of SparkFun Pro Micro
- B-: Connected to - of 18650 Li-ion Battery and GND of SparkFun Pro Micro
- IN-: Connected to - of Solar Cell
- IN+: Connected to + of Solar Cell
Solar Cell
- +: Connected to IN+ of TP4056
- -: Connected to IN- of TP4056
Documented Code
SparkFun Pro Micro Code
#include <Wire.h>
#include <LiquidCrystal_I2C.h>
#include <DHT.h>
#include <SPI.h>
#include <nRF24L01.h>
#include <RF24.h>

// Pin untuk NRF24L01
#define CE_PIN   8
#define CSN_PIN  10

// Pin untuk sensor DHT11
#define DHT_PIN  7
DHT dht(DHT_PIN, DHT11);

// Setup modul NRF24L01
RF24 radio(CE_PIN, CSN_PIN);
const byte address[6] = "00001";

// Setup LCD I2C
LiquidCrystal_I2C lcd(0x27, 16, 2); // Alamat I2C 0x27 untuk LCD 16x2

void setup() {
  // Inisialisasi komunikasi serial
  Serial.begin(9600);

  // Inisialisasi sensor DHT11
  dht.begin();

  // Inisialisasi LCD
  lcd.init();
  lcd.backlight();
  lcd.print("Initializing...");
  delay(1000);

  // Inisialisasi modul NRF24L01
  radio.begin();
  radio.openWritingPipe(address);
  radio.setPALevel(RF24_PA_HIGH);

  // Clear layar LCD
  lcd.clear();
  lcd.print("Ready to send...");
}

void loop() {
  // Membaca suhu dan kelembapan dari DHT11
  float temperature = dht.readTemperature();
  float humidity = dht.readHumidity();

  if (isnan(temperature) || isnan(humidity)) {
    lcd.clear();
    lcd.print("Sensor Error");
    delay(2000);
    return;
  }

  // Menampilkan suhu dan kelembapan pada LCD
  lcd.clear();
  lcd.setCursor(0, 0);
  lcd.print("Temp: ");
  lcd.print(temperature);
  lcd.print("C");

  lcd.setCursor(0, 1);
  lcd.print("Humidity: ");
  lcd.print(humidity);
  lcd.print("%");

  // Mengirimkan data melalui NRF24L01
  float data[2] = {temperature, humidity};
  radio.write(&data, sizeof(data));

  // Menunggu 2 detik sebelum membaca ulang
  delay(2000);
}
DHT11 Code
void setup() {
  // put your setup code here, to run once:

}

void loop() {
  // put your main code here, to run repeatedly:

}
Solar Cell Code
void setup() {
  // put your setup code here, to run once:

}

void loop() {
  // put your main code here, to run repeatedly:

}
This documentation provides a comprehensive overview of the circuit, including a summary, detailed component list, wiring details, and documented code for the microcontrollers.