
Arduino Nano Controlled PAM8403 Audio Amplifier with Voice Synthesis
View and Edit Project In Cirkit Designer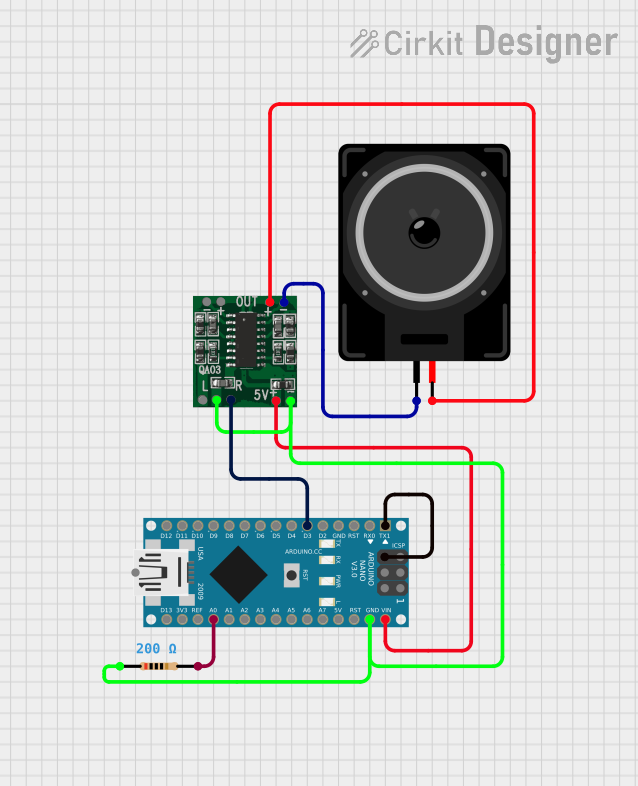
Circuit Documentation
Summary
The circuit in question is designed to drive a loudspeaker using an audio signal generated by an Arduino Nano and amplified by a PAM8403 amplifier module. The Arduino Nano is programmed to read an analog voltage, convert it to a digital value, and output a corresponding audio signal. The PAM8403 module amplifies this audio signal to drive the loudspeaker. A resistor is included in the circuit, likely for voltage measurement or signal conditioning purposes.
Component List
PAM8403 Amplifier Module
- Description: A small digital amplifier chip that provides high-quality sound amplification.
- Purpose: To amplify the audio signal from the Arduino Nano to drive the loudspeaker.
- Pins: 5vIN+, GND/IN-, R-INPUT, GND, L-INPUT, L-, L+, R+, R-
Loudspeaker
- Description: An electroacoustic transducer that converts an electrical audio signal into a corresponding sound.
- Purpose: To produce audible sound from the amplified audio signal.
- Pins: pin1, pin2
Arduino Nano
- Description: A small, complete, and breadboard-friendly board based on the ATmega328 (Arduino Nano 3.x).
- Purpose: To generate audio signals and control the PAM8403 amplifier module.
- Pins: D1/TX, D0/RX, RESET, GND, D2, D3, D4, D5, D6, D7, D8, D9, D10, D11/MOSI, D12/MISO, VIN, 5V, A7, A6, A5, A4, A3, A2, A1, A0, AREF, 3V3, D13/SCK
Resistor (200 Ohms)
- Description: A passive two-terminal electrical component that implements electrical resistance as a circuit element.
- Purpose: To provide a known resistance in the circuit, possibly for voltage measurement or signal conditioning.
- Pins: pin1, pin2
Wiring Details
PAM8403 Amplifier Module
- 5vIN+: Connected to Arduino Nano VIN.
- GND/IN- and GND: Common ground with Arduino Nano GND and one terminal of the Resistor.
- R-INPUT: Connected to Arduino Nano D3.
- R+: Connected to Loudspeaker pin2.
- R-: Connected to Loudspeaker pin1.
Loudspeaker
- pin1: Connected to PAM8403 R-.
- pin2: Connected to PAM8403 R+.
Arduino Nano
- VIN: Connected to PAM8403 5vIN+.
- GND: Common ground with PAM8403 GND/IN- and GND.
- D3: Connected to PAM8403 R-INPUT.
- D1/TX: Connected to Arduino Nano GND (possibly for debugging purposes).
- A0: Connected to one terminal of the Resistor.
Resistor (200 Ohms)
- pin1: Connected to common ground with PAM8403 GND/IN- and GND.
- pin2: Connected to Arduino Nano A0.
Documented Code
The code provided is for the Arduino Nano and is written in C++ using the Arduino IDE. The code utilizes the Talkie library to generate voice from the Arduino Nano. It reads an analog voltage from pin A0, converts it to a digital value, and outputs a corresponding audio signal through pin D3.
#include <Arduino.h>
#include <Talkie.h>
#include <TalkieUtils.h>
#include <Vocab_Special.h>

// ... (initial setup and library includes)

Talkie Voice;

void setup() {
    Serial.begin(115200);
    // ... (additional setup code)
    Serial.println(F("START " __FILE__ " from " __DATE__));
    Serial.print(F("Voice queue size is: "));
    Serial.println(Voice.sayQ(spPAUSE1));
    // ... (more setup code)
}

void loop() {
    // Read voltage at pin A0
    int tVoltage = analogRead(A0) * 3.3 / 1.023;
    Serial.print(tVoltage);
    Serial.println(" mV input");
    // ... (additional loop code)
    float tVoltageFloat = tVoltage / 1000.0;
    sayQVoltageVolts(&Voice, tVoltageFloat);
    Voice.sayQ(spPAUSE1);
    while (Voice.isTalking()) {
        // wait for end of speech
    }
    delay(200);
}
The code initializes the Talkie library, sets up serial communication, and in the main loop, reads the analog voltage, prints it to the serial monitor, and uses the Talkie library to convert the voltage value to speech. The sayQVoltageVolts function is used to queue the voltage value for speech output. The loop waits for the speech to finish before continuing with a short delay.