
Arduino UNO-Based Battery-Powered Robotic Vehicle with Ultrasonic Sensor and Magnetometer
View and Edit Project In Cirkit Designer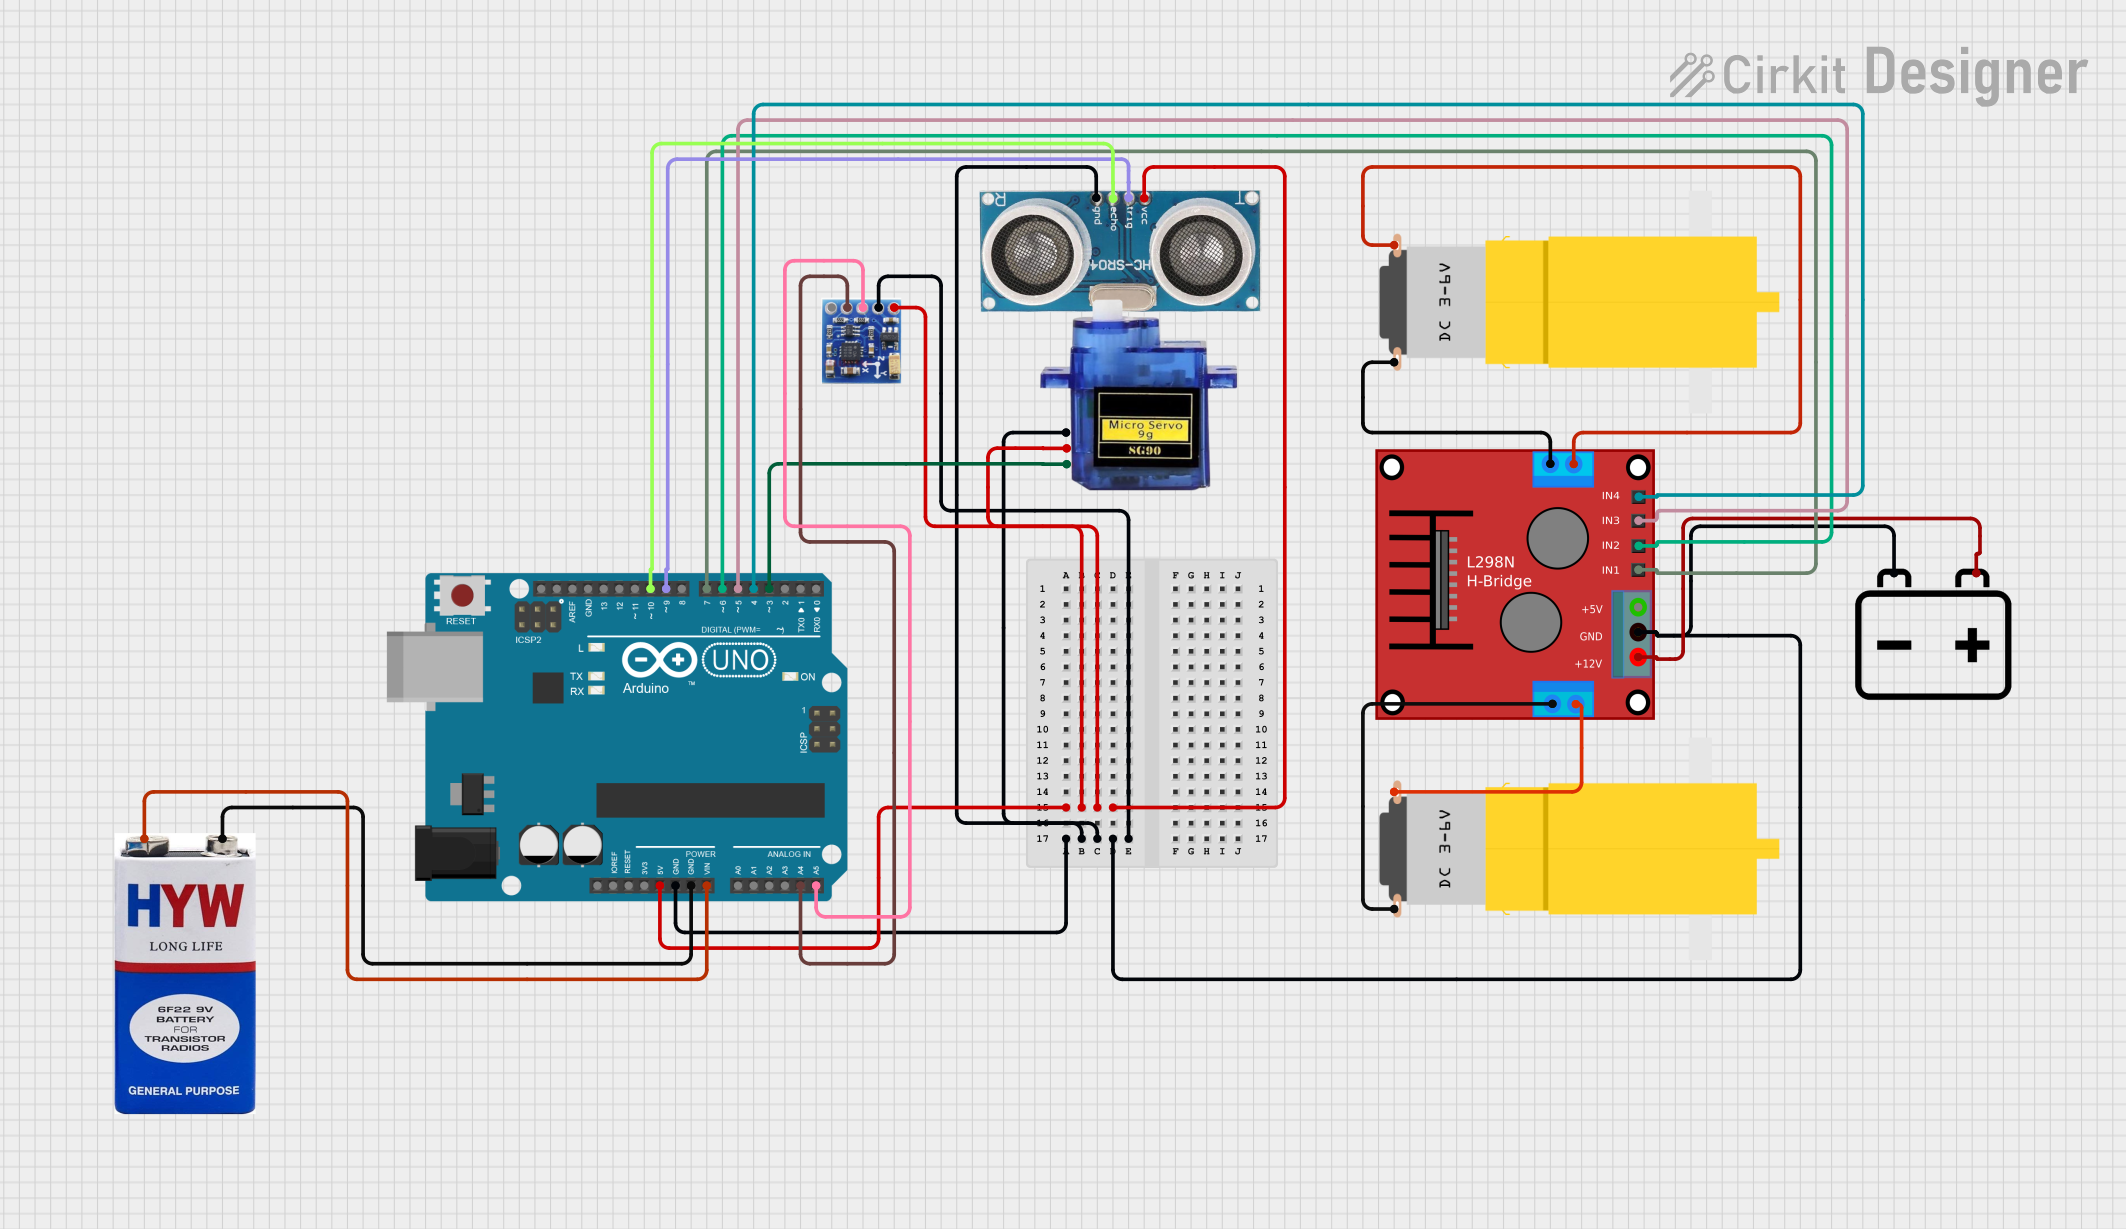
Circuit Documentation
Summary
This document provides a detailed overview of a circuit that includes various components such as an Arduino UNO, motors, sensors, and batteries. The circuit is designed to control motors and sensors using the Arduino UNO microcontroller. The document includes a component list, wiring details, and the embedded code used in the microcontroller.
Component List
Arduino UNO
- Description: A microcontroller board based on the ATmega328P.
- Pins: UNUSED, IOREF, Reset, 3.3V, 5V, GND, Vin, A0, A1, A2, A3, A4, A5, SCL, SDA, AREF, D13, D12, D11, D10, D9, D8, D7, D6, D5, D4, D3, D2, D1, D0
ponte h
- Description: H-Bridge motor driver.
- Pins: OUT4-Motor2, OUT3-Motor2, OUT2-Motor1, OUT1-Motor1, 5V, GND, 12V, IN3, IN1, IN2, IN4
Motor amarillo motorreductor hobby
- Description: Hobby motor with gearbox.
- Pins: vcc, GND
QMC5883L Magnetometer
- Description: 3-axis magnetometer.
- Pins: VCC, GND, SCL, SDA, DRDY
Ultrasonic Sensor
- Description: Sensor for measuring distance using ultrasonic waves.
- Pins: +VCC, Trigger, Echo, GND
Micro servo 9G
- Description: Small servo motor.
- Pins: GND, +5V, PWM
9V battery
- Description: 9V power source.
- Pins: +, -
12V Battery
- Description: 12V power source.
- Pins: -, +
Wiring Details
Arduino UNO
- 5V: Connected to +5V of Micro servo 9G, +VCC of Ultrasonic Sensor, VCC of QMC5883L Magnetometer
- GND: Connected to GND of Micro servo 9G, GND of Ultrasonic Sensor, - of 12V Battery, GND of ponte h, GND of QMC5883L Magnetometer, - of 9V battery
- Vin: Connected to + of 9V battery
- D5: Connected to IN3 of ponte h
- D7: Connected to IN1 of ponte h
- D6: Connected to IN2 of ponte h
- D4: Connected to IN4 of ponte h
- A4: Connected to SDA of QMC5883L Magnetometer
- A5: Connected to SCL of QMC5883L Magnetometer
- D10: Connected to Echo of Ultrasonic Sensor
- D9: Connected to Trigger of Ultrasonic Sensor
- D3: Connected to PWM of Micro servo 9G
ponte h
- OUT4-Motor2: Connected to GND of Motor amarillo motorreductor hobby
- OUT3-Motor2: Connected to vcc of Motor amarillo motorreductor hobby
- OUT2-Motor1: Connected to GND of Motor amarillo motorreductor hobby
- OUT1-Motor1: Connected to vcc of Motor amarillo motorreductor hobby
- GND: Connected to GND of Arduino UNO, GND of 12V Battery
- 12V: Connected to + of 12V Battery
- IN3: Connected to D5 of Arduino UNO
- IN1: Connected to D7 of Arduino UNO
- IN2: Connected to D6 of Arduino UNO
- IN4: Connected to D4 of Arduino UNO
Motor amarillo motorreductor hobby
- vcc: Connected to OUT3-Motor2 of ponte h, OUT1-Motor1 of ponte h
- GND: Connected to OUT4-Motor2 of ponte h, OUT2-Motor1 of ponte h
QMC5883L Magnetometer
- VCC: Connected to 5V of Arduino UNO
- GND: Connected to GND of Arduino UNO
- SCL: Connected to A5 of Arduino UNO
- SDA: Connected to A4 of Arduino UNO
Ultrasonic Sensor
- +VCC: Connected to 5V of Arduino UNO
- GND: Connected to GND of Arduino UNO
- Echo: Connected to D10 of Arduino UNO
- Trigger: Connected to D9 of Arduino UNO
Micro servo 9G
- GND: Connected to GND of Arduino UNO
- +5V: Connected to 5V of Arduino UNO
- PWM: Connected to D3 of Arduino UNO
9V battery
- +: Connected to Vin of Arduino UNO
- -: Connected to GND of Arduino UNO
12V Battery
- +: Connected to 12V of ponte h
- -: Connected to GND of Arduino UNO
Code Documentation
Arduino UNO Code
void setup() {
  // put your setup code here, to run once:

}

void loop() {
  // put your main code here, to run repeatedly:

}
This code is a basic template for the Arduino UNO. The setup() function is where you initialize your components and the loop() function is where you place the main logic that runs repeatedly.
Additional Documentation
This section is reserved for any additional documentation or notes related to the code or circuit.