
Arduino-Based Smart Lock System with RFID, Keypad, and Servo Motor
View and Edit Project In Cirkit Designer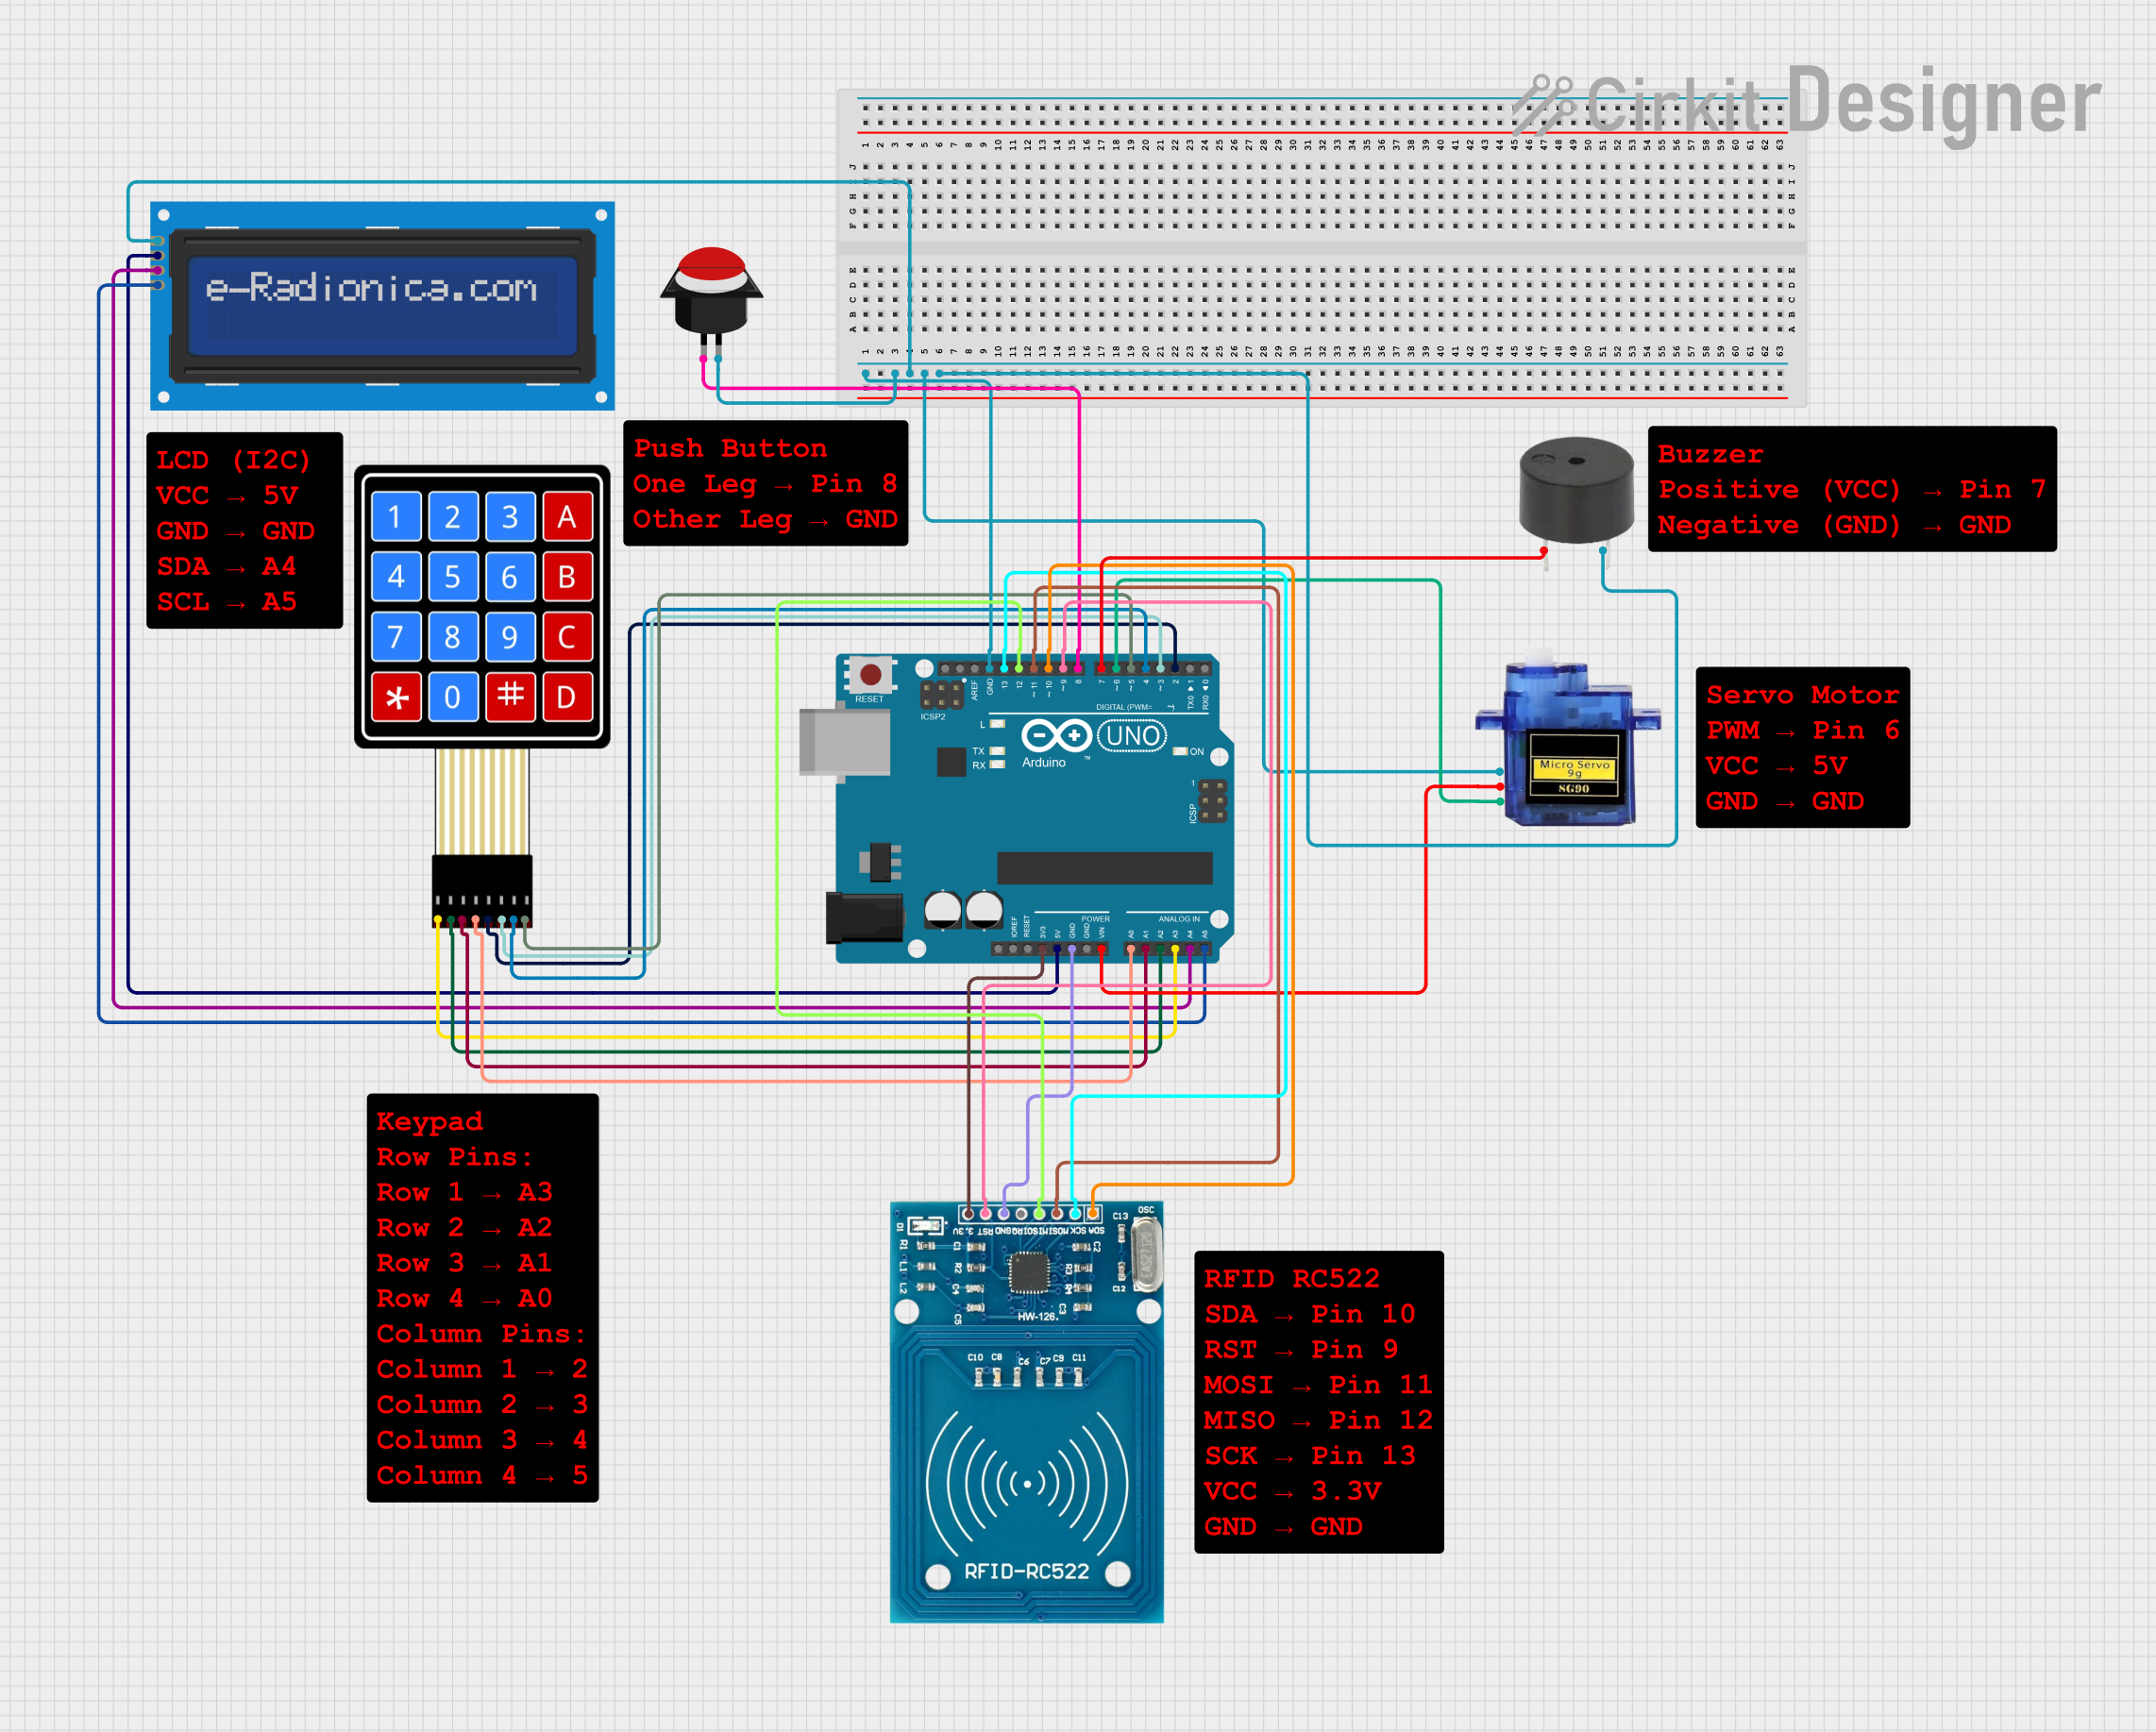
Circuit Documentation
Summary
This circuit is designed to control a locking mechanism using a combination of an RFID reader, a keypad, a push button, and a micro servo. The system also includes an LCD screen for user interaction and a buzzer for audio feedback. The core of the circuit is an Arduino UNO microcontroller, which interfaces with all the components.
Component List
Arduino UNO
- Description: Microcontroller board based on the ATmega328P.
- Pins: UNUSED, IOREF, Reset, 3.3V, 5V, GND, Vin, A0, A1, A2, A3, A4, A5, SCL, SDA, AREF, D13, D12, D11, D10, D9, D8, D7, D6, D5, D4, D3, D2, D1, D0
Micro servo 9G
- Description: Small servo motor for precise control of angular position.
- Pins: GND, +5V, PWM
4X4 Membrane Matrix Keypad
- Description: Keypad with 16 keys arranged in a 4x4 matrix.
- Pins: R1, R2, R3, R4, C1, C2, C3, C4
Buzzer
- Description: Simple piezoelectric buzzer for audio feedback.
- Pins: PIN, GND
Push Button Round
- Description: Simple push button for user input.
- Pins: leg0, leg1
LCD screen 16x2 I2C
- Description: 16x2 character LCD screen with I2C interface.
- Pins: SCL, SDA, VCC, GND
RFID-RC522
- Description: RFID reader module for reading RFID tags.
- Pins: VCC (3.3V), RST, GND, IRQ, MISO, MOSI, SCK, SDA
Wiring Details
Arduino UNO
- GND: Connected to GND of Push Button Round, LCD screen 16x2 I2C, Micro servo 9G, and Buzzer.
- 3.3V: Connected to VCC (3.3V) of RFID-RC522.
- 5V: Connected to VCC of LCD screen 16x2 I2C.
- Vin: Connected to +5V of Micro servo 9G.
- A0: Connected to R4 of 4X4 Membrane Matrix Keypad.
- A1: Connected to R3 of 4X4 Membrane Matrix Keypad.
- A2: Connected to R2 of 4X4 Membrane Matrix Keypad.
- A3: Connected to R1 of 4X4 Membrane Matrix Keypad.
- A4: Connected to SDA of LCD screen 16x2 I2C.
- A5: Connected to SCL of LCD screen 16x2 I2C.
- D13: Connected to SCK of RFID-RC522.
- D12: Connected to MISO of RFID-RC522.
- D11: Connected to MOSI of RFID-RC522.
- D10: Connected to SDA of RFID-RC522.
- D9: Connected to RST of RFID-RC522.
- D8: Connected to leg0 of Push Button Round.
- D7: Connected to PIN of Buzzer.
- D6: Connected to PWM of Micro servo 9G.
- D5: Connected to C4 of 4X4 Membrane Matrix Keypad.
- D4: Connected to C3 of 4X4 Membrane Matrix Keypad.
- D3: Connected to C2 of 4X4 Membrane Matrix Keypad.
- D2: Connected to C1 of 4X4 Membrane Matrix Keypad.
Micro servo 9G
- GND: Connected to GND of Arduino UNO.
- +5V: Connected to Vin of Arduino UNO.
- PWM: Connected to D6 of Arduino UNO.
4X4 Membrane Matrix Keypad
- R1: Connected to A3 of Arduino UNO.
- R2: Connected to A2 of Arduino UNO.
- R3: Connected to A1 of Arduino UNO.
- R4: Connected to A0 of Arduino UNO.
- C1: Connected to D2 of Arduino UNO.
- C2: Connected to D3 of Arduino UNO.
- C3: Connected to D4 of Arduino UNO.
- C4: Connected to D5 of Arduino UNO.
Buzzer
- PIN: Connected to D7 of Arduino UNO.
- GND: Connected to GND of Arduino UNO.
Push Button Round
- leg0: Connected to D8 of Arduino UNO.
- leg1: Connected to GND of Arduino UNO.
LCD screen 16x2 I2C
- SCL: Connected to A5 of Arduino UNO.
- SDA: Connected to A4 of Arduino UNO.
- VCC: Connected to 5V of Arduino UNO.
- GND: Connected to GND of Arduino UNO.
RFID-RC522
- VCC (3.3V): Connected to 3.3V of Arduino UNO.
- RST: Connected to D9 of Arduino UNO.
- GND: Connected to GND of Arduino UNO.
- SCK: Connected to D13 of Arduino UNO.
- MISO: Connected to D12 of Arduino UNO.
- MOSI: Connected to D11 of Arduino UNO.
- SDA: Connected to D10 of Arduino UNO.
Documented Code
#include <Wire.h>
#include <LiquidCrystal_I2C.h>
#include <Keypad.h>
#include <Servo.h>
#include <SPI.h>
#include <MFRC522.h>

#define buzzer_pin 7

// I2C LCD setup
LiquidCrystal_I2C lcd(0x27, 16, 2);

// Define keypad layout
const byte ROWS = 4;
const byte COLS = 4;
char keys[ROWS][COLS] = {
  { 'D', '#', '0', '*' },
  { 'C', '9', '8', '7' },
  { 'B', '6', '5', '4' },
  { 'A', '3', '2', '1' }
};
byte colPins[ROWS] = { 2, 3, 4, 5 };
byte rowPins[COLS] = { A3, A2, A1, A0 };

Keypad keypad = Keypad(makeKeymap(keys), rowPins, colPins, ROWS, COLS);  //deklarasi keypad manggil fungsi

// Password setup
String password = "1234";
String inputCode = "";  // buffer/ penyimpanan tiap kode yg diinput
String secret_key;

// Servo setup
Servo myServo; // deklarasi servo
int lockPosition = 90; //sudut servo saat mengunci
int unlockPosition = 0;

// Push button setup
const int buttonPin = 8;
bool buttonState = LOW; //variabel penyimpanan pembacaan tombol
bool lastButtonState = LOW; //variabel penyimpanan pembacaan terakhir tombol

// RFID setup
#define RST_PIN 9
#define SS_PIN 10
MFRC522 mfrc522(SS_PIN, RST_PIN);

// Authorized RFID UID
byte authorizedUID[] = { 0x31, 0x55, 0x60, 0x2E };
// 31 55 60 2E

void setup() {
  // Initialize serial communication
  Serial.begin(9600); //kecepatan baudrate
  pinMode(buzzer_pin, OUTPUT);// set buzzer sebagai output

  // Initialize LCD
  lcd.init();// inisialisasi lcd
  lcd.backlight();// menyalakan lampu lcd
  lcd.setCursor(0, 0);// cursor lcd
  lcd.print("Enter Password:");

  // Initialize servo
  myServo.attach(6); // pin servo
  myServo.write(lockPosition); // set sudut servo

  // Initialize push button
  pinMode(buttonPin, INPUT_PULLUP); //tombol sebagi input

  // Initialize RFID
  SPI.begin();
  mfrc522.PCD_Init();
  lcd.setCursor(0, 1);
  lcd.print("RFID Ready");
  lockAction(); // langsung kunci saat awal kali menyala
}

void lockAction() {
  myServo.write(lockPosition);
  lcd.setCursor(0, 1);
  lcd.print("Locked          ");
}

void unlockAction() {
  myServo.write(unlockPosition); // set sudut servo
  lcd.setCursor(0, 1);
  lcd.print("Unlocked        ");
}

void wrongPassword() {
  lcd.setCursor(0, 1);
  lcd.print("Access Denied   ");