
Adafruit MPU6050 and VL6180X Sensor Interface with Servo Control
View and Edit Project In Cirkit Designer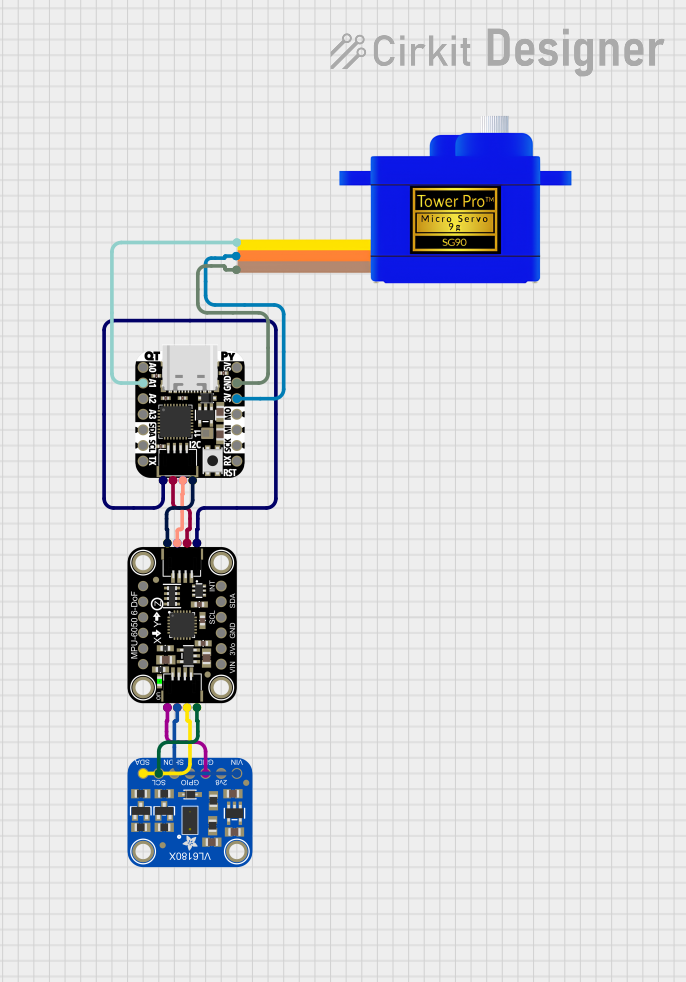
Circuit Documentation
Summary of the Circuit
This circuit integrates a set of sensors and a microcontroller to perform various sensing and control tasks. The primary components include the Adafruit MPU6050, a motion-tracking device with a 6-axis gyroscope and accelerometer; the Adafruit QT Py microcontroller, which serves as the central processing unit for the circuit; the Adafruit VL6180X Time of Flight Distance Sensor, which measures distance using laser light; and a Servomotor SG90, a small and lightweight servo for motion control. The circuit is designed to read sensor data from the MPU6050 and VL6180X and output it through the QT Py's serial interface. Additionally, the QT Py controls the Servomotor SG90 based on the program logic.
Component List
Adafruit MPU6050
- Description: A 6-axis gyroscope and accelerometer module that provides motion tracking data.
- Pins: AD0, FSYNC_IN, SCL_EXT, SDA_EXT, CLKIN, GND, VCC, 3.3V, SCL, SDA, INT
Adafruit QT Py
- Description: A small microcontroller board based on the SAMD21, compatible with Arduino IDE and capable of I2C communication.
- Pins: A0, A1, A2, A3, TX, RX, 3.3V, GND, +5V, SDA, SCL, MOSI, MISO, SCK
Adafruit VL6180X Time of Flight Distance Sensor
- Description: A sensor that measures distance using laser light with high accuracy and fast readings.
- Pins: VIN, 2.8V, GND, GPIO, XSHUT, SCL, SDA
Servomotor SG90
- Description: A small and lightweight servo that is commonly used for RC vehicles and simple robotics.
- Pins: SIG, VCC, GND
Wiring Details
Adafruit MPU6050
- GND: Connected to GND on Adafruit QT Py and Adafruit VL6180X Time of Flight Distance Sensor
- VCC: Connected to 3.3V on Adafruit QT Py and VIN on Adafruit VL6180X Time of Flight Distance Sensor
- SCL: Connected to SCL on Adafruit QT Py and Adafruit VL6180X Time of Flight Distance Sensor
- SDA: Connected to SDA on Adafruit QT Py and Adafruit VL6180X Time of Flight Distance Sensor
Adafruit QT Py
- GND: Connected to GND on Adafruit MPU6050 and Servomotor SG90
- 3.3V: Connected to VCC on Adafruit MPU6050 and VCC on Servomotor SG90
- SDA: Connected to SDA on Adafruit MPU6050 and Adafruit VL6180X Time of Flight Distance Sensor
- SCL: Connected to SCL on Adafruit MPU6050 and Adafruit VL6180X Time of Flight Distance Sensor
- A1: Connected to SIG on Servomotor SG90
Adafruit VL6180X Time of Flight Distance Sensor
- GND: Connected to GND on Adafruit MPU6050
- VIN: Connected to VCC on Adafruit MPU6050
- SCL: Connected to SCL on Adafruit MPU6050
- SDA: Connected to SDA on Adafruit MPU6050
Servomotor SG90
- SIG: Connected to A1 on Adafruit QT Py
- VCC: Connected to 3.3V on Adafruit QT Py
- GND: Connected to GND on Adafruit QT Py
Documented Code
#include <Wire.h>
#include <Adafruit_VL6180X.h>        // For VL6180X ToF sensor
#include <Adafruit_MPU6050.h>        // For Adafruit MPU6050 library
#include <Adafruit_Sensor.h>         // For sensor data handling

// VL6180X Time-of-Flight sensor setup
Adafruit_VL6180X vl = Adafruit_VL6180X();

// MPU6050 setup
Adafruit_MPU6050 mpu;

void setup() {
  // Initialize serial communication for debugging (serial monitor output)
  Serial.begin(115200);
  Serial.println("Starting setup...");

  // Initialize I2C communication (shared by all devices via Qwiic)
  Wire.begin();

  // Initialize MPU6050 sensor
  if (!mpu.begin()) {
    Serial.println("Failed to find MPU6050 chip");
    while (1);
  }
  Serial.println("MPU6050 Initialized");
  mpu.setAccelerometerRange(MPU6050_RANGE_2_G);
  mpu.setGyroRange(MPU6050_RANGE_250_DEG);
  mpu.setFilterBandwidth(MPU6050_BAND_21_HZ);

  // Initialize VL6180X ToF sensor
  if (!vl.begin()) {
    Serial.println("Failed to find VL6180X chip");
    while (1);
  }
  Serial.println("VL6180X ToF Sensor Initialized");

  Serial.println("Setup complete. System ready.");
}

void loop() {
  // 1. Get MPU6050 sensor readings
  sensors_event_t a, g, temp;
  mpu.getEvent(&a, &g, &temp);

  // Output MPU6050 accelerometer and gyroscope readings to the serial monitor
  Serial.print("MPU6050 AccX: ");
  Serial.print(a.acceleration.x);
  Serial.print(" | AccY: ");
  Serial.print(a.acceleration.y);
  Serial.print(" | AccZ: ");
  Serial.print(a.acceleration.z);
  Serial.print(" | GyroX: ");
  Serial.print(g.gyro.x);
  Serial.print(" | GyroY: ");
  Serial.print(g.gyro.y);
  Serial.print(" | GyroZ: ");
  Serial.println(g.gyro.z);

  // 2. Read distance from VL6180X ToF sensor
  uint8_t range = vl.readRange();
  uint8_t status = vl.readRangeStatus();

  // Output VL6180X readings to the serial monitor
  if (status == VL6180X_ERROR_NONE) {
    Serial.print("VL6180X ToF Distance: ");
    Serial.print(range);
    Serial.println(" mm");
  } else {
    Serial.println("VL6180X ToF Error");
  }

  // Small delay before the next loop
  delay(1000);  // Update rate
}
This code is designed to run on the Adafruit QT Py microcontroller. It initializes and reads data from both the MPU6050 motion sensor and the VL6180X Time of Flight sensor, outputting the readings to the serial monitor. The code also includes error checking to ensure that the sensors are properly initialized before attempting to read data.