
Arduino Mega 2560 and LCD Display-Based Smart Button with I2C Communication
View and Edit Project In Cirkit Designer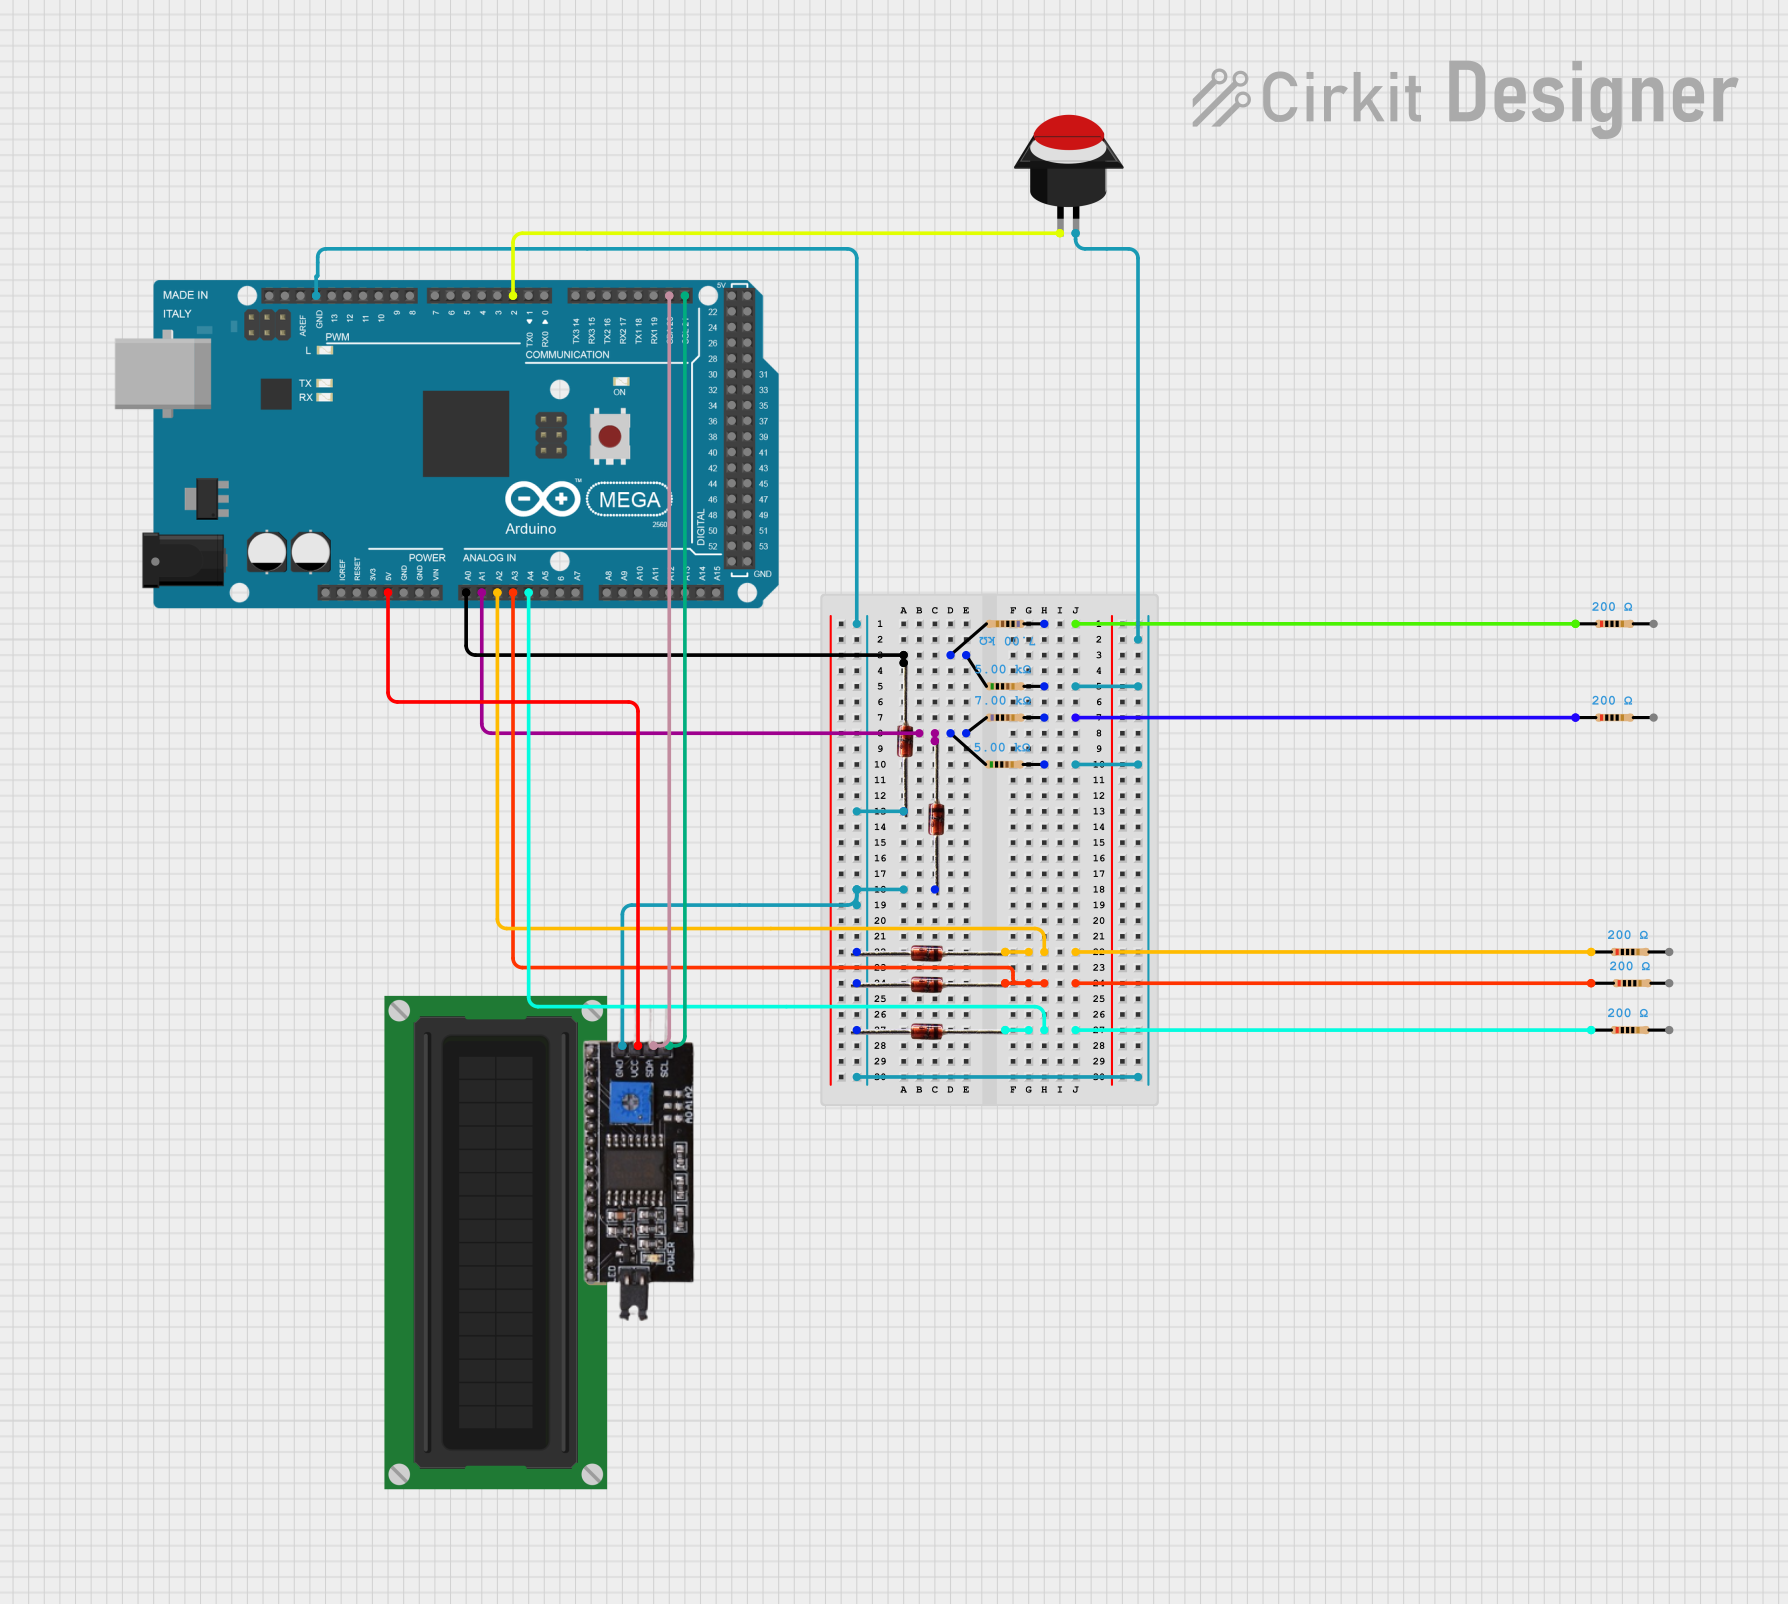
Circuit Documentation
Summary
This document provides a detailed overview of a circuit that includes an Arduino Mega 2560 microcontroller, an LCD Display, an I2C module, several resistors, Zener diodes, and a push button. The circuit is designed to interface the microcontroller with various components, enabling functionalities such as display control and input handling.
Component List
LCD Display (16 pin)
- Description: A 16-pin LCD display used for visual output.
- Pins: VSS, VDD, VO, RS, R_W, E, DB0, DB1, DB2, DB3, DB4, DB5, DB6, DB7, A, K
Arduino Mega 2560
- Description: A microcontroller board based on the ATmega2560.
- Pins: IOREF, RESET, 3V3, 5V, GND, VIN, A0-A15, D21/SCL, D20/SDA, D19/RX1, D18/TX1, D17 PWM/RX2, D16 PWM/TX2, D15/RX3, D14/TX3, D0 RX0, D1 TX0, D2 PWM-D13 PWM, AREF, SDA, SCL, D52-D23
I2C Module
- Description: A module for I2C communication.
- Pins: SCL, SDA, VCC, GND
Resistors
- Description: Various resistors with different resistance values.
- Pins: pin1, pin2
- Properties:
- 5000 Ohms
- 7000 Ohms
- 200 Ohms
12V Zener Diode
- Description: A Zener diode with a breakdown voltage of 12V.
- Pins: Anode, Cathode
Push Button Round
- Description: A round push button for user input.
- Pins: leg0, leg1
Wiring Details
LCD Display (16 pin)
- Not connected in the provided net list.
Arduino Mega 2560
- A0: Connected to:
- Resistor (pin2)
- 12V Zener Diode (Cathode)
- A1: Connected to:
- Resistor (pin1)
- 12V Zener Diode (Cathode)
- A2: Connected to:
- Resistor (pin1)
- 12V Zener Diode (Cathode)
- A3: Connected to:
- Resistor (pin1)
- 12V Zener Diode (Cathode)
- A4: Connected to:
- Resistor (pin1)
- 12V Zener Diode (Cathode)
- 5V: Connected to:
- I2C Module (VCC)
- D21/SCL: Connected to:
- I2C Module (SCL)
- D20/SDA: Connected to:
- I2C Module (SDA)
- D2 PWM: Connected to:
- Push Button Round (leg0)
- GND: Connected to:
- Resistor (pin2)
- I2C Module (GND)
- 12V Zener Diode (Anode)
I2C Module
- VCC: Connected to:
- Arduino Mega 2560 (5V)
- GND: Connected to:
- Arduino Mega 2560 (GND)
- SCL: Connected to:
- Arduino Mega 2560 (D21/SCL)
- SDA: Connected to:
- Arduino Mega 2560 (D20/SDA)
Resistors
- Resistor (5000 Ohms):
- pin1: Connected to Resistor (pin1)
- pin2: Connected to Resistor (pin2), Arduino Mega 2560 (A0), 12V Zener Diode (Cathode)
- Resistor (7000 Ohms):
- pin1: Connected to Resistor (pin1)
- pin2: Connected to Resistor (pin2), Push Button Round (leg1), 12V Zener Diode (Anode), I2C Module (GND), Arduino Mega 2560 (GND)
- Resistor (200 Ohms):
- pin1: Connected to Resistor (pin1)
- pin2: Connected to Resistor (pin2), Arduino Mega 2560 (A1), 12V Zener Diode (Cathode)
12V Zener Diode
- Anode: Connected to:
- Resistor (pin2)
- Push Button Round (leg1)
- I2C Module (GND)
- Arduino Mega 2560 (GND)
- Cathode: Connected to:
- Resistor (pin2)
- Arduino Mega 2560 (A0, A1, A2, A3, A4)
Push Button Round
- leg0: Connected to:
- Arduino Mega 2560 (D2 PWM)
- leg1: Connected to:
- Resistor (pin2)
- 12V Zener Diode (Anode)
- I2C Module (GND)
- Arduino Mega 2560 (GND)
Documented Code
Arduino Mega 2560 Code
void setup() {
  // put your setup code here, to run once:

}

void loop() {
  // put your main code here, to run repeatedly:

}
This code is a basic template for the Arduino Mega 2560, with empty setup and loop functions. The setup function runs once when the microcontroller is powered on or reset, and the loop function runs continuously after setup completes.