
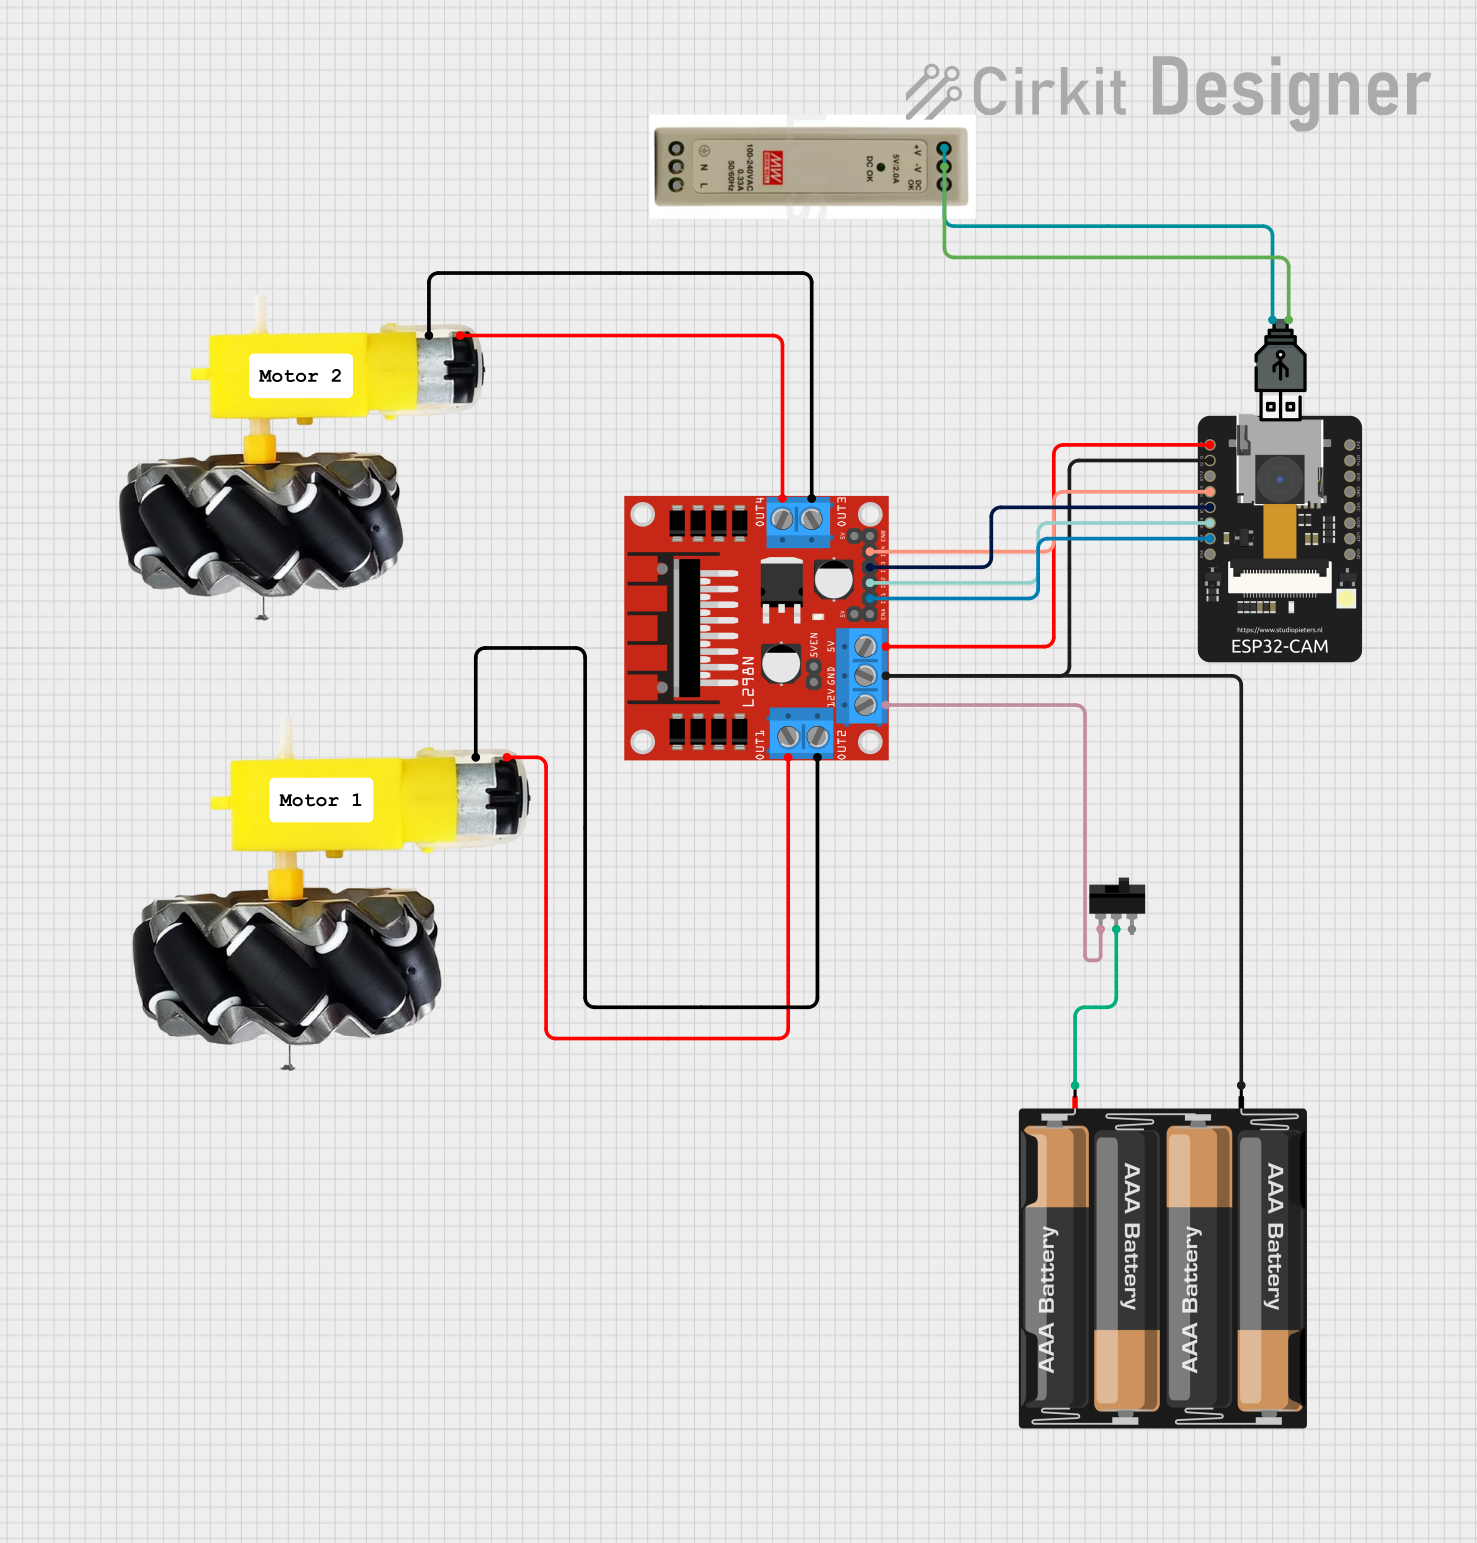
Circuit Documentation
Summary
This circuit is designed to control a car using an ESP32-CAM microcontroller, an L298N DC motor driver, and a set of motors and wheels. The ESP32-CAM is responsible for controlling the direction and speed of the motors, capturing images, and connecting to a WiFi network. The L298N motor driver interfaces between the ESP32-CAM and the motors. Power is supplied by a 5V PSU and a 4 x AAA battery mount.
Component List
Motor and Wheels
- Description: Motors with attached wheels for movement.
- Pins: vcc, GND
ESP32-CAM
- Description: Microcontroller with camera and WiFi capabilities.
- Pins: 5V, GND, IO12, IO13, IO15, IO14, IO2, IO4, VOT, VOR, VCC, IO0, IO16, 3V3
L298N DC Motor Driver
- Description: Motor driver for controlling DC motors.
- Pins: OUT1, OUT2, 12V, GND, 5V, OUT3, OUT4, 5V-ENA-JMP-I, 5V-ENA-JMP-O, +5V-J1, +5V-J2, ENA, IN1, IN2, IN3, IN4, ENB
4 x AAA Battery Mount
- Description: Battery holder for four AAA batteries.
- Pins: -, +
Toggle Switch
- Description: Switch for controlling power.
- Pins: L1, COM, L2
5V PSU
- Description: 5V power supply unit.
- Pins: 5V+, GND, 5V OK, PE, N, L
USB Power
- Description: USB power source.
- Pins: +, -
Wiring Details
Motor and Wheels (Instance 1)
- vcc connected to OUT1 of L298N DC Motor Driver
- GND connected to OUT2 of L298N DC Motor Driver
Motor and Wheels (Instance 2)
- vcc connected to OUT4 of L298N DC Motor Driver
- GND connected to OUT3 of L298N DC Motor Driver
ESP32-CAM
- 5V connected to 5V of L298N DC Motor Driver
- GND connected to - of 4 x AAA Battery Mount and GND of L298N DC Motor Driver
- IO13 connected to IN4 of L298N DC Motor Driver
- IO15 connected to IN3 of L298N DC Motor Driver
- IO14 connected to IN2 of L298N DC Motor Driver
- IO2 connected to IN1 of L298N DC Motor Driver
L298N DC Motor Driver
- OUT1 connected to vcc of Motor and Wheels (Instance 1)
- OUT2 connected to GND of Motor and Wheels (Instance 1)
- OUT3 connected to GND of Motor and Wheels (Instance 2)
- OUT4 connected to vcc of Motor and Wheels (Instance 2)
- 5V connected to 5V of ESP32-CAM
- GND connected to GND of ESP32-CAM and - of 4 x AAA Battery Mount
- IN1 connected to IO2 of ESP32-CAM
- IN2 connected to IO14 of ESP32-CAM
- IN3 connected to IO15 of ESP32-CAM
- IN4 connected to IO13 of ESP32-CAM
- 12V connected to L1 of Toggle Switch
4 x AAA Battery Mount
- - connected to GND of ESP32-CAM and GND of L298N DC Motor Driver
- + connected to COM of Toggle Switch
Toggle Switch
- L1 connected to 12V of L298N DC Motor Driver
- COM connected to + of 4 x AAA Battery Mount
5V PSU
- 5V+ connected to + of USB Power
- GND connected to - of USB Power
USB Power
- + connected to 5V+ of 5V PSU
- - connected to GND of 5V PSU
Code Documentation
ESP32-CAM Code
/*
 * ESP32-CAM Car Control with Camera and WiFi
 * This code controls the L298N motor driver to drive the motors
 * connected to the car. The ESP32-CAM uses its GPIO pins to control
 * the direction and speed of the motors. Additionally, it initializes
 * the camera for capturing images and connects to a WiFi network.
 * It also sets up a web server with HTML buttons for controlling the car.
 */

#include "esp_camera.h"
#include <WiFi.h>
#include <WebServer.h>

//=====================
//Select camera model
//=====================
//#define CAMERA_MODEL_WROVER_KIT // Has PSRAM
//#define CAMERA_MODEL_ESP_EYE  // Has PSRAM
//#define CAMERA_MODEL_AI_THINKER // Has PSRAM

// Define motor control pins
#define IN1 2
#define IN2 14
#define IN3 15
#define IN4 13

// Camera configuration
#define PWDN_GPIO_NUM    -1
#define RESET_GPIO_NUM   -1
#define XCLK_GPIO_NUM    0
#define SIOD_GPIO_NUM    26
#define SIOC_GPIO_NUM    27
#define Y9_GPIO_NUM      35
#define Y8_GPIO_NUM      34
#define Y7_GPIO_NUM      39
#define Y6_GPIO_NUM      36
#define Y5_GPIO_NUM      21
#define Y4_GPIO_NUM      19
#define Y3_GPIO_NUM      18
#define Y2_GPIO_NUM      5
#define VSYNC_GPIO_NUM   25
#define HREF_GPIO_NUM    23
#define PCLK_GPIO_NUM    22

// WiFi credentials
const char* ssid = "your_SSID";
const char* password = "your_PASSWORD";

WebServer server(80);

void handleRoot() {
  String html = "<html><body>";
  html += "<h1>ESP32-CAM Car Control</h1>";
  html += "<button onclick=\"location.href='/forward'\">Forward</button>";
  html += "<button onclick=\"location.href='/backward'\">Backward</button>";
  html += "<button onclick=\"location.href='/left'\">Left</button>";
  html += "<button onclick=\"location.href='/right'\">Right</button>";
  html += "<button onclick=\"location.href='/stop'\">Stop</button>";
  html += "</body></html>";
  server.send(200, "text/html", html);
}

void handleForward() {
  digitalWrite(IN1, HIGH);
  digitalWrite(IN2, LOW);
  digitalWrite(IN3, HIGH);
  digitalWrite(IN4, LOW);
  server.send(200, "text/plain", "Moving forward");
}

void handleBackward() {
  digitalWrite(IN1, LOW);
  digitalWrite(IN2, HIGH);
  digitalWrite(IN3, LOW);
  digitalWrite(IN4, HIGH);
  server.send(200, "text/plain", "Moving backward");
}

void handleLeft() {
  digitalWrite(IN1, LOW);
  digitalWrite(IN2, HIGH);
  digitalWrite(IN3, HIGH);
  digitalWrite(IN4, LOW);
  server.send(200, "text/plain", "Turning left");
}

void handleRight() {
  digitalWrite(IN1, HIGH);
  digitalWrite(IN2, LOW);
  digitalWrite(IN3, LOW);
  digitalWrite(IN4, HIGH);
  server.send(200, "text/plain", "Turning right");
}

void handleStop() {
  digitalWrite(IN1, LOW);
  digitalWrite(IN2, LOW);
  digitalWrite(IN3, LOW);
  digitalWrite(IN4, LOW);
  server.send(200, "text/plain", "Stopped");
}

void setup() {
  Serial.begin(115200);

  // Initialize motor control pins as outputs
  pinMode(IN1, OUTPUT);
  pinMode(IN2, OUTPUT);
  pinMode(IN3, OUTPUT);
  pinMode(IN4, OUTPUT);

  // Initialize camera
  camera_config_t config;
  config.ledc_channel = LEDC_CHANNEL_0;
  config.ledc_timer = LEDC_TIMER_0;
  config.pin_d0 = Y2_GPIO_NUM;
  config.pin_d1 = Y3_GPIO_NUM;
  config.pin_d2 = Y4_GPIO_NUM;
  config.pin_d3 = Y5_GPIO_NUM;
  config.pin_d4 = Y6_GPIO_NUM;
  config.pin_d5 =