
Arduino UNO-Based Temperature and Humidity Monitor with I2C LCD Display and Buzzer
View and Edit Project In Cirkit Designer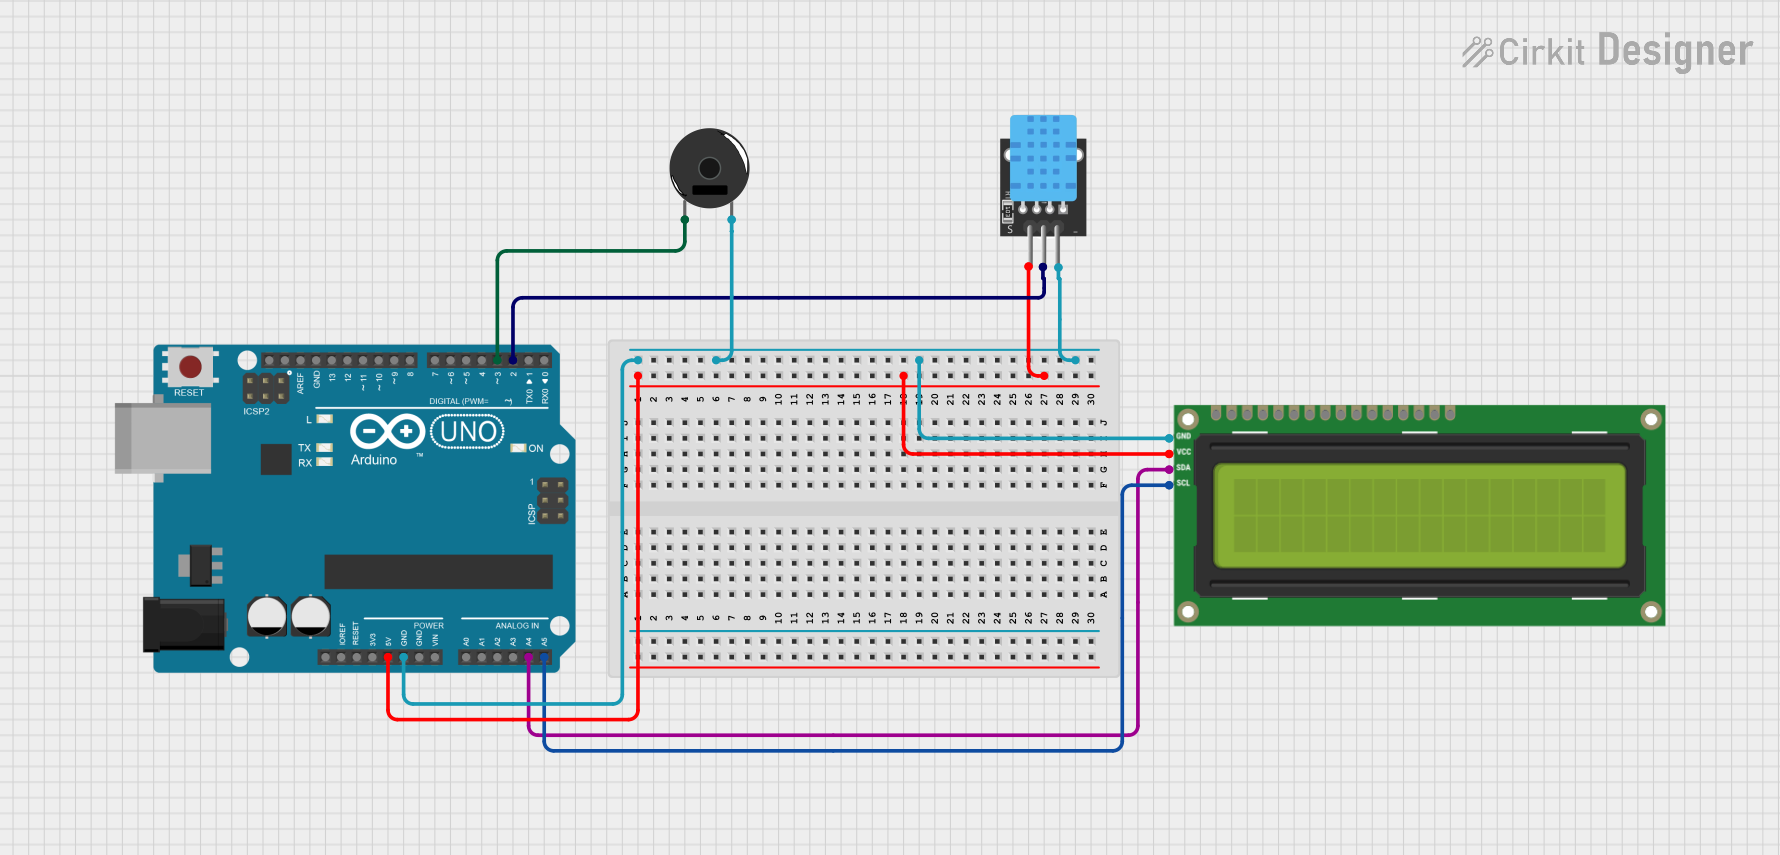
Circuit Documentation
Summary
This circuit involves an Arduino UNO microcontroller interfacing with an I2C LCD 16x2 screen, a KY-015 DHT11 temperature and humidity sensor, and a Piezo Buzzer. The Arduino UNO reads temperature and humidity data from the DHT11 sensor and displays it on the LCD screen. Additionally, the Piezo Buzzer can be used for audible alerts.
Component List
Arduino UNO
- Description: A microcontroller board based on the ATmega328P.
- Pins: UNUSED, IOREF, Reset, 3.3V, 5V, GND, Vin, A0, A1, A2, A3, A4, A5, SCL, SDA, AREF, D13, D12, D11, D10, D9, D8, D7, D6, D5, D4, D3, D2, D1, D0
I2C LCD 16x2 Screen
- Description: A 16x2 character LCD display with I2C interface.
- Pins: SCL, SDA, VCC (5V), GND, VDD, VO, RS, RW, E, D0, D1, D2, D3, D4, D5, D6, D7, BLA, BLK
KY-015 DHT11
- Description: A digital temperature and humidity sensor.
- Pins: 5V, S, GND
Piezo Buzzer
- Description: A simple piezoelectric buzzer for sound generation.
- Pins: pin 1, pin 2
Wiring Details
Arduino UNO
- 5V: Connected to VCC (5V) of I2C LCD 16x2 Screen and 5V of KY-015 DHT11.
- GND: Connected to GND of Piezo Buzzer, GND of I2C LCD 16x2 Screen, and GND of KY-015 DHT11.
- A4: Connected to SDA of I2C LCD 16x2 Screen.
- A5: Connected to SCL of I2C LCD 16x2 Screen.
- D3: Connected to pin 1 of Piezo Buzzer.
- D2: Connected to S of KY-015 DHT11.
I2C LCD 16x2 Screen
- VCC (5V): Connected to 5V of Arduino UNO.
- GND: Connected to GND of Arduino UNO.
- SDA: Connected to A4 of Arduino UNO.
- SCL: Connected to A5 of Arduino UNO.
KY-015 DHT11
- 5V: Connected to 5V of Arduino UNO.
- GND: Connected to GND of Arduino UNO.
- S: Connected to D2 of Arduino UNO.
Piezo Buzzer
- pin 1: Connected to D3 of Arduino UNO.
- pin 2: Connected to GND of Arduino UNO.
Code Documentation
Arduino UNO Code
#include <Wire.h>
#include <LiquidCrystal_I2C.h>
#include <DHT.h>

// Set up the LCD display with I2C address (usually 0x27) and 16x2 character size
LiquidCrystal_I2C lcd(0x27, 16, 2);

// DHT sensor setup
#define DHTPIN 2           // Pin connected to the DHT11 data pin
#define DHTTYPE DHT11      // Use DHT11 sensor (can be changed to DHT22 if using a DHT22 sensor)

DHT dht(DHTPIN, DHTTYPE);

void setup() {
  // Initialize the LCD and turn on the backlight
  lcd.begin(16, 2);  // Corrected to include the number of columns and rows
  lcd.backlight();

  // Start the DHT sensor
  dht.begin();

  // Print initial message
  lcd.setCursor(0, 0);    // Set cursor to column 0, row 0
  lcd.print("Temp & Humidity");
  delay(2000);
  lcd.clear();
}

void loop() {
  // Read temperature in Celsius
  float temperature = dht.readTemperature();
  // Read humidity percentage
  float humidity = dht.readHumidity();

  // Check if the readings are valid (i.e., not NaN)
  if (isnan(temperature) || isnan(humidity)) {
    lcd.setCursor(0, 0);
    lcd.print("Error reading");
    lcd.setCursor(0, 1);
    lcd.print("sensor data");
    return;
  }

  // Display the temperature on the LCD
  lcd.setCursor(0, 0);
  lcd.print("Temp: ");
  lcd.print(temperature);
  lcd.print(" C");

  // Display the humidity on the LCD
  lcd.setCursor(0, 1);
  lcd.print("Hum: ");
  lcd.print(humidity);
  lcd.print(" %");

  // Delay for a second before refreshing data
  delay(1000);
}
This code initializes the I2C LCD and the DHT11 sensor, reads temperature and humidity data, and displays the readings on the LCD screen. If the sensor data is invalid, an error message is displayed. The loop continuously updates the display with new readings every second.