Arduino UNO with Adafruit ADXL345 Accelerometer Data Logger
Circuit Documentation
Summary
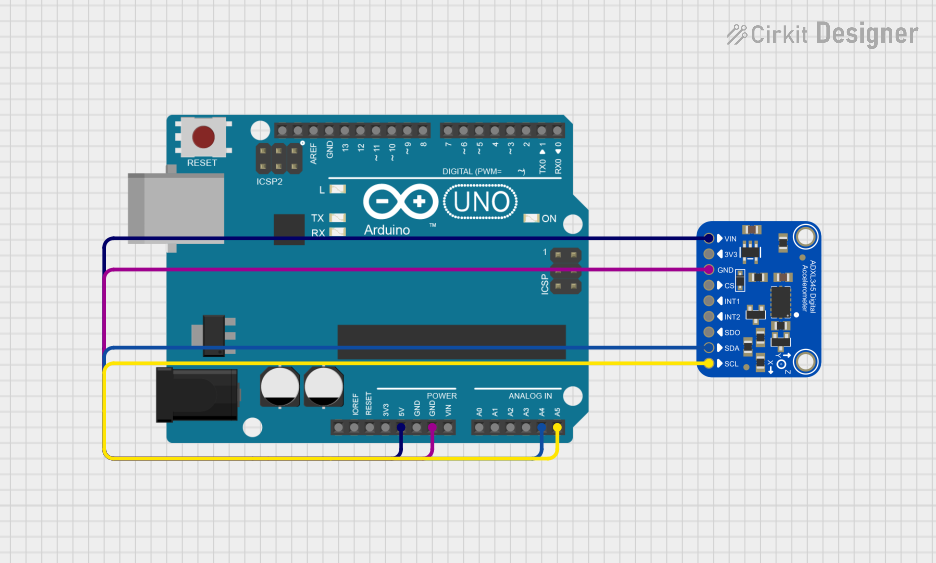
The circuit in question consists of an Arduino UNO microcontroller board interfaced with an Adafruit ADXL345 accelerometer. The Arduino UNO is responsible for controlling the accelerometer and processing its data. The ADXL345 is a small, thin, low-power, 3-axis accelerometer with high resolution (13-bit) measurement at up to ±16g. The accelerometer communicates with the Arduino UNO via the I2C protocol, using the SDA and SCL lines. The circuit is powered by the Arduino's 5V output, and a common ground is established between the two components.
Component List
Arduino UNO
- Description: A microcontroller board based on the ATmega328P. It has 14 digital input/output pins, 6 analog inputs, a 16 MHz quartz crystal, a USB connection, a power jack, an ICSP header, and a reset button.
- Purpose: Acts as the central processing unit for the circuit, running the embedded code to interact with the accelerometer and output data to the serial monitor.
Adafruit ADXL345
- Description: A small, thin, ultra-low power, 3-axis accelerometer with high resolution (13-bit) measurement up to ±16g. Digital output data is formatted as 16-bit twos complement and is accessible through either a SPI (3- or 4-wire) or I2C digital interface.
- Purpose: Measures acceleration forces that can be used to detect motion, tilt, and basic orientation.
Wiring Details
Arduino UNO
- 5V to Adafruit ADXL345 VIN
- GND to Adafruit ADXL345 GND
- A4 (SDA) to Adafruit ADXL345 SDA/SDIO
- A5 (SCL) to Adafruit ADXL345 SCL
Adafruit ADXL345
- VIN connected to Arduino UNO 5V
- GND connected to Arduino UNO GND
- SDA/SDIO connected to Arduino UNO A4 (SDA)
- SCL connected to Arduino UNO A5 (SCL)
Documented Code
#include <Wire.h>
#include <Adafruit_Sensor.h>
#include <Adafruit_ADXL345_U.h>

// Create an instance of the Adafruit_ADXL345_Unified accelerometer
Adafruit_ADXL345_Unified accel = Adafruit_ADXL345_Unified(12345);

void setup() {
  Serial.begin(9600);
  Serial.println("Accelerometer Test");

  // Initialize the accelerometer
  if (!accel.begin()) {
    Serial.println("No ADXL345 detected");
    while (1);
  }

  // Set the range to whatever is appropriate for your project
  accel.setRange(ADXL345_RANGE_16_G);

  // Display some basic information on this sensor
  displaySensorDetails();
}

void loop() {
  // Get a new sensor event
  sensors_event_t event;
  accel.getEvent(&event);

  // Display the results (acceleration is measured in m/s^2)
  Serial.print("X: "); Serial.print(event.acceleration.x); Serial.print(" ");
  Serial.print("Y: "); Serial.print(event.acceleration.y); Serial.print(" ");
  Serial.print("Z: "); Serial.print(event.acceleration.z); Serial.print(" ");
  Serial.println("m/s^2 ");

  // Delay before the next reading
  delay(500);
}

void displaySensorDetails() {
  sensor_t sensor;
  accel.getSensor(&sensor);
  Serial.println("------------------------------------");
  Serial.print("Sensor:       "); Serial.println(sensor.name);
  Serial.print("Driver Ver:   "); Serial.println(sensor.version);
  Serial.print("Unique ID:    "); Serial.println(sensor.sensor_id);
  Serial.print("Max Value:    "); Serial.print(sensor.max_value); Serial.println(" m/s^2");
  Serial.print("Min Value:    "); Serial.print(sensor.min_value); Serial.println(" m/s^2");
  Serial.print("Resolution:   "); Serial.print(sensor.resolution); Serial.println(" m/s^2");
  Serial.println("------------------------------------");
  Serial.println("");
  delay(500);
}
This code initializes the ADXL345 accelerometer and reads the acceleration data in all three axes (X, Y, and Z). The data is then printed to the serial monitor in meters per second squared (m/s^2). The displaySensorDetails function prints out some basic information about the sensor itself. The code includes a delay of 500 milliseconds between readings to make the output readable.