
Circuit Documentation
Summary
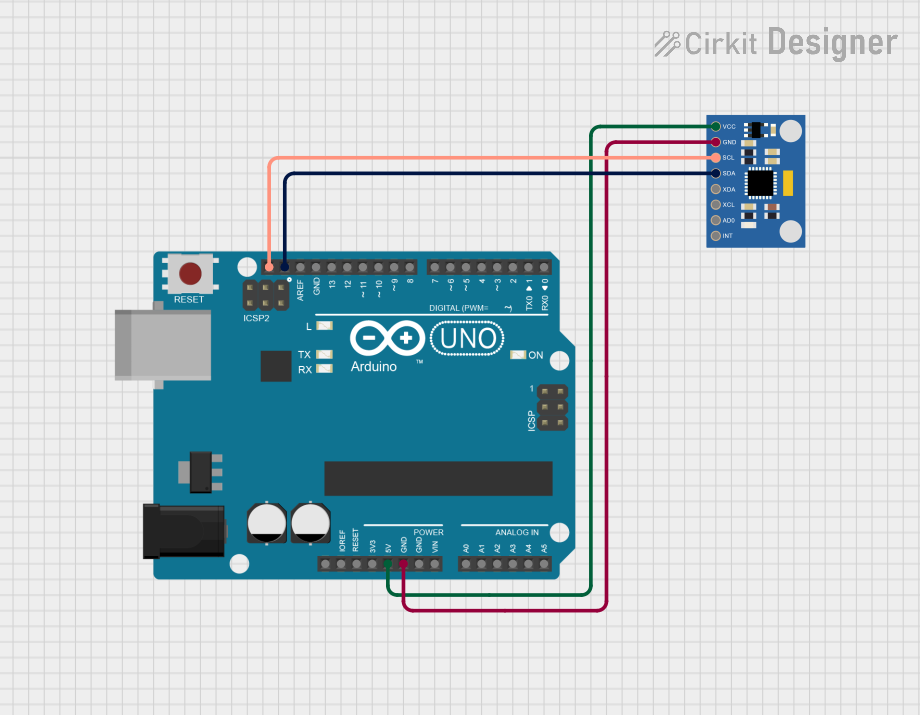
This circuit utilizes an Arduino UNO microcontroller and an MPU6050 Accelerometer + Gyroscope sensor. The primary purpose of this setup is to read and process accelerometer and gyroscope data, which can be used for various applications such as motion detection, orientation sensing, and robotics.
Component List
Arduino UNO
- Description: A microcontroller board based on the ATmega328P. It is widely used for various electronic projects due to its ease of use and extensive community support.
- Purpose: Acts as the main controller for the circuit, processing data from the MPU6050 sensor and managing communication with the user via serial output.
MPU6050 Accelerometer + Gyroscope
- Description: A 6-axis motion tracking device that combines a 3-axis accelerometer and a 3-axis gyroscope on a single chip.
- Purpose: Measures acceleration and angular velocity, providing data that can be used for motion tracking and orientation detection.
Wiring Details
Arduino UNO
5V: Connected to the VCC pin of the MPU6050.
GND: Connected to the GND pin of the MPU6050.
SCL: Connected to the SCL pin of the MPU6050.
SDA: Connected to the SDA pin of the MPU6050.
MPU6050 Accelerometer + Gyroscope
VCC: Connected to the 5V pin of the Arduino UNO.
GND: Connected to the GND pin of the Arduino UNO.
SCL: Connected to the SCL pin of the Arduino UNO.
SDA: Connected to the SDA pin of the Arduino UNO.
Documented Code
Arduino Code
// Basic demo for accelerometer readings from Adafruit MPU6050

#include <Adafruit_MPU6050.h>
#include <Adafruit_Sensor.h>
#include <Wire.h>

Adafruit_MPU6050 mpu;

void setup(void) {
  Serial.begin(115200);
  while (!Serial)
    delay(10); // will pause Zero, Leonardo, etc until serial console opens

  Serial.println("Adafruit MPU6050 test!");

  // Try to initialize!
  if (!mpu.begin()) {
    Serial.println("Failed to find MPU6050 chip");
    while (1) {
      delay(10);
    }
  }
  Serial.println("MPU6050 Found!");

  mpu.setAccelerometerRange(MPU6050_RANGE_8_G);
  Serial.print("Accelerometer range set to: ");
  switch (mpu.getAccelerometerRange()) {
  case MPU6050_RANGE_2_G:
    Serial.println("+-2G");
    break;
  case MPU6050_RANGE_4_G:
    Serial.println("+-4G");
    break;
  case MPU6050_RANGE_8_G:
    Serial.println("+-8G");
    break;
  case MPU6050_RANGE_16_G:
    Serial.println("+-16G");
    break;
  }
  mpu.setGyroRange(MPU6050_RANGE_2000_DEG);
  Serial.print("Gyro range set to: ");
  switch (mpu.getGyroRange()) {
  case MPU6050_RANGE_250_DEG:
    Serial.println("+- 250 deg/s");
    break;
  case MPU6050_RANGE_500_DEG:
    Serial.println("+- 500 deg/s");
    break;
  case MPU6050_RANGE_1000_DEG:
    Serial.println("+- 1000 deg/s");
    break;
  case MPU6050_RANGE_2000_DEG:
    Serial.println("+- 2000 deg/s");
    break;
  }

  mpu.setFilterBandwidth(MPU6050_BAND_21_HZ);
  Serial.print("Filter bandwidth set to: ");
  switch (mpu.getFilterBandwidth()) {
  case MPU6050_BAND_260_HZ:
    Serial.println("260 Hz");
    break;
  case MPU6050_BAND_184_HZ:
    Serial.println("184 Hz");
    break;
  case MPU6050_BAND_94_HZ:
    Serial.println("94 Hz");
    break;
  case MPU6050_BAND_44_HZ:
    Serial.println("44 Hz");
    break;
  case MPU6050_BAND_21_HZ:
    Serial.println("21 Hz");
    break;
  case MPU6050_BAND_10_HZ:
    Serial.println("10 Hz");
    break;
  case MPU6050_BAND_5_HZ:
    Serial.println("5 Hz");
    break;
  }

  Serial.println("");
  delay(100);
}

void loop() {

  /* Get new sensor events with the readings */
  sensors_event_t a, g, temp;
  mpu.getEvent(&a, &g, &temp);

  /* Convert gyroscope readings from rad/s to deg/s */
  float gyroX_deg = g.gyro.x * 180.0 / PI;
  float gyroY_deg = g.gyro.y * 180.0 / PI;
  float gyroZ_deg = g.gyro.z * 180.0 / PI;

  /* Print out the values */
  Serial.print("Acceleration X: ");
  Serial.print(a.acceleration.x);
  Serial.print(", Y: ");
  Serial.print(a.acceleration.y);
  Serial.print(", Z: ");
  Serial.print(a.acceleration.z);
  Serial.println(" m/s^2");

  Serial.print("Rotation X: ");
  Serial.print(gyroX_deg);
  Serial.print(" deg/s, Y: ");
  Serial.print(gyroY_deg);
  Serial.print(" deg/s, Z: ");
  Serial.print(gyroZ_deg);
  Serial.println(" deg/s");

  Serial.print("Temperature: ");
  Serial.print(temp.temperature);
  Serial.println(" degC");

  Serial.println("");
  delay(500);
}
This documentation provides a comprehensive overview of the circuit, detailing the components used, their connections, and the code that drives the functionality of the system.