
Arduino UNO Smart Dustbin with Ultrasonic Sensors and Servo Motor
View and Edit Project In Cirkit Designer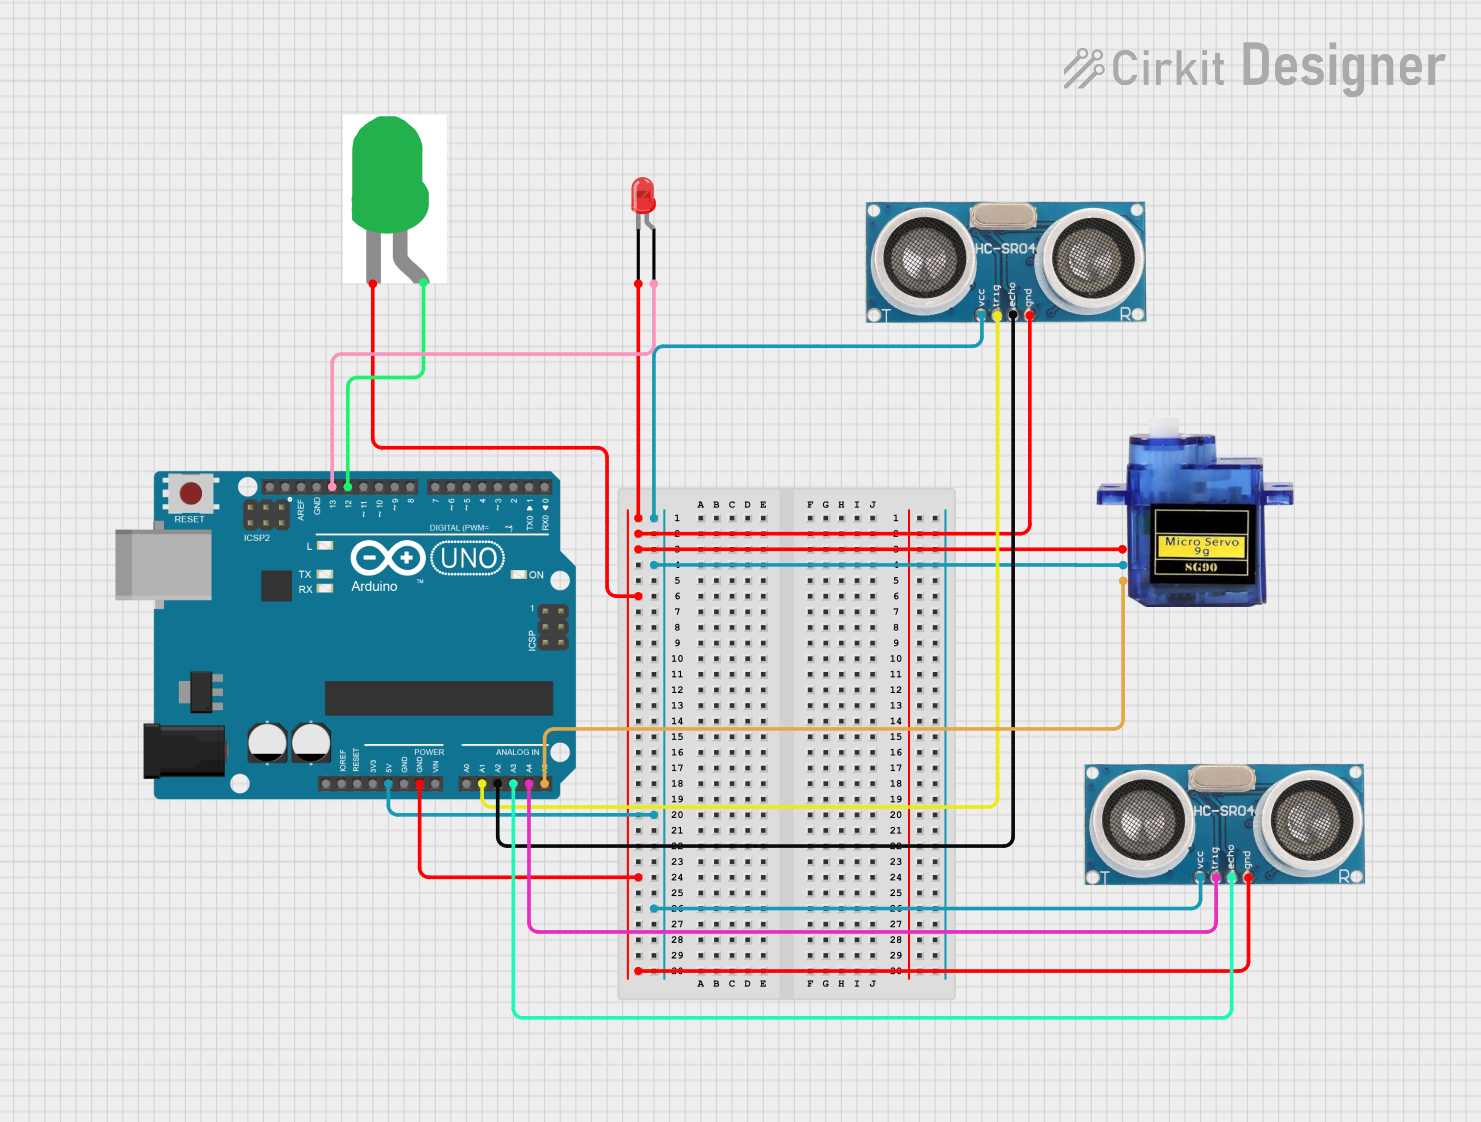
Circuit Documentation
Summary
This circuit is designed to control a dustbin lid and monitor the fill level using two ultrasonic sensors, an Arduino UNO, a micro servo motor, and two LEDs (red and green). The Arduino UNO reads the distance from the ultrasonic sensors to determine when to open or close the lid and to indicate the fill level of the dustbin using the LEDs.
Component List
Ultrasonic Sensor
- Description: Measures distance using ultrasonic waves.
- Pins: +VCC, Trigger, Echo, GND
LED: Two Pin (red)
- Description: Indicates the dustbin is full.
- Pins: Cathode, Anode
LED: Two Pin (green)
- Description: Indicates the dustbin is not full.
- Pins: Cathode, Anode
Arduino UNO
- Description: Microcontroller board used to control the circuit.
- Pins: UNUSED, IOREF, Reset, 3.3V, 5V, GND, Vin, A0, A1, A2, A3, A4, A5, SCL, SDA, AREF, D13, D12, D11, D10, D9, D8, D7, D6, D5, D4, D3, D2, D1, D0
Micro servo 9G
- Description: Controls the opening and closing of the dustbin lid.
- Pins: GND, +5V, PWM
Wiring Details
Ultrasonic Sensor 1
- +VCC: Connected to Arduino UNO 5V
- Trigger: Connected to Arduino UNO A1
- Echo: Connected to Arduino UNO A2
- GND: Connected to Arduino UNO GND
Ultrasonic Sensor 2
- +VCC: Connected to Arduino UNO 5V
- Trigger: Connected to Arduino UNO A4
- Echo: Connected to Arduino UNO A3
- GND: Connected to Arduino UNO GND
LED: Two Pin (red)
- Cathode: Connected to Arduino UNO GND
- Anode: Connected to Arduino UNO D13
LED: Two Pin (green)
- Cathode: Connected to Arduino UNO GND
- Anode: Connected to Arduino UNO D12
Arduino UNO
- 5V: Connected to +VCC of both Ultrasonic Sensors and +5V of Micro servo 9G
- GND: Connected to GND of both Ultrasonic Sensors, Cathode of both LEDs, and GND of Micro servo 9G
- A1: Connected to Trigger of Ultrasonic Sensor 1
- A2: Connected to Echo of Ultrasonic Sensor 1
- A3: Connected to Echo of Ultrasonic Sensor 2
- A4: Connected to Trigger of Ultrasonic Sensor 2
- D13: Connected to Anode of LED (red)
- D12: Connected to Anode of LED (green)
- A5: Connected to PWM of Micro servo 9G
Micro servo 9G
- GND: Connected to Arduino UNO GND
- +5V: Connected to Arduino UNO 5V
- PWM: Connected to Arduino UNO A5
Code Documentation
#include <Wire.h>
#include <LiquidCrystal_I2C.h>
#include <Stepper.h>
#include <Servo.h>

// Define the pins for the ultrasonic sensors
const int trigPin1 = 2;   // Trigger pin for Ultrasonic Sensor 1 (lid control)
const int echoPin1 = 3;   // Echo pin for Ultrasonic Sensor 1 (lid control)
const int trigPin2 = 4;   // Trigger pin for Ultrasonic Sensor 2 (level monitoring)
const int echoPin2 = 5;   // Echo pin for Ultrasonic Sensor 2 (level monitoring)

// Define pins for LEDs
const int greenLedPin = 12;  // Green LED (dustbin is not full)
const int redLedPin = 13;    // Red LED (dustbin is full)

// Define pin for the servo motor
const int servoPin = 6;      // Servo pin (controls lid)

Servo dustbinServo;          // Create Servo object for controlling the lid

// Variables for ultrasonic sensors
long duration1, distance1;   // For Ultrasonic Sensor 1 (lid control)
long duration2, distance2;   // For Ultrasonic Sensor 2 (level monitoring)

void setup() {
  // Start serial communication for debugging
  Serial.begin(9600);

  // Set ultrasonic sensor pins as OUTPUT and INPUT
  pinMode(trigPin1, OUTPUT);
  pinMode(echoPin1, INPUT);
  pinMode(trigPin2, OUTPUT);
  pinMode(echoPin2, INPUT);

  // Set LED pins as OUTPUT
  pinMode(greenLedPin, OUTPUT);
  pinMode(redLedPin, OUTPUT);

  // Attach the servo motor to pin 6
  dustbinServo.attach(servoPin);

  // Initialize the servo in a closed position (0 degree)
  dustbinServo.write(0);

  // Initialize LEDs (off initially)
  digitalWrite(greenLedPin, LOW);
  digitalWrite(redLedPin, LOW);
}

void loop() {
  // Get the distance from Ultrasonic Sensor 1 for opening/closing the lid
  distance1 = getDistance(trigPin1, echoPin1);
  Serial.print("Distance1: ");
  Serial.println(distance1);

  // Open or close the dustbin lid based on distance from Sensor 1
  if (distance1 < 50) {  // If distance is less than 50 cm, open the lid
    dustbinServo.write(50); // Open the lid (servo position 120 degrees)
    delay(1000); // Wait for 1 second
  } else if (distance1 > 60) { // If distance is greater than 60 cm, close the lid
    dustbinServo.write(130); // Close the lid (servo position 0 degrees)
  }

  // Get the distance from Ultrasonic Sensor 2 for level monitoring
  distance2 = getDistance(trigPin2, echoPin2);
  Serial.print("Distance2: ");
  Serial.println(distance2);

  // Check the dustbin level using Sensor 2
  if (distance2 < 5) {
    // If the distance is less than 10 cm, the dustbin is full
    digitalWrite(greenLedPin, LOW);  // Turn off green LED
    digitalWrite(redLedPin, HIGH);   // Turn on red LED
  } else if (distance2 > 5 && distance2 < 10) {
    // If the distance is between 5 cm and 10 cm, the dustbin is partially filled
    digitalWrite(greenLedPin, HIGH); // Turn on green LED
    digitalWrite(redLedPin, LOW);    // Turn off red LED
  } else {
    // If the distance is greater than 10 cm, the dustbin is empty
    digitalWrite(greenLedPin, HIGH); // Turn on green LED
    digitalWrite(redLedPin, LOW);    // Turn off red LED
  }

  // Add a small delay before the next loop iteration
  delay(500);
}

// Function to calculate distance from an ultrasonic sensor
long getDistance(int trigPin, int echoPin) {
  // Send a 10 ms pulse to trigger the sensor
  digitalWrite(trigPin, LOW);
  delayMicroseconds(2);
  digitalWrite(trigPin, HIGH);
  delayMicroseconds(10);
  digitalWrite(trigPin, LOW);

  // Read the time taken for the echo to return
  duration2 = pulseIn(echoPin, HIGH);

  // Calculate the distance in cm (duration in microseconds / 58.2)
  return duration2 / 58.2;
}
This code initializes the pins for the ultrasonic sensors, LEDs, and servo motor. It continuously reads the distance from the ultrasonic sensors to control the dustbin lid and monitor the fill level, updating the LEDs accordingly.