
Circuit Documentation
Summary
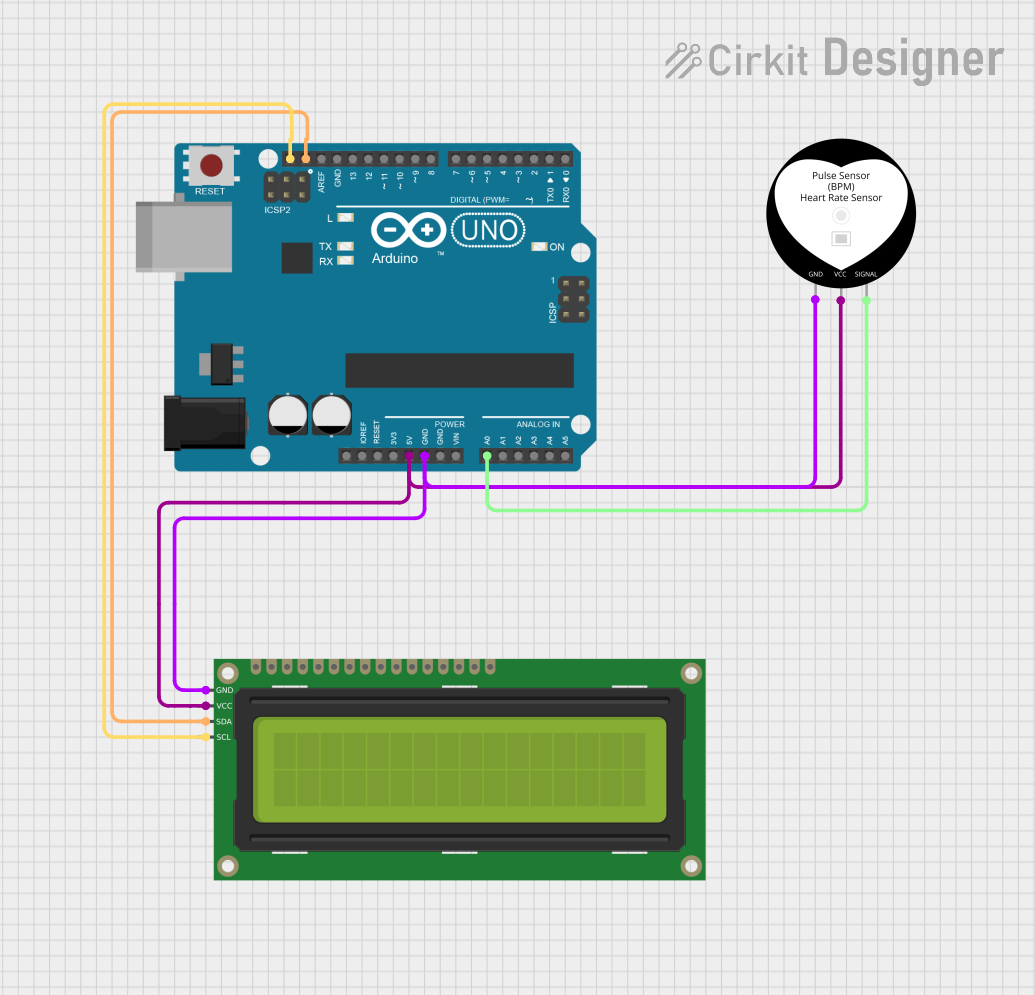
This circuit is designed to monitor heart rate using a Heart Pulse Sensor and display the results on a 16x2 I2C LCD. The Arduino UNO serves as the microcontroller, processing the sensor data and controlling the LCD display. The circuit is powered by the Arduino's 5V output, and both the sensor and the LCD are connected to the Arduino via I2C communication.
Component List
Arduino UNO
- Description: A microcontroller board based on the ATmega328P. It is used to read data from the heart pulse sensor and control the LCD display.
- Purpose: Acts as the central processing unit for the circuit, handling input from the heart pulse sensor and output to the LCD.
16x2 I2C LCD
- Description: A liquid crystal display that can show two lines of 16 characters each. It communicates with the Arduino via I2C protocol.
- Purpose: Displays the heart rate (BPM) read from the heart pulse sensor.
Heart Pulse Sensor
- Description: A sensor that detects heartbeats and outputs a signal corresponding to the pulse rate.
- Purpose: Measures the heart rate and sends the data to the Arduino for processing.
Wiring Details
Arduino UNO
5V: Connected to the VCC pin of the 16x2 I2C LCD and the VCC pin of the Heart Pulse Sensor.
GND: Connected to the GND pin of the 16x2 I2C LCD and the GND pin of the Heart Pulse Sensor.
A0: Connected to the SIG pin of the Heart Pulse Sensor.
SCL: Connected to the SCL pin of the 16x2 I2C LCD.
SDA: Connected to the SDA pin of the 16x2 I2C LCD.
16x2 I2C LCD
VCC: Connected to the 5V pin of the Arduino UNO.
GND: Connected to the GND pin of the Arduino UNO.
SCL: Connected to the SCL pin of the Arduino UNO.
SDA: Connected to the SDA pin of the Arduino UNO.
Heart Pulse Sensor
VCC: Connected to the 5V pin of the Arduino UNO.
GND: Connected to the GND pin of the Arduino UNO.
SIG: Connected to the A0 pin of the Arduino UNO.
Documented Code
/*
 * Arduino Sketch for Heart Pulse Sensor with LCD Display
 *
 * This code reads data from a heart pulse sensor connected to the Arduino UNO
 * and displays the pulse rate on a 16x2 I2C LCD. The sensor's signal pin is
 * connected to the A0 pin of the Arduino. The code utilizes the PulseSensor
 * library to process the sensor data and the LiquidCrystal_I2C library to
 * display the BPM on the LCD.
 */

#include <Wire.h>
#include <LiquidCrystal_I2C.h>
#include <PulseSensorPlayground.h>

// Pin where the pulse sensor is connected
const int PULSE_SENSOR_PIN = A0;

// Create an instance of the PulseSensorPlayground class
PulseSensorPlayground pulseSensor;

// Initialize the LCD with the I2C address 0x27 and 16 columns x 2 rows
LiquidCrystal_I2C lcd(0x27, 16, 2);

void setup() {
  // Initialize serial communication at 9600 bits per second
  Serial.begin(9600);

  // Initialize the LCD
  lcd.begin(16,2);
  lcd.backlight();

  // Configure the pulse sensor
  pulseSensor.analogInput(PULSE_SENSOR_PIN);
  pulseSensor.setSerial(Serial);
  pulseSensor.setThreshold(535);

  // Start the pulse sensor
  if (pulseSensor.begin()) {
    Serial.println("Pulse sensor started successfully.");
    lcd.setCursor(0, 0);
    lcd.print("Pulse Sensor OK");
  } else {
    Serial.println("Pulse sensor failed to start.");
    lcd.setCursor(0, 0);
    lcd.print("Sensor Fail");
  }
}

void loop() {
  // Read the pulse sensor
  int myBPM = pulseSensor.getBeatsPerMinute();

  // If a valid BPM is detected, print it to the console and display on LCD
  if (pulseSensor.sawStartOfBeat()) {
    Serial.print("BPM: ");
    Serial.println(myBPM);
    lcd.setCursor(0, 1);
    lcd.print("BPM: ");
    lcd.print(myBPM);
    lcd.print("   "); // Clear any leftover digits
  }

  // Add a small delay to stabilize readings
  delay(10);
}
This documentation provides a comprehensive overview of the circuit, detailing the components used, their connections, and the code that drives the functionality of the heart rate monitoring system.