Cirkit Designer
Your all-in-one circuit design IDE
Home /
Project Documentation
Arduino Nano-Based Smart Weighing Scale with Ultrasonic Measurement and Audio Feedback

Circuit Documentation
Summary of the Circuit
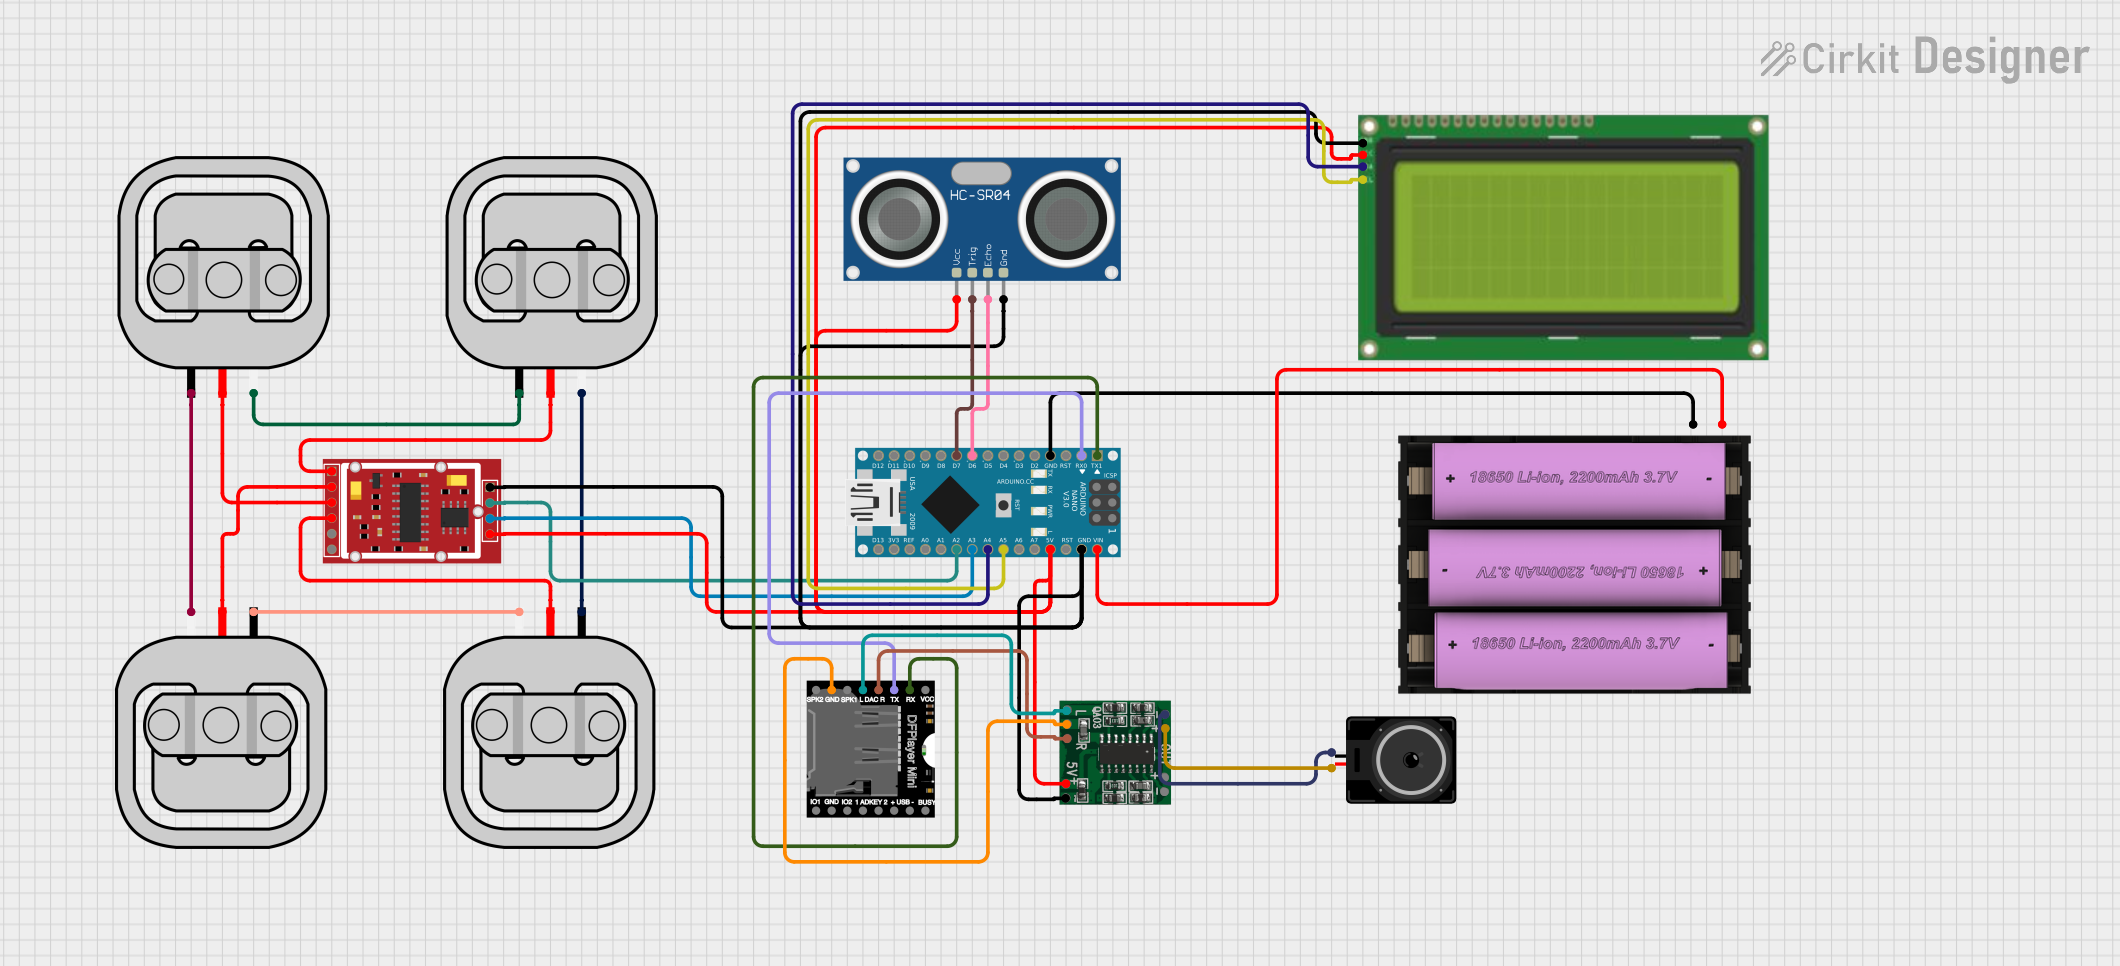
This circuit is designed to interface an Arduino Nano with a variety of sensors and modules, including an HC-SR04 Ultrasonic Sensor, a set of Load Sensors connected to an HX711 Weighing Sensor Module, an I2C LCD display, a DFPlayer Mini MP3 module, and a PAM8403 audio amplifier connected to a loudspeaker. The circuit is powered by a 7V battery. The Arduino Nano serves as the central processing unit, controlling the sensors, displaying information on the LCD, and managing audio playback through the DFPlayer Mini and the PAM8403 amplifier.
Component List
Arduino Nano
- Microcontroller board based on the ATmega328P
- Pins: Digital I/O, Analog Inputs, Power, and others
Lcd 20x4 I2C
- 20x4 character LCD display with I2C communication interface
- Pins: GND, 5V, SCA, SCL
HC-SR04 Ultrasonic Sensor
- Ultrasonic distance measuring module
- Pins: VCC, TRIG, ECHO, GND
Set Battery (7V)
- Power source for the circuit
- Pins: + (positive), - (negative)
Load Sensor - 50kg (4x)
- Weight sensor capable of measuring up to 50kg
- Pins: W (White), R (Red), B (Black)
DFPlayer Mini
- Compact MP3 player module for playing audio files from a micro SD card
- Pins: VCC, BUSY, RX, TX, and others
PAM8403
- Audio amplifier module
- Pins: Power input, audio input, and speaker output
Loudspeaker
- Audio output device
- Pins: pin1, pin2
HX711 Weighing Sensor Module
- 24-bit analog-to-digital converter (ADC) designed for weigh scales
- Pins: B-, B+, A-, A+, E-, E+, VCC, CK/TX, DO/RX, GND
Wiring Details
Arduino Nano
- D1/TX connected to DFPlayer Mini RX
- D0/RX connected to DFPlayer Mini TX
- GND connected to the common ground net
- D6 connected to HC-SR04 ECHO
- D7 connected to HC-SR04 TRIG
- VIN connected to Set Battery (7V) +
- 5V connected to the common 5V net
- A5 connected to Lcd 20x4 I2C SCL
- A4 connected to Lcd 20x4 I2C SCA
- A3 connected to HX711 Weighing Sensor Module CK/TX
- A2 connected to HX711 Weighing Sensor Module DO/RX
Lcd 20x4 I2C
- GND connected to the common ground net
- 5V connected to the common 5V net
- SCL connected to Arduino Nano A5
- SCA connected to Arduino Nano A4
HC-SR04 Ultrasonic Sensor
- VCC connected to the common 5V net
- TRIG connected to Arduino Nano D7
- ECHO connected to Arduino Nano D6
- GND connected to the common ground net
Set Battery (7V)
- connected to Arduino Nano VIN
- connected to the common ground net
Load Sensors - 50kg
- Load Sensors are interconnected in a Wheatstone bridge configuration and connected to the HX711 Weighing Sensor Module
DFPlayer Mini
- VCC connected to the common 5V net
- BUSY not connected
- RX connected to Arduino Nano D1/TX
- TX connected to Arduino Nano D0/RX
- DAC_R connected to PAM8403 R-INPUT
- DAC_L connected to PAM8403 L-INPUT
- GND connected to the common ground net
PAM8403
- 5vIN+ connected to the common 5V net
- GND/IN- connected to the common ground net
- R-INPUT connected to DFPlayer Mini DAC_R
- L-INPUT connected to DFPlayer Mini DAC_L
- L- connected to Loudspeaker pin1
- L+ connected to Loudspeaker pin2
Loudspeaker
- pin1 connected to PAM8403 L-
- pin2 connected to PAM8403 L+
HX711 Weighing Sensor Module
- B-, B+, A-, A+, E-, E+ connected to the Load Sensors
- VCC connected to the common 5V net
- CK/TX connected to Arduino Nano A3
- DO/RX connected to Arduino Nano A2
- GND connected to the common ground net
Documented Code
Arduino Nano Code (sketch.ino)
void setup() {
  // put your setup code here, to run once:

}

void loop() {
  // put your main code here, to run repeatedly:

}
Additional Notes
- The provided code is a template and does not include any functional code for operating the circuit. The user must implement the setup and loop functions to initialize the components and define the circuit's behavior during operation.
- The code must be written to handle I2C communication with the LCD, serial communication with the DFPlayer Mini, digital read/write for the HC-SR04 sensor, and data retrieval from the HX711 module.
- Proper power management and pin configurations must be ensured to prevent damage to the components.