Arduino Nano Controlled Motor with Safety Limit Switches and Relay
Circuit Documentation
Summary
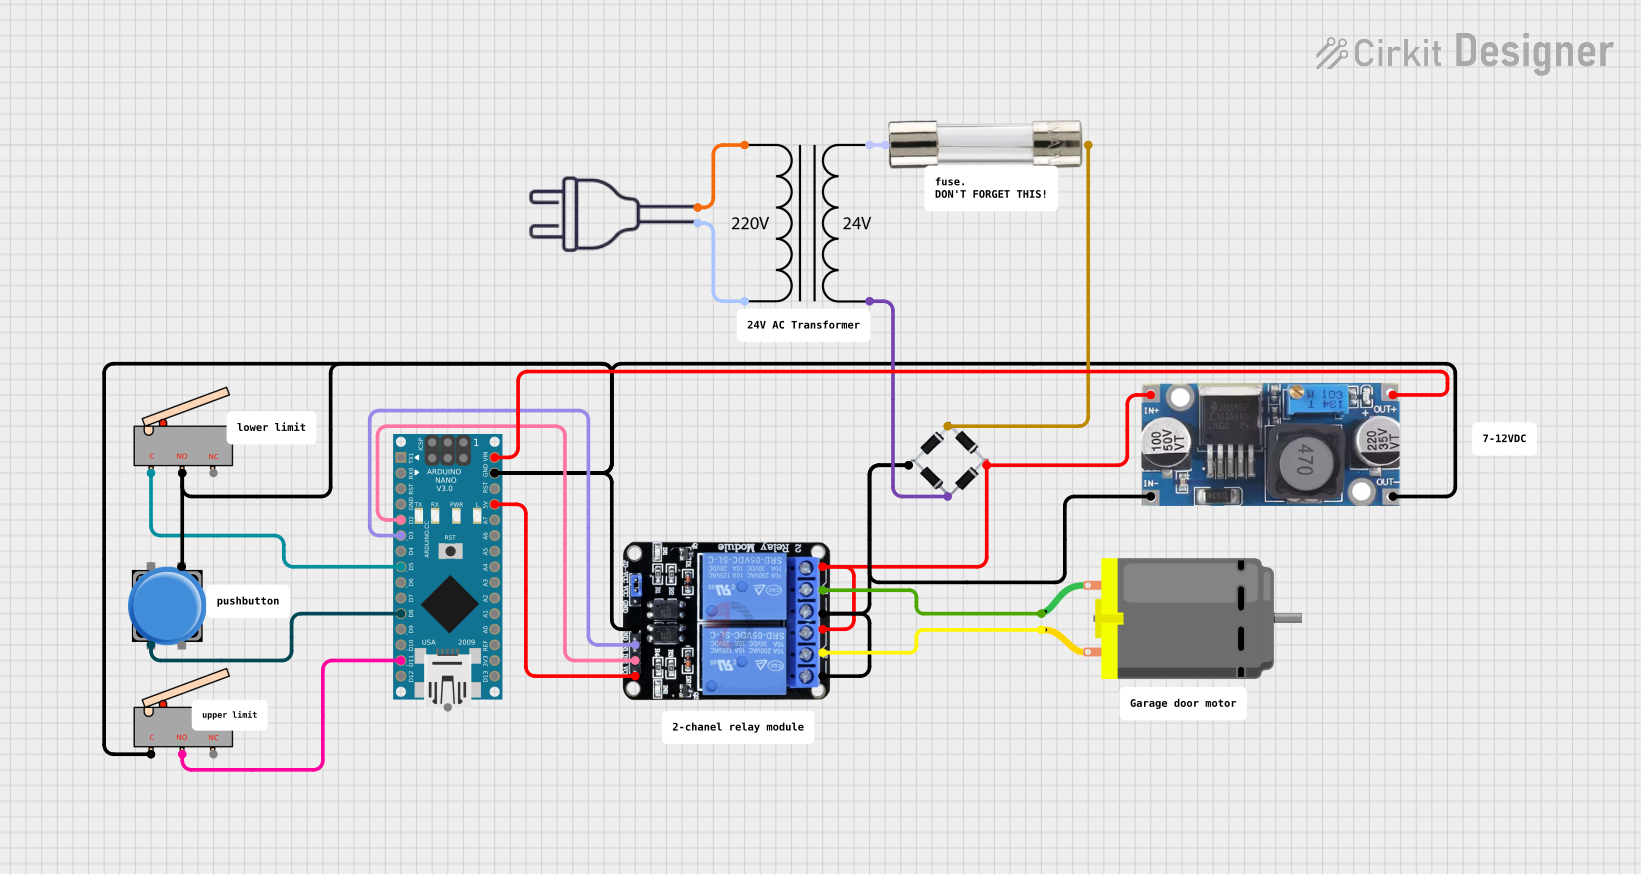
This circuit incorporates a variety of components including an Arduino Nano microcontroller, limit switches, a pushbutton, a bridge rectifier, a fuse, a two-channel 5V relay, a DC motor, a power transformer (220V to 24V), and a step-down buck converter. The circuit is designed to control a DC motor using the Arduino Nano, which interfaces with the relay to switch the motor on and off. The limit switches and pushbutton provide input signals to the Arduino for controlling the motor's operation. The power transformer steps down the mains voltage to 24V, which is then rectified and regulated to provide the necessary power to the Arduino and the relay module.
Component List
Arduino Nano
A compact microcontroller board based on the ATmega328P, featuring digital and analog I/O pins.
Limit Switches
Electromechanical devices that are used to detect the presence or absence of an object or to limit its motion.
Pushbutton
A simple switch mechanism for controlling some aspect of a machine or a process.
Bridge Rectifier
A component that converts an AC input into a DC output.
Fuse
A safety device that protects electrical circuits from overcurrent.
Two Channel Relay 5V
An electrically operated switch that allows the Arduino to control higher power loads.
DC Motor
An electrical machine that converts electrical energy into mechanical energy.
Power Transformer (220V to 24V)
A device that steps down the mains voltage to a lower level suitable for the circuit.
Step Down Buck Converter
A DC-DC converter that steps down voltage from its input to its output.
Wiring Details
Arduino Nano
- D2: Connected to Two Channel Relay 5V (IN2)
- D3: Connected to Two Channel Relay 5V (IN1)
- D5: Connected to Limit Switch (C)
- D8: Connected to Pushbutton (Pin 2)
- D11/MOSI: Connected to Limit Switch (NO)
- VIN: Connected to Step Down Buck Converter (OUT +)
- GND: Common ground with Pushbutton (Pin 3), Two Channel Relay 5V (GND), Step Down Buck Converter (OUT - GND), Limit Switches (C, NO), and Bridge Rectifier (source_out-)
- 5V: Connected to Two Channel Relay 5V (VCC)
Limit Switches
- C: One connected to Arduino Nano (D5), another common ground.
- NO: One connected to Arduino Nano (D11/MOSI), another common ground.
Pushbutton
- Pin 2: Connected to Arduino Nano (D8)
- Pin 3: Common ground
Bridge Rectifier
- Source_in-: Connected to Fuse (Terminal 2)
- source_out-: Common ground
- source_out+: Connected to Step Down Buck Converter (IN +)
- source_in+: Connected to Power Transformer (220V to 24V) (4 - Secondary)
Fuse
- Terminal 1: Connected to Power Transformer (220V to 24V) (3 - Secondary)
- Terminal 2: Connected to Bridge Rectifier (Source_in-)
Two Channel Relay 5V
- VCC: Connected to Arduino Nano (5V)
- IN2: Connected to Arduino Nano (D2)
- IN1: Connected to Arduino Nano (D3)
- GND: Common ground
- NC2, NC1: Common ground
- C2: Connected to DC Motor (pin 2)
- NO2, NO1: Connected to Step Down Buck Converter (IN +)
- C1: Connected to DC Motor (pin 1)
DC Motor
- pin 1: Connected to Two Channel Relay 5V (C1)
- pin 2: Connected to Two Channel Relay 5V (C2)
Power Transformer (220V to 24V)
- 2 - Primary: Connected to power 220v (hot wire)
- 1 - Primary: Connected to power 220v (neutral wire)
- 3 - Secondary: Connected to Fuse (Terminal 1)
- 4 - Secondary: Connected to Bridge Rectifier (source_in+)
Step Down Buck Converter
- IN +: Connected to Bridge Rectifier (source_out+)
- IN - GND: Common ground
- OUT +: Connected to Arduino Nano (VIN)
- OUT - GND: Common ground
Documented Code
Arduino Nano
File: sketch.ino
void setup() {
  // put your setup code here, to run once:

}

void loop() {
  // put your main code here, to run repeatedly:

}
File: documentation.txt
(No additional documentation provided for the code)