
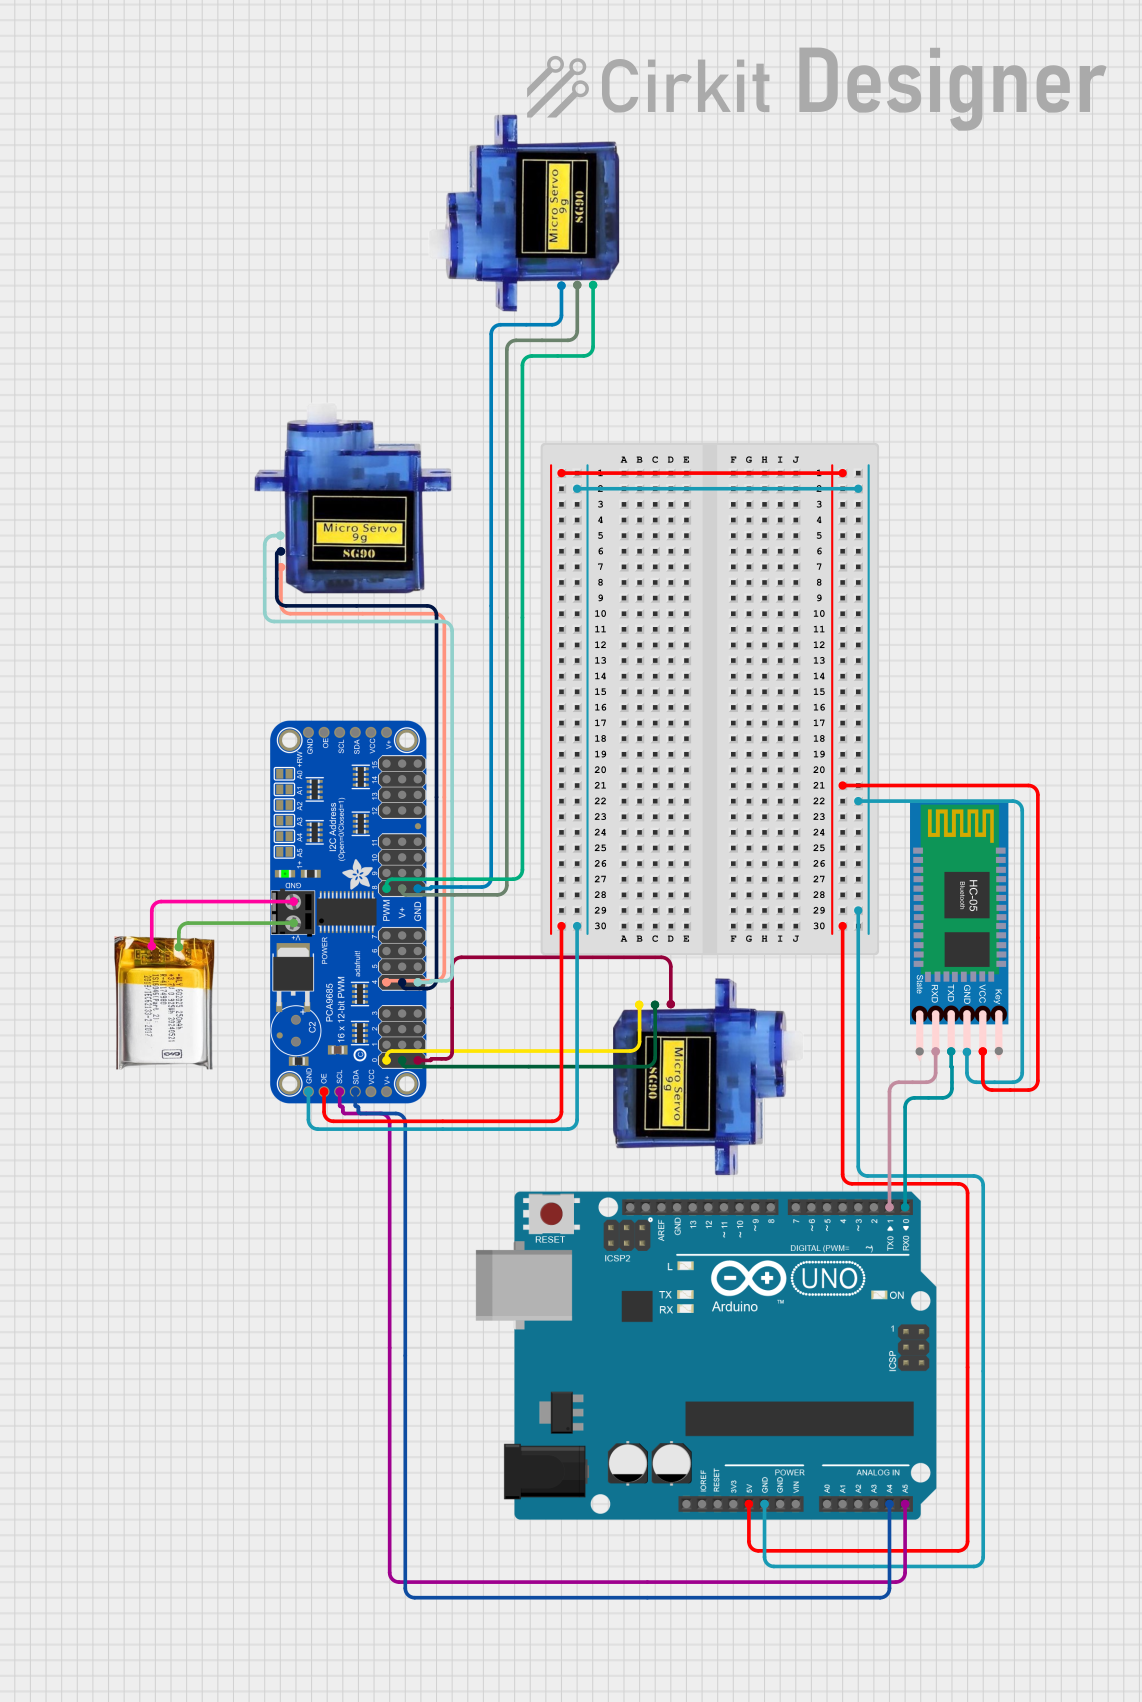
Circuit Documentation
Summary
This circuit is designed to control three micro servos via Bluetooth commands and a flex sensor using an Arduino UNO. The HC-05 Bluetooth module receives commands from another device, and the Adafruit PCA9685 PWM Servo Breakout is used to control the servos. The servos' positions are updated based on the received Bluetooth data and flex sensor readings.
Component List
HC-05 Bluetooth Module
- Description: A Bluetooth module used for wireless communication.
- Pins: Key, VCC, TXD, RXD, State, GND
Micro servo 9G
- Description: A small servo motor used for precise control of angular position.
- Pins: GND, +5V, PWM
Arduino UNO
- Description: A microcontroller board based on the ATmega328P.
- Pins: UNUSED, IOREF, Reset, 3.3V, 5V, GND, Vin, A0, A1, A2, A3, A4, A5, SCL, SDA, AREF, D13, D12, D11, D10, D9, D8, D7, D6, D5, D4, D3, D2, D1, D0
Adafruit PCA9685 PWM Servo Breakout
- Description: A PWM driver board used to control multiple servos.
- Pins: 5.0V, GND, PWRIN, PWM7, PWM6, PWM5, PWM4, PWM3, PWM2, PWM1, PWM0, VCC, SDA, SCL, OE, PWM15, PWM14, PWM13, PWM12, PWM11, PWM10, PWM9, PWM8
3.7v LiPo
- Description: A 3.7V Lithium Polymer battery used to power the circuit.
- Pins: +Ve, GND
Wiring Details
HC-05 Bluetooth Module
- VCC connected to 5V on Arduino UNO and OE on Adafruit PCA9685 PWM Servo Breakout
- GND connected to GND on Arduino UNO and Adafruit PCA9685 PWM Servo Breakout
- TXD connected to D0 on Arduino UNO
- RXD connected to D1 on Arduino UNO
Micro servo 9G (Instance 1)
- GND connected to GND on Adafruit PCA9685 PWM Servo Breakout
- +5V connected to 5.0V on Adafruit PCA9685 PWM Servo Breakout
- PWM connected to PWM4 on Adafruit PCA9685 PWM Servo Breakout
Micro servo 9G (Instance 2)
- GND connected to GND on Adafruit PCA9685 PWM Servo Breakout
- +5V connected to 5.0V on Adafruit PCA9685 PWM Servo Breakout
- PWM connected to PWM8 on Adafruit PCA9685 PWM Servo Breakout
Micro servo 9G (Instance 3)
- GND connected to GND on Adafruit PCA9685 PWM Servo Breakout
- +5V connected to 5.0V on Adafruit PCA9685 PWM Servo Breakout
- PWM connected to PWM0 on Adafruit PCA9685 PWM Servo Breakout
Arduino UNO
- 5V connected to VCC on HC-05 Bluetooth Module and OE on Adafruit PCA9685 PWM Servo Breakout
- GND connected to GND on HC-05 Bluetooth Module and Adafruit PCA9685 PWM Servo Breakout
- D0 connected to TXD on HC-05 Bluetooth Module
- D1 connected to RXD on HC-05 Bluetooth Module
- A4 connected to SDA on Adafruit PCA9685 PWM Servo Breakout
- A5 connected to SCL on Adafruit PCA9685 PWM Servo Breakout
Adafruit PCA9685 PWM Servo Breakout
- 5.0V connected to +5V on all Micro servo 9G instances
- GND connected to GND on all Micro servo 9G instances, HC-05 Bluetooth Module, Arduino UNO, and 3.7v LiPo
- PWRIN connected to +Ve on 3.7v LiPo
- SDA connected to A4 on Arduino UNO
- SCL connected to A5 on Arduino UNO
- OE connected to 5V on Arduino UNO and VCC on HC-05 Bluetooth Module
3.7v LiPo
- +Ve connected to PWRIN on Adafruit PCA9685 PWM Servo Breakout
- GND connected to GND on Adafruit PCA9685 PWM Servo Breakout
Code Documentation
Arduino UNO Code
/*
 * This Arduino Sketch controls three micro servos via Bluetooth commands and a flex sensor.
 * The HC-05 Bluetooth module receives commands from another device.
 * The Adafruit PCA9685 PWM Servo Breakout is used to control the servos.
 * The servos' positions are updated based on the received Bluetooth data and flex sensor readings.
 */

#include <Wire.h>
#include <Adafruit_PWMServoDriver.h>

Adafruit_PWMServoDriver pwm = Adafruit_PWMServoDriver();

const int bluetoothRx = 0; // RX pin of HC-05
const int bluetoothTx = 1; // TX pin of HC-05
const int flexSensorPin = A0; // Analog pin for flex sensor

void setup() {
  Serial.begin(9600); // Initialize serial communication
  pwm.begin();
  pwm.setPWMFreq(60); // Analog servos run at ~60 Hz
  pinMode(flexSensorPin, INPUT);
}

void loop() {
  if (Serial.available() > 0) {
    int servoNum = Serial.read();
    int servoPos = Serial.read();
    if (servoNum >= 0 && servoNum <= 2) {
      setServoPosition(servoNum, servoPos);
    }
  }

  int flexValue = analogRead(flexSensorPin);
  int servoPos = map(flexValue, 0, 1023, 0, 180);
  setServoPosition(0, servoPos); // Example: Control servo 0 with flex sensor
  delay(100); // Small delay for stability
}

void setServoPosition(int servoNum, int pos) {
  int pulseLength = map(pos, 0, 180, 150, 600);
  pwm.setPWM(servoNum, 0, pulseLength);
}
Adafruit PCA9685 PWM Servo Breakout Code
void setup() {
  // put your setup code here, to run once:
}

void loop() {
  // put your main code here, to run repeatedly:
}
3.7v LiPo Code
void setup() {
  // put your setup code here, to run once:
}

void loop() {
  // put your main code here, to run repeatedly:
}
This documentation provides a comprehensive overview of the circuit, including a summary, component list, wiring details, and code documentation.