
Arduino UNO and Adafruit FeatherWing Controlled DC Motor System with RC Receiver
View and Edit Project In Cirkit Designer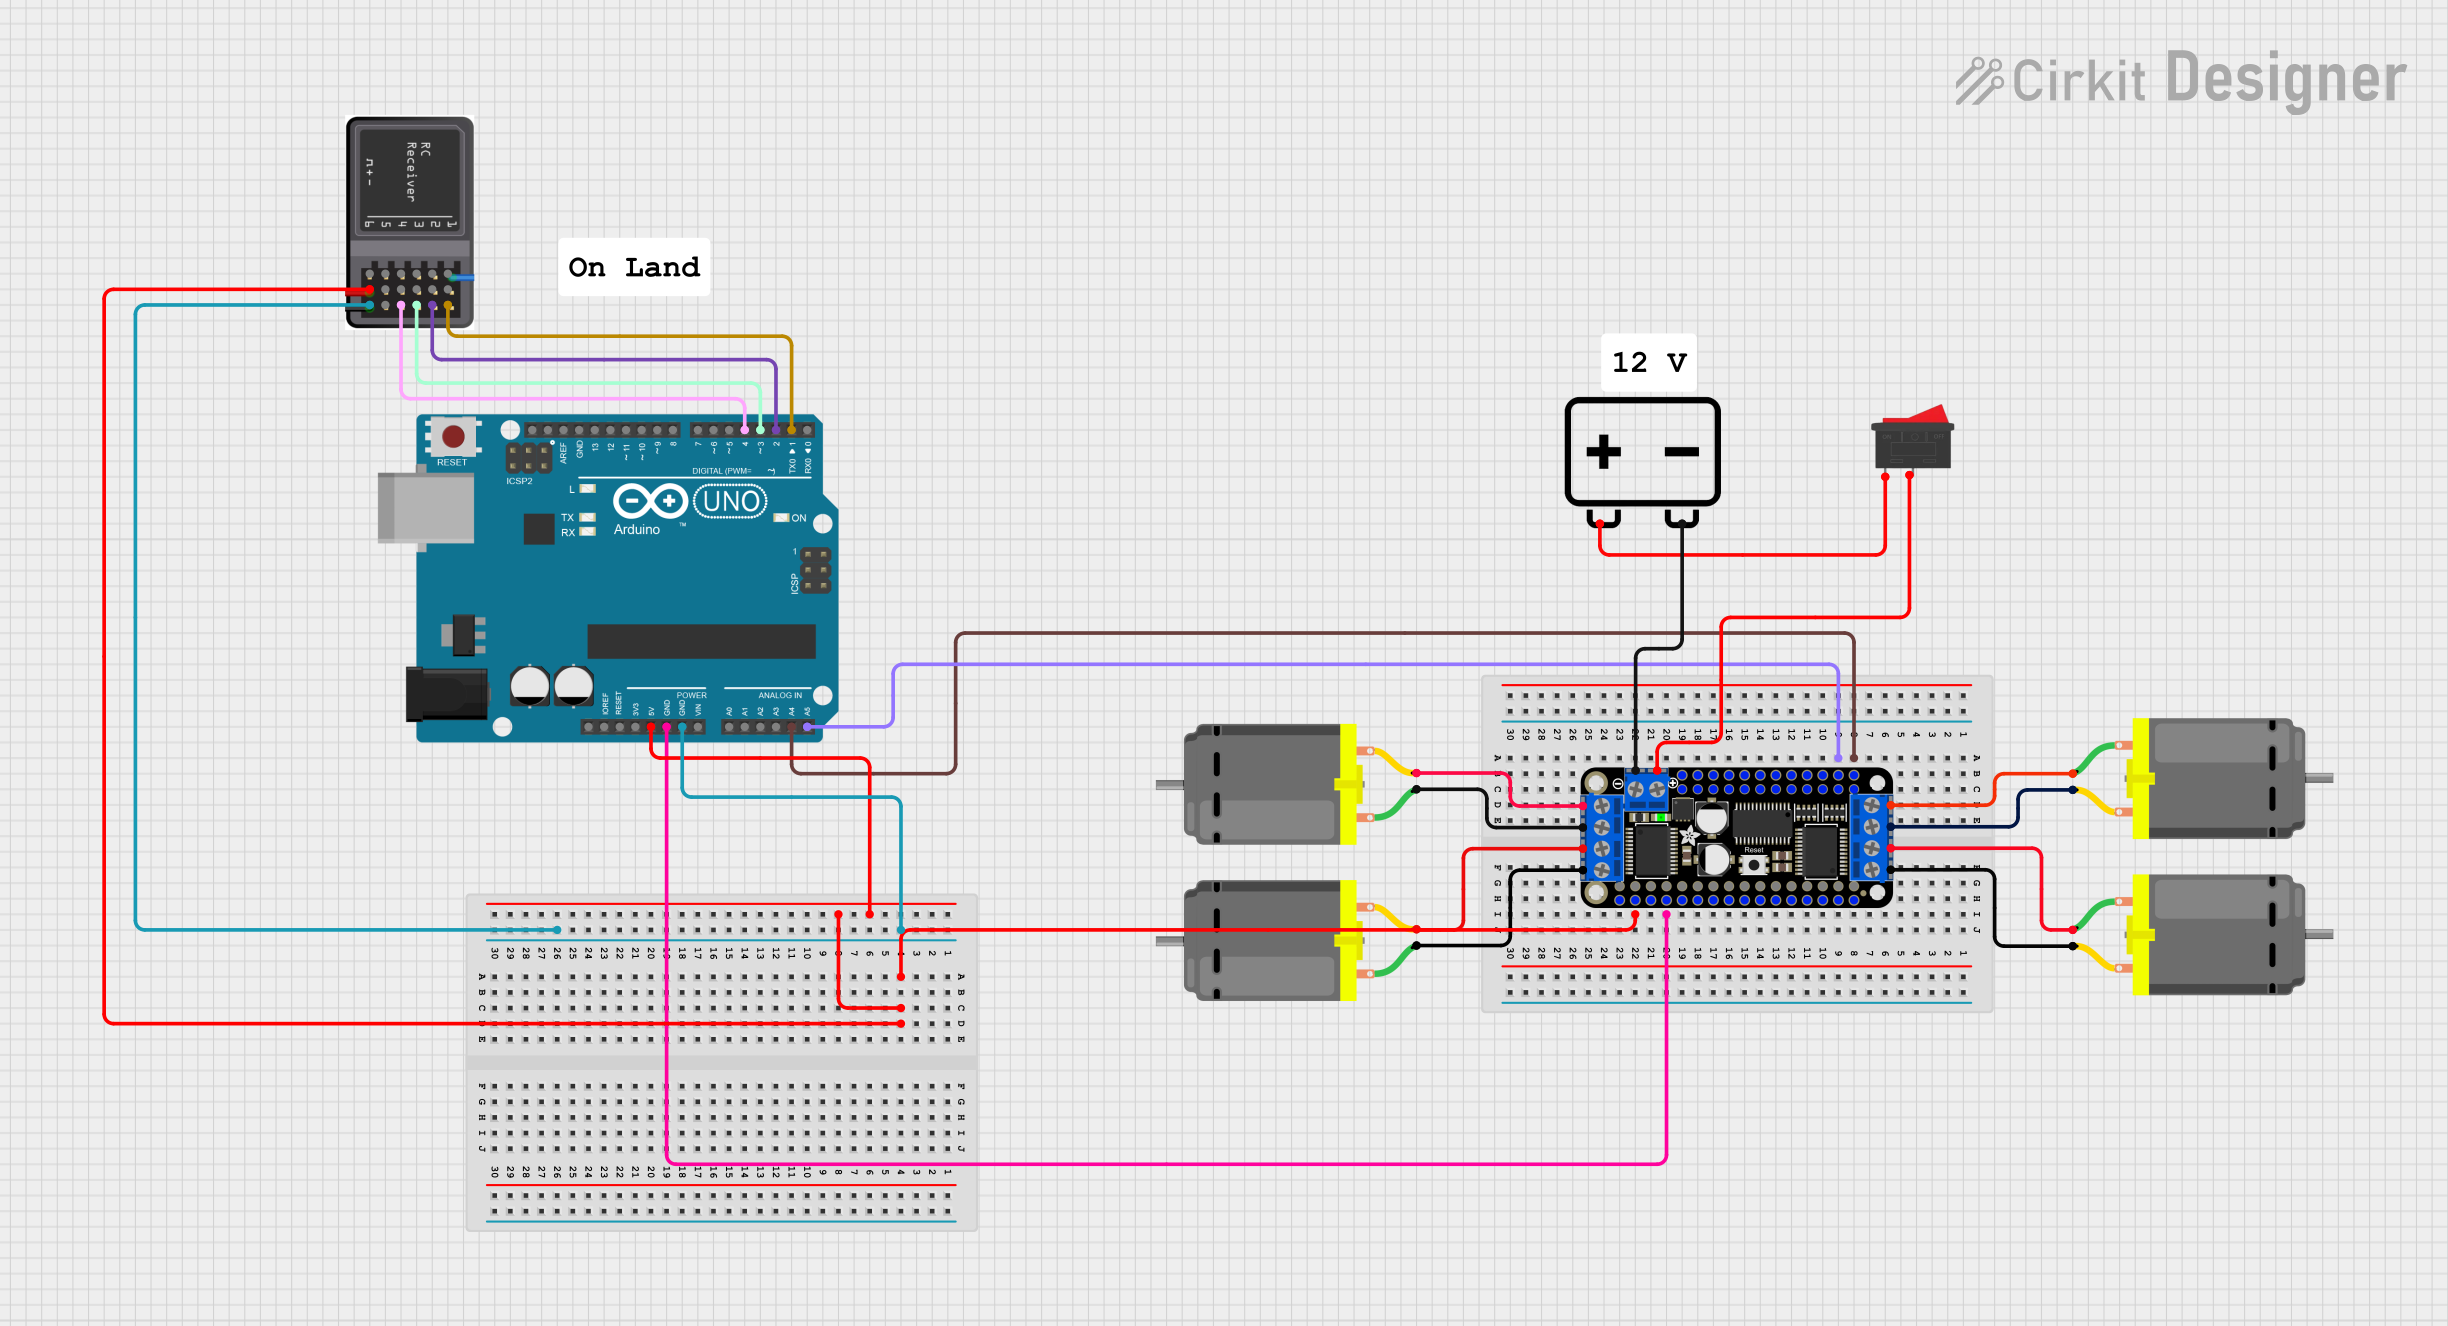
Circuit Documentation
Summary
This document provides a detailed overview of a circuit that includes multiple DC motors, a 12V battery, a rocker switch, an Adafruit DC+Stepper FeatherWing, an Arduino UNO, and an RC receiver module. The circuit is designed to control the DC motors using the FeatherWing and Arduino UNO, with power supplied by the 12V battery and controlled via the rocker switch. The RC receiver module is used for remote control functionalities.
Component List
DC Motor
- Description: A standard DC motor.
- Pins: pin 1, pin 2
12V Battery
- Description: A 12V battery used to power the circuit.
- Pins: -, +
Rocker Switch
- Description: A simple on/off switch.
- Pins: 1, 2
Adafruit DC+Stepper FeatherWing
- Description: A motor driver board that can control DC motors and stepper motors.
- Pins: VBAT, EN, USB, N, M, L, K, J, I, H, SCL, SDA, G, TX, RX, MISO, MOSI, SCK, F, E, D, C, B, A, GND, AREF, +3.3V, RESET, VMOTOR, M1A, M1B, M2B, M2A, M3A, M3B, M4A, M4B
Arduino UNO
- Description: A microcontroller board based on the ATmega328P.
- Pins: UNUSED, IOREF, Reset, 3.3V, 5V, GND, Vin, A0, A1, A2, A3, A4, A5, SCL, SDA, AREF, D13, D12, D11, D10, D9, D8, D7, D6, D5, D4, D3, D2, D1, D0
RC Receiver Module
- Description: A module used to receive remote control signals.
- Pins: S6, S5, S4, S3, S2, S1, Vcc, GND
Comment
- Description: A comment component for documentation purposes.
- Pins: None
Wiring Details
DC Motor
Motor 1:
- pin 1 connected to Adafruit DC+Stepper FeatherWing M3B
- pin 2 connected to Adafruit DC+Stepper FeatherWing M3A
Motor 2:
- pin 1 connected to Adafruit DC+Stepper FeatherWing M4A
- pin 2 connected to Adafruit DC+Stepper FeatherWing M4B
Motor 3:
- pin 1 connected to Adafruit DC+Stepper FeatherWing M1B
- pin 2 connected to Adafruit DC+Stepper FeatherWing M1A
Motor 4:
- pin 1 connected to Adafruit DC+Stepper FeatherWing M2A
- pin 2 connected to Adafruit DC+Stepper FeatherWing M2B
12V Battery
-
- connected to Adafruit DC+Stepper FeatherWing GND
-
- connected to Rocker Switch pin 1
Rocker Switch
- pin 1 connected to 12V Battery +
- pin 2 connected to Adafruit DC+Stepper FeatherWing VMOTOR
Adafruit DC+Stepper FeatherWing
- SDA connected to Arduino UNO A4
- SCL connected to Arduino UNO A5
- GND connected to Arduino UNO GND
- +3.3V connected to RC Receiver Module Vcc and Arduino UNO 5V
- VMOTOR connected to Rocker Switch pin 2
- GND connected to 12V Battery -
Arduino UNO
- A4 connected to Adafruit DC+Stepper FeatherWing SDA
- A5 connected to Adafruit DC+Stepper FeatherWing SCL
- GND connected to Adafruit DC+Stepper FeatherWing GND and RC Receiver Module GND
- 5V connected to Adafruit DC+Stepper FeatherWing +3.3V
- D4 connected to RC Receiver Module GND
- D3 connected to RC Receiver Module GND
- D2 connected to RC Receiver Module GND
- D1 connected to RC Receiver Module GND
RC Receiver Module
- Vcc connected to Adafruit DC+Stepper FeatherWing +3.3V
- GND connected to Arduino UNO GND, D4, D3, D2, D1
Documented Code
Arduino UNO Code
void setup() {
  // put your setup code here, to run once:

}

void loop() {
  // put your main code here, to run repeatedly:

}
This code is a basic template for the Arduino UNO, with setup and loop functions defined but not yet implemented. The setup function runs once when the microcontroller is powered on or reset, and the loop function runs continuously after the setup function completes.