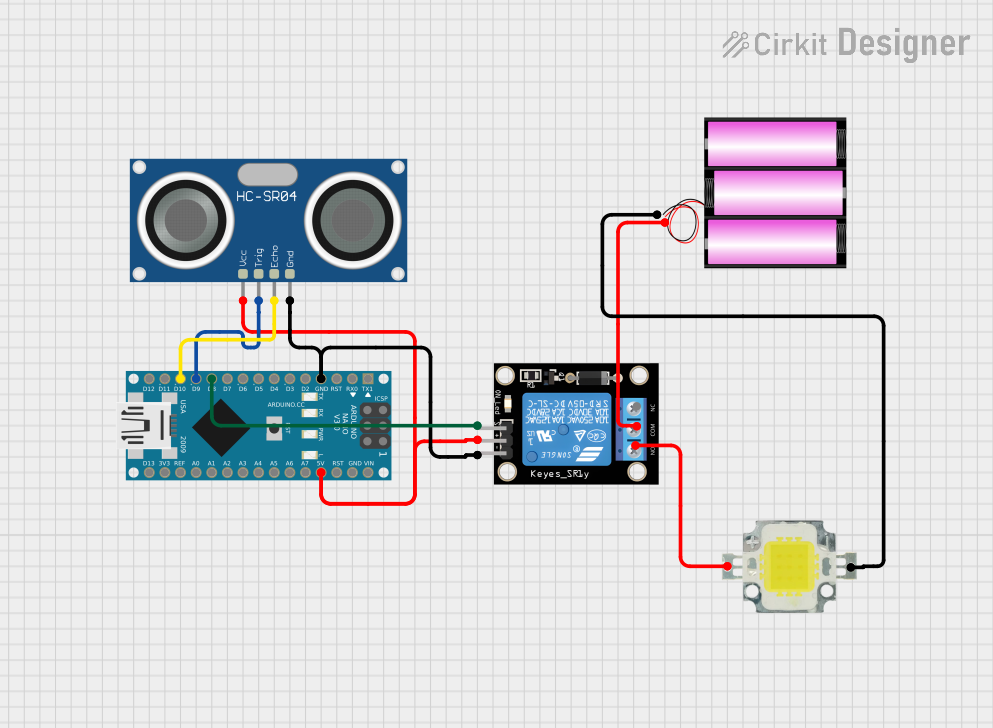
Arduino Nano-Controlled Ultrasonic Relay Switch for Power LED

Circuit Documentation
Summary
This circuit is designed to control a 12V power LED using an Arduino Nano in conjunction with an HC-SR04 Ultrasonic Sensor and a single-channel relay module. The LED is turned on or off based on the proximity of an object to the ultrasonic sensor. If the detected distance is less than or equal to a predefined safety distance, the relay switches off the LED, otherwise, the LED remains on. The circuit is powered by a 12V battery.
Component List
Arduino Nano
- Microcontroller board based on the ATmega328P
- It has a variety of digital and analog I/O pins
- Used for controlling the relay and reading the ultrasonic sensor data
HC-SR04 Ultrasonic Sensor
- Ultrasonic distance sensor
- Provides 2cm to 400cm non-contact measurement functionality
- Operates on a 5V supply
- Used to measure the distance to the nearest object
Relay Module 1 Channel
- Electromechanical switch with one channel
- Controlled by the Arduino to turn the power LED on or off
- Has a Normally Open (NO) and a Common (COM) terminal for switching
Battery 12V
- Provides power to the circuit
- Used to supply the relay and the power LED
Power LED 12V 10W 0.8-0.9A
- High power light-emitting diode
- Operates on 12V
- Used as the output device to indicate the status or as a warning signal
Wiring Details
Arduino Nano
- GND connected to the ground of the relay module and the ultrasonic sensor
- D8 connected to the signal (S) pin of the relay module
- D9 connected to the trigger (TRIG) pin of the ultrasonic sensor
- D10 connected to the echo (ECHO) pin of the ultrasonic sensor
- 5V connected to the 5V pin of the relay module and the VCC pin of the ultrasonic sensor
HC-SR04 Ultrasonic Sensor
- VCC connected to the 5V output from the Arduino Nano
- TRIG connected to pin D9 on the Arduino Nano
- ECHO connected to pin D10 on the Arduino Nano
- GND connected to the ground on the Arduino Nano
Relay Module 1 Channel
- S connected to pin D8 on the Arduino Nano
- 5V connected to the 5V output from the Arduino Nano
- GND connected to the ground on the Arduino Nano
- COM connected to the positive terminal of the battery
- NO connected to the positive terminal of the power LED
Battery 12V
- + connected to the COM terminal of the relay module
- - connected to the negative terminal of the power LED
Power LED 12V 10W 0.8-0.9A
- + connected to the NO terminal of the relay module
- - connected to the negative terminal of the battery
Documented Code
// Code for controlling a power LED using an HC-SR04 Ultrasonic Sensor and a relay module
const int trigPin = 9;
const int echoPin = 10;
const int relayPin = 8;
const int safetyDistance = 100;  // Distance in cm (1 meter)

void setup() {
 pinMode(trigPin, OUTPUT);
 pinMode(echoPin, INPUT);
 pinMode(relayPin, OUTPUT);
 digitalWrite(relayPin, LOW);  // Keep LED on initially
 Serial.begin(9600);
}

void loop() {
 long duration, distance;
 digitalWrite(trigPin, LOW);
 delayMicroseconds(2);
 digitalWrite(trigPin, HIGH);
 delayMicroseconds(10);
 digitalWrite(trigPin, LOW);

 duration = pulseIn(echoPin, HIGH);
 distance = (duration * 0.034) / 2;

 Serial.print("Distance: ");
 Serial.println(distance);

 if (distance <= safetyDistance) {
   digitalWrite(relayPin, HIGH);  // Turn off LED
 } else {
   digitalWrite(relayPin, LOW);  // Keep LED on
 }

 delay(500);  // Delay for stability
}
This code initializes the Arduino Nano to communicate with the HC-SR04 Ultrasonic Sensor and control the relay module. The safetyDistance variable defines the threshold distance for the relay to switch off the LED. The setup() function configures the necessary pins and initializes serial communication. The loop() function continuously measures the distance using the ultrasonic sensor and controls the relay accordingly. If the measured distance is less than or equal to safetyDistance, the relay is activated, turning off the LED. If the distance is greater, the relay is deactivated, and the LED remains on.