Cirkit Designer
Your all-in-one circuit design IDE
Home /
Project Documentation
Arduino UNO-Based Smart Parking System with IR Sensors and LCD Display
Circuit Documentation
Summary
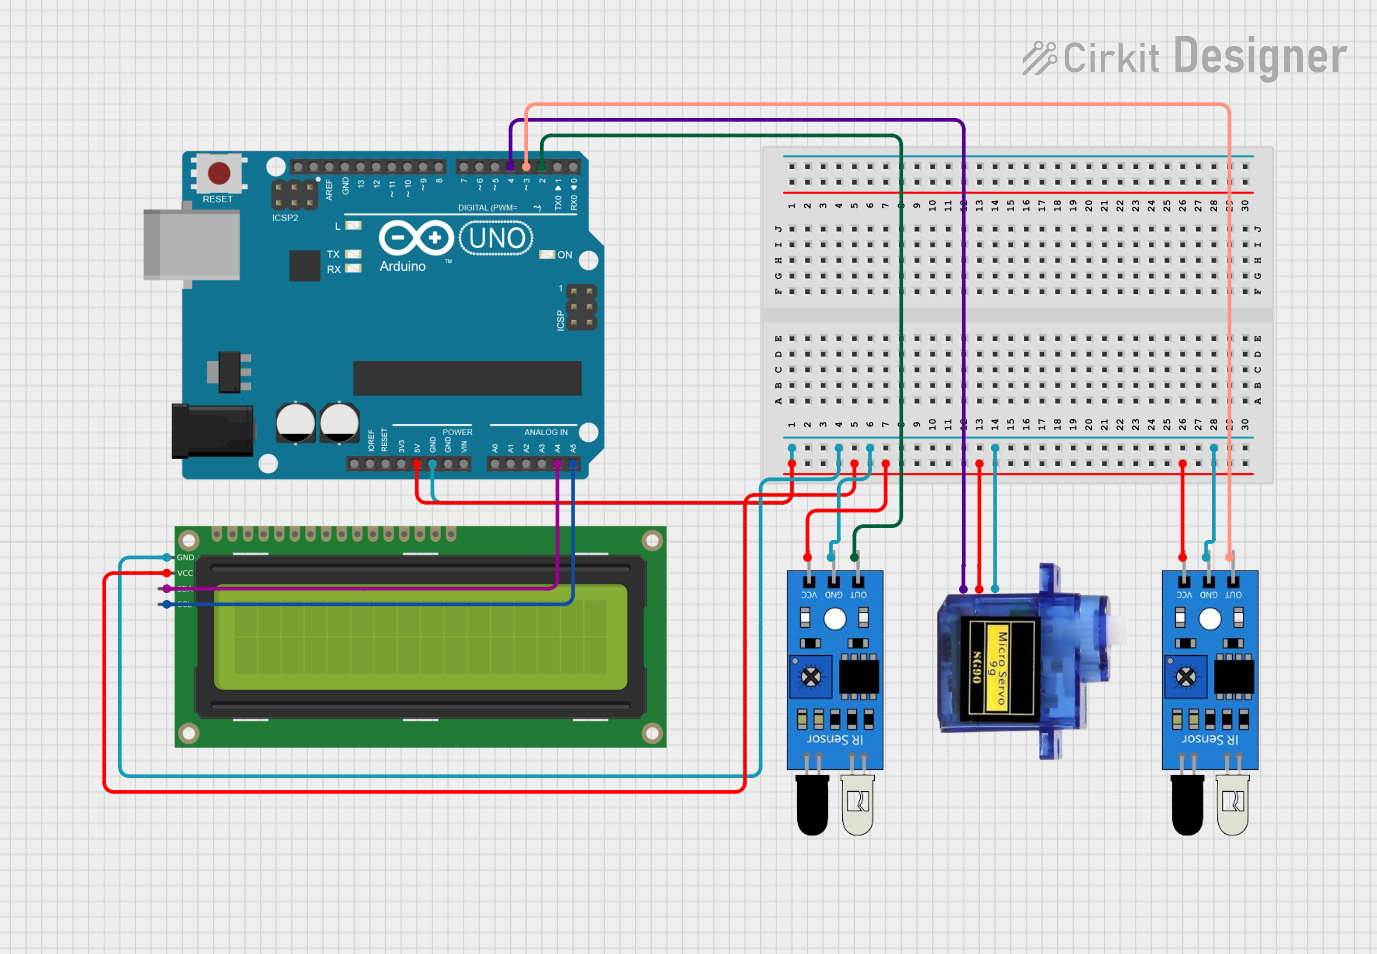
This circuit is designed to create a parking system using an Arduino UNO, IR sensors, a micro servo, and a 16x2 I2C LCD display. The system detects the presence of a vehicle using IR sensors and displays the parking status on the LCD. The micro servo is used to control a barrier that opens and closes based on the availability of parking slots.
Component List
IR Sensor
- Description: Infrared sensor used to detect the presence of a vehicle.
- Pins: out, gnd, vcc
Arduino UNO
- Description: Microcontroller board based on the ATmega328P.
- Pins: UNUSED, IOREF, Reset, 3.3V, 5V, GND, Vin, A0, A1, A2, A3, A4, A5, SCL, SDA, AREF, D13, D12, D11, D10, D9, D8, D7, D6, D5, D4, D3, D2, D1, D0
Micro Servo 9G
- Description: Small servo motor used to control the barrier.
- Pins: GND, +5V, PWM
16x2 I2C LCD
- Description: LCD display with I2C interface used to show parking status.
- Pins: GND, VCC, SDA, SCL
Wiring Details
IR Sensor 1
- Pin out connected to Arduino UNO D2
- Pin gnd connected to Arduino UNO GND
- Pin vcc connected to Arduino UNO 5V
IR Sensor 2
- Pin out connected to Arduino UNO D3
- Pin gnd connected to Arduino UNO GND
- Pin vcc connected to Arduino UNO 5V
Arduino UNO
- Pin 5V connected to 16x2 I2C LCD VCC, IR Sensor 1 vcc, IR Sensor 2 vcc, Micro Servo 9G +5V
- Pin GND connected to 16x2 I2C LCD GND, IR Sensor 1 gnd, IR Sensor 2 gnd, Micro Servo 9G GND
- Pin D2 connected to IR Sensor 1 out
- Pin D3 connected to IR Sensor 2 out
- Pin A4 connected to 16x2 I2C LCD SDA
- Pin A5 connected to 16x2 I2C LCD SCL
- Pin D4 connected to Micro Servo 9G PWM
Micro Servo 9G
- Pin GND connected to Arduino UNO GND
- Pin +5V connected to Arduino UNO 5V
- Pin PWM connected to Arduino UNO D4
16x2 I2C LCD
- Pin GND connected to Arduino UNO GND
- Pin VCC connected to Arduino UNO 5V
- Pin SDA connected to Arduino UNO A4
- Pin SCL connected to Arduino UNO A5
Code Documentation
#include <LiquidCrystal_I2C.h>
#include <Wire.h>
#include <LiquidCrystal_I2C.h>
LiquidCrystal_I2C lcd(0x27,16,2);
#include <Servo.h>
Servo myservo;
int IR1 = 2;
int IR2 = 3;
int Slot = 4;
int flag1 = 0;
int flag2 = 0;

void setup() {
  Serial.begin(9600);
  lcd.init();
  lcd.backlight();
  pinMode(IR1, INPUT);
  pinMode(IR2, INPUT);
  myservo.attach(4);
  myservo.write(100);
  lcd.setCursor (0,0);
  lcd.print("     ARDUINO    ");
  lcd.setCursor (0,1);
  lcd.print(" PARKING SYSTEM ");
  delay (2000);
  lcd.clear();
}

void loop(){
  if(digitalRead (IR1) == LOW && flag1==0){
    if(Slot>0){
      flag1=1;
      if(flag2==0){
        myservo.write(0);
        Slot = Slot-1;
      }
    } else {
      lcd.setCursor (0,0);
      lcd.print("    SORRY :(    ");
      lcd.setCursor (0,1);
      lcd.print("  Parking Full  ");
      delay (3000);
      lcd.clear();
    }
    if(digitalRead (IR2) == LOW && flag2==0){
      flag2=1;
      if(flag1==0){
        myservo.write(0);
        Slot = Slot+1;
      }
    }
    if(flag1==1 && flag2==1){
      delay (1000);
      myservo.write(100);
      flag1=0, flag2=0;
    }
    lcd.setCursor (0,0);
    lcd.print("    WELCOME!    ");
    lcd.setCursor (0,1);
    lcd.print("Slot Left: ");
    lcd.print(Slot);
  }
}
This code initializes the LCD and servo, sets up the IR sensors as inputs, and controls the servo based on the sensor readings. The LCD displays the parking status, including the number of available slots.