
Circuit Documentation
Summary
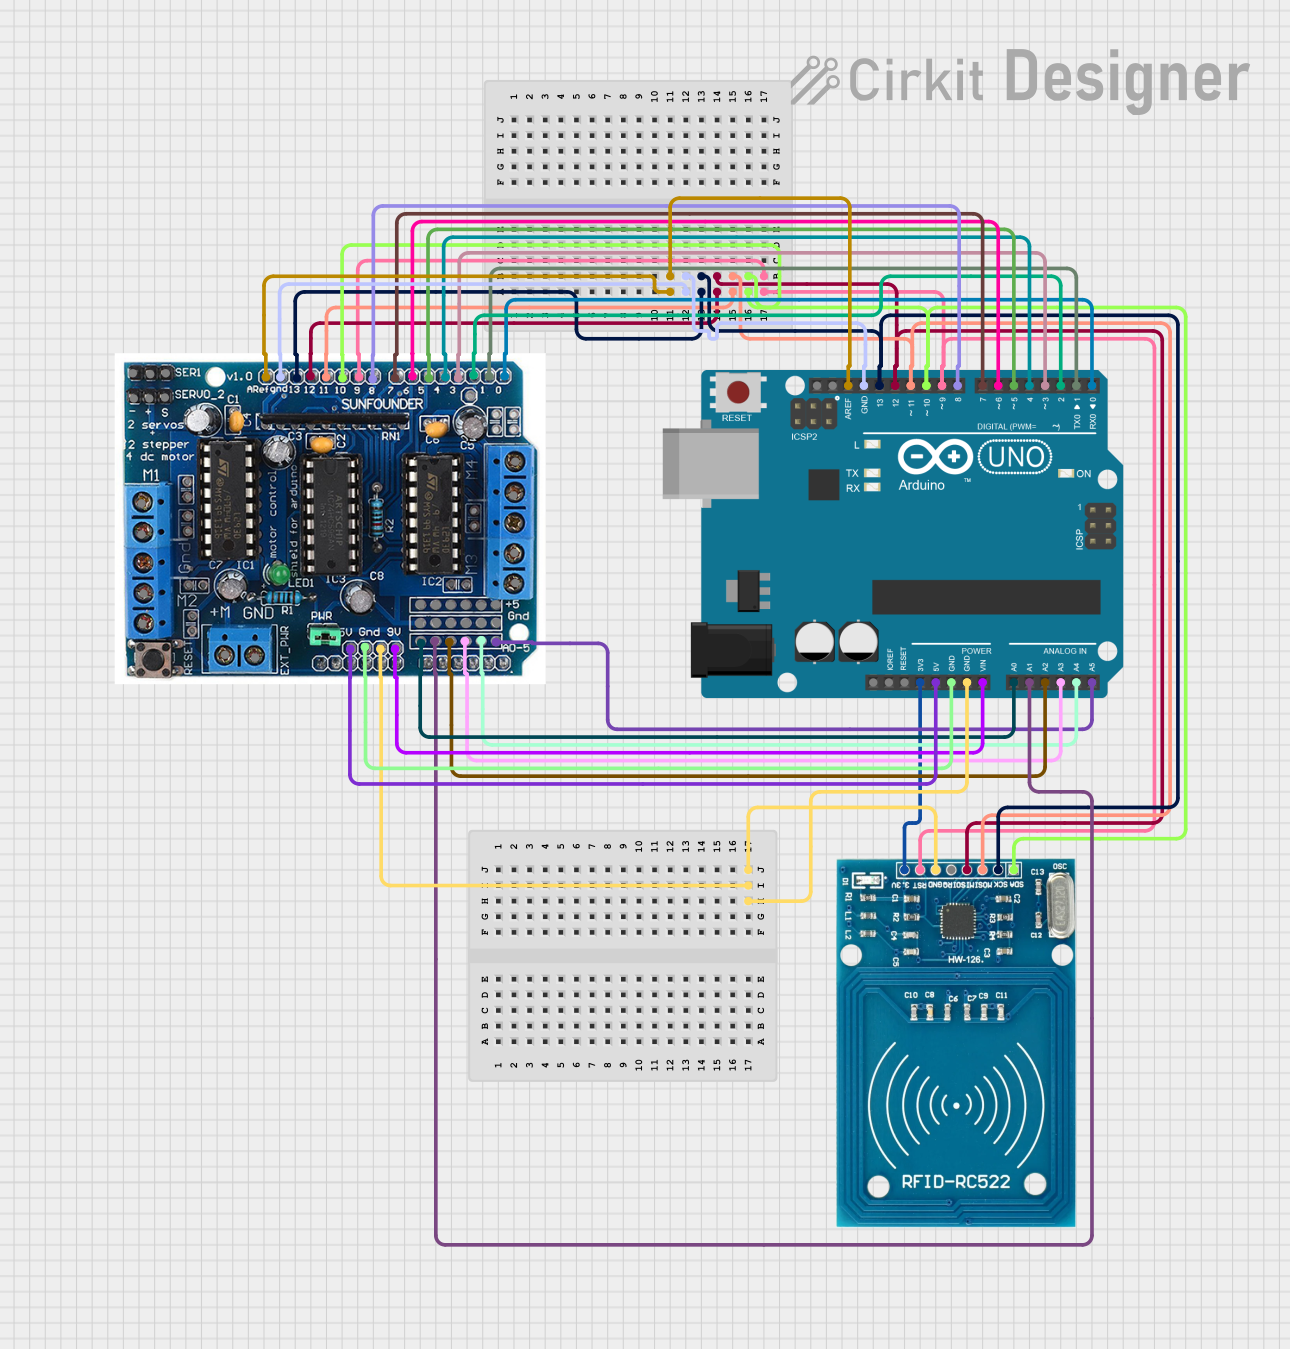
This circuit integrates an Arduino UNO microcontroller with an RFID-RC522 module and an L293D motor driver shield. The purpose of the circuit is to control a set of motors based on RFID card detection. When a specific RFID card is scanned, the motors are either driven forward or backward, depending on the card's ID.
Component List
Arduino UNO
- Description: A microcontroller board based on the ATmega328P.
- Pins: UNUSED, IOREF, Reset, 3.3V, 5V, GND, Vin, A0-A5, SCL, SDA, AREF, D0-D13.
RFID-RC522
- Description: An RFID reader/writer module.
- Pins: VCC (3.3V), RST, GND, IRQ, MISO, MOSI, SCK, SDA.
L293D Motor Driver Shield
- Description: A motor driver shield that can drive up to 4 DC motors.
- Pins: 5v, GND, A0-A5, M+, M1-M4, 0-9, 10-12, gnd, Aref, Servo1, Servo2, +, -, 9v.
Wiring Details
Arduino UNO
- 3.3V connected to RFID-RC522 VCC (3.3V)
- 5V connected to L293D Motor Driver Shield 5v
- GND connected to L293D Motor Driver Shield GND and RFID-RC522 GND
- Vin connected to L293D Motor Driver Shield 9v
- A0-A5 connected to L293D Motor Driver Shield A0-A5
- AREF connected to L293D Motor Driver Shield Aref
- D0-D13 connected to L293D Motor Driver Shield 0-12 respectively
RFID-RC522
- VCC (3.3V) connected to Arduino UNO 3.3V
- RST connected to Arduino UNO D9
- GND connected to Arduino UNO GND
- MISO connected to Arduino UNO D12
- MOSI connected to Arduino UNO D11
- SCK connected to Arduino UNO D13
- SDA connected to Arduino UNO D10
L293D Motor Driver Shield
- 5v connected to Arduino UNO 5V
- GND connected to Arduino UNO GND
- A0-A5 connected to Arduino UNO A0-A5
- M+ (Motor power supply)
- M1-M4 (Motor outputs)
- 0-9 connected to Arduino UNO D0-D9 respectively
- 10-12 connected to Arduino UNO D10-D12 respectively
- Aref connected to Arduino UNO AREF
- + (Additional power supply if needed)
- - (Ground for additional power supply)
- 9v connected to Arduino UNO Vin
Documented Code
Arduino UNO Code (sketch.ino)
/*
 * This Arduino Sketch interfaces with an RFID-RC522 module and an L293D motor driver shield.
 * When RFID card 1 is scanned, all motors run forward.
 * When RFID card 2 is scanned, all motors run backwards.
 */

#include <SPI.h>
#include <MFRC522.h>

#define RST_PIN 9
#define SS_PIN 10

MFRC522 rfid(SS_PIN, RST_PIN);

const int motorPins[] = {2, 3, 4, 5, 6, 7, 8};

void setup() {
  Serial.begin(9600);
  SPI.begin();
  rfid.PCD_Init();
  for (int i = 0; i < 7; i++) {
    pinMode(motorPins[i], OUTPUT);
  }
}

void loop() {
  if (!rfid.PICC_IsNewCardPresent() || !rfid.PICC_ReadCardSerial()) {
    return;
  }

  String cardID = "";
  for (byte i = 0; i < rfid.uid.size; i++) {
    cardID += String(rfid.uid.uidByte[i] < 0x10 ? "0" : "");
    cardID += String(rfid.uid.uidByte[i], HEX);
  }
  cardID.toUpperCase();
  Serial.println(cardID);

  if (cardID == "CARD1_ID") {
    runMotorsForward();
  } else if (cardID == "CARD2_ID") {
    runMotorsBackward();
  }

  rfid.PICC_HaltA();
  rfid.PCD_StopCrypto1();
}

void runMotorsForward() {
  for (int i = 0; i < 7; i++) {
    digitalWrite(motorPins[i], HIGH);
  }
}

void runMotorsBackward() {
  for (int i = 0; i < 7; i++) {
    digitalWrite(motorPins[i], LOW);
  }
}
L293D Motor Driver Shield Code (sketch.ino)
void setup() {
  // put your setup code here, to run once:

}

void loop() {
  // put your main code here, to run repeatedly:

}
Note: The L293D Motor Driver Shield code provided is empty and does not contain any operational code.