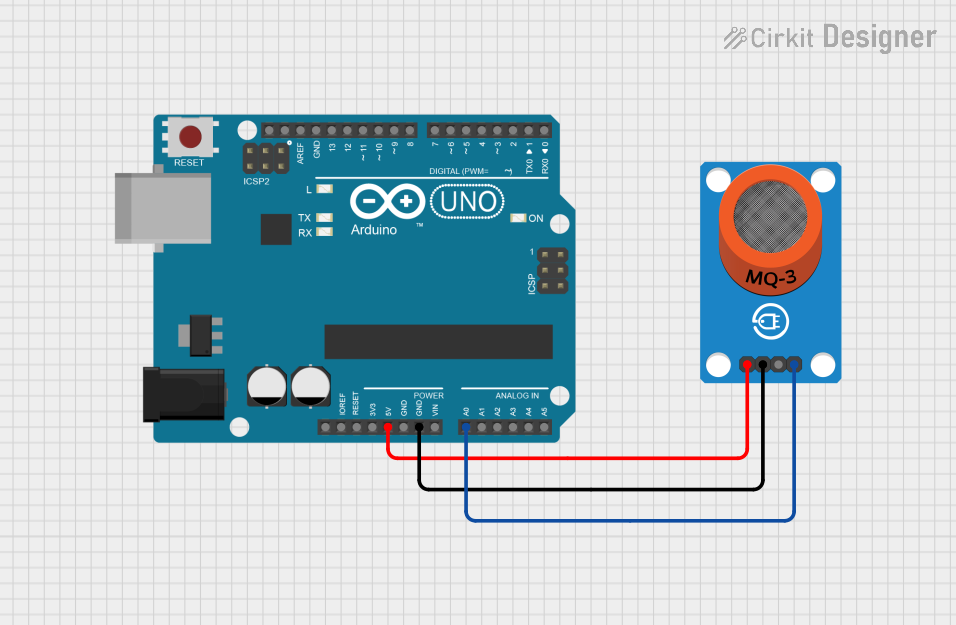
Arduino UNO with MQ-3 Alcohol Sensor for Breathalyzer Readings

Circuit Documentation
Summary
This document provides a detailed overview of a simple circuit that interfaces an Arduino UNO with an MQ-3 Alcohol Sensor. The purpose of the circuit is to measure alcohol concentration levels and output the readings to a serial monitor. The Arduino UNO is used as the microcontroller to read analog values from the MQ-3 sensor and communicate the results. The circuit is powered by the Arduino UNO's 5V output, and the sensor's analog output is connected to one of the Arduino's analog input pins.
Component List
Arduino UNO
- Description: A microcontroller board based on the ATmega328P.
- Pins: UNUSED, IOREF, Reset, 3.3V, 5V, GND, Vin, A0-A5, SCL, SDA, AREF, D0-D13.
- Purpose: Acts as the central processing unit for the circuit, reading sensor data and handling serial communication.
MQ-3 Alcohol Sensor Breakout
- Description: A breakout board for the MQ-3 alcohol sensor.
- Pins: VCC, GND, DO, AO.
- Purpose: Detects alcohol concentration in the air and provides an analog output proportional to the detected level.
Wiring Details
Arduino UNO
- 5V: Provides power to the MQ-3 sensor.
- GND: Common ground with the MQ-3 sensor.
- A0: Receives the analog output from the MQ-3 sensor.
MQ-3 Alcohol Sensor Breakout
- VCC: Connected to the 5V output from the Arduino UNO.
- GND: Connected to the ground (GND) on the Arduino UNO.
- AO: Analog output connected to the A0 pin on the Arduino UNO.
Documented Code
The following code is written for the Arduino UNO to interface with the MQ-3 Alcohol Sensor. The code initializes the sensor and serial communication, then continuously reads the analog value from the sensor and outputs it to the serial monitor.
/*
  MQ-3 Alcohol Sensor Reading
  This sketch interfaces with the MQ-3 alcohol sensor. It initializes the sensor
  and serial communication, then continuously reads the analog value from the
  sensor and outputs it to the serial monitor. The sensor requires a warm-up
  period, which is handled in the setup function. Readings are taken every 2
  seconds.
*/

#define MQ3pin A0 // Pin for the MQ-3 sensor's analog output

float sensorValue;  // Variable to store sensor value

void setup() {
  Serial.begin(9600); // Initialize serial communication at 9600 baud
  Serial.println("MQ3 warming up!");
  delay(20000); // Warm-up time for the MQ3 sensor (20 seconds)
}

void loop() {
  sensorValue = analogRead(MQ3pin); // Read from the MQ-3 sensor

  // Print the sensor value to the serial monitor
  Serial.print("Sensor Value: ");
  Serial.println(sensorValue);

  delay(2000); // Wait 2 seconds before next reading
}
The code includes a warm-up period for the sensor during the setup phase, after which it enters a loop where it reads the sensor value every 2 seconds and prints it to the serial monitor.