
Arduino UNO-Based Smart Street Light Control with LDR and PIR Sensors
View and Edit Project In Cirkit Designer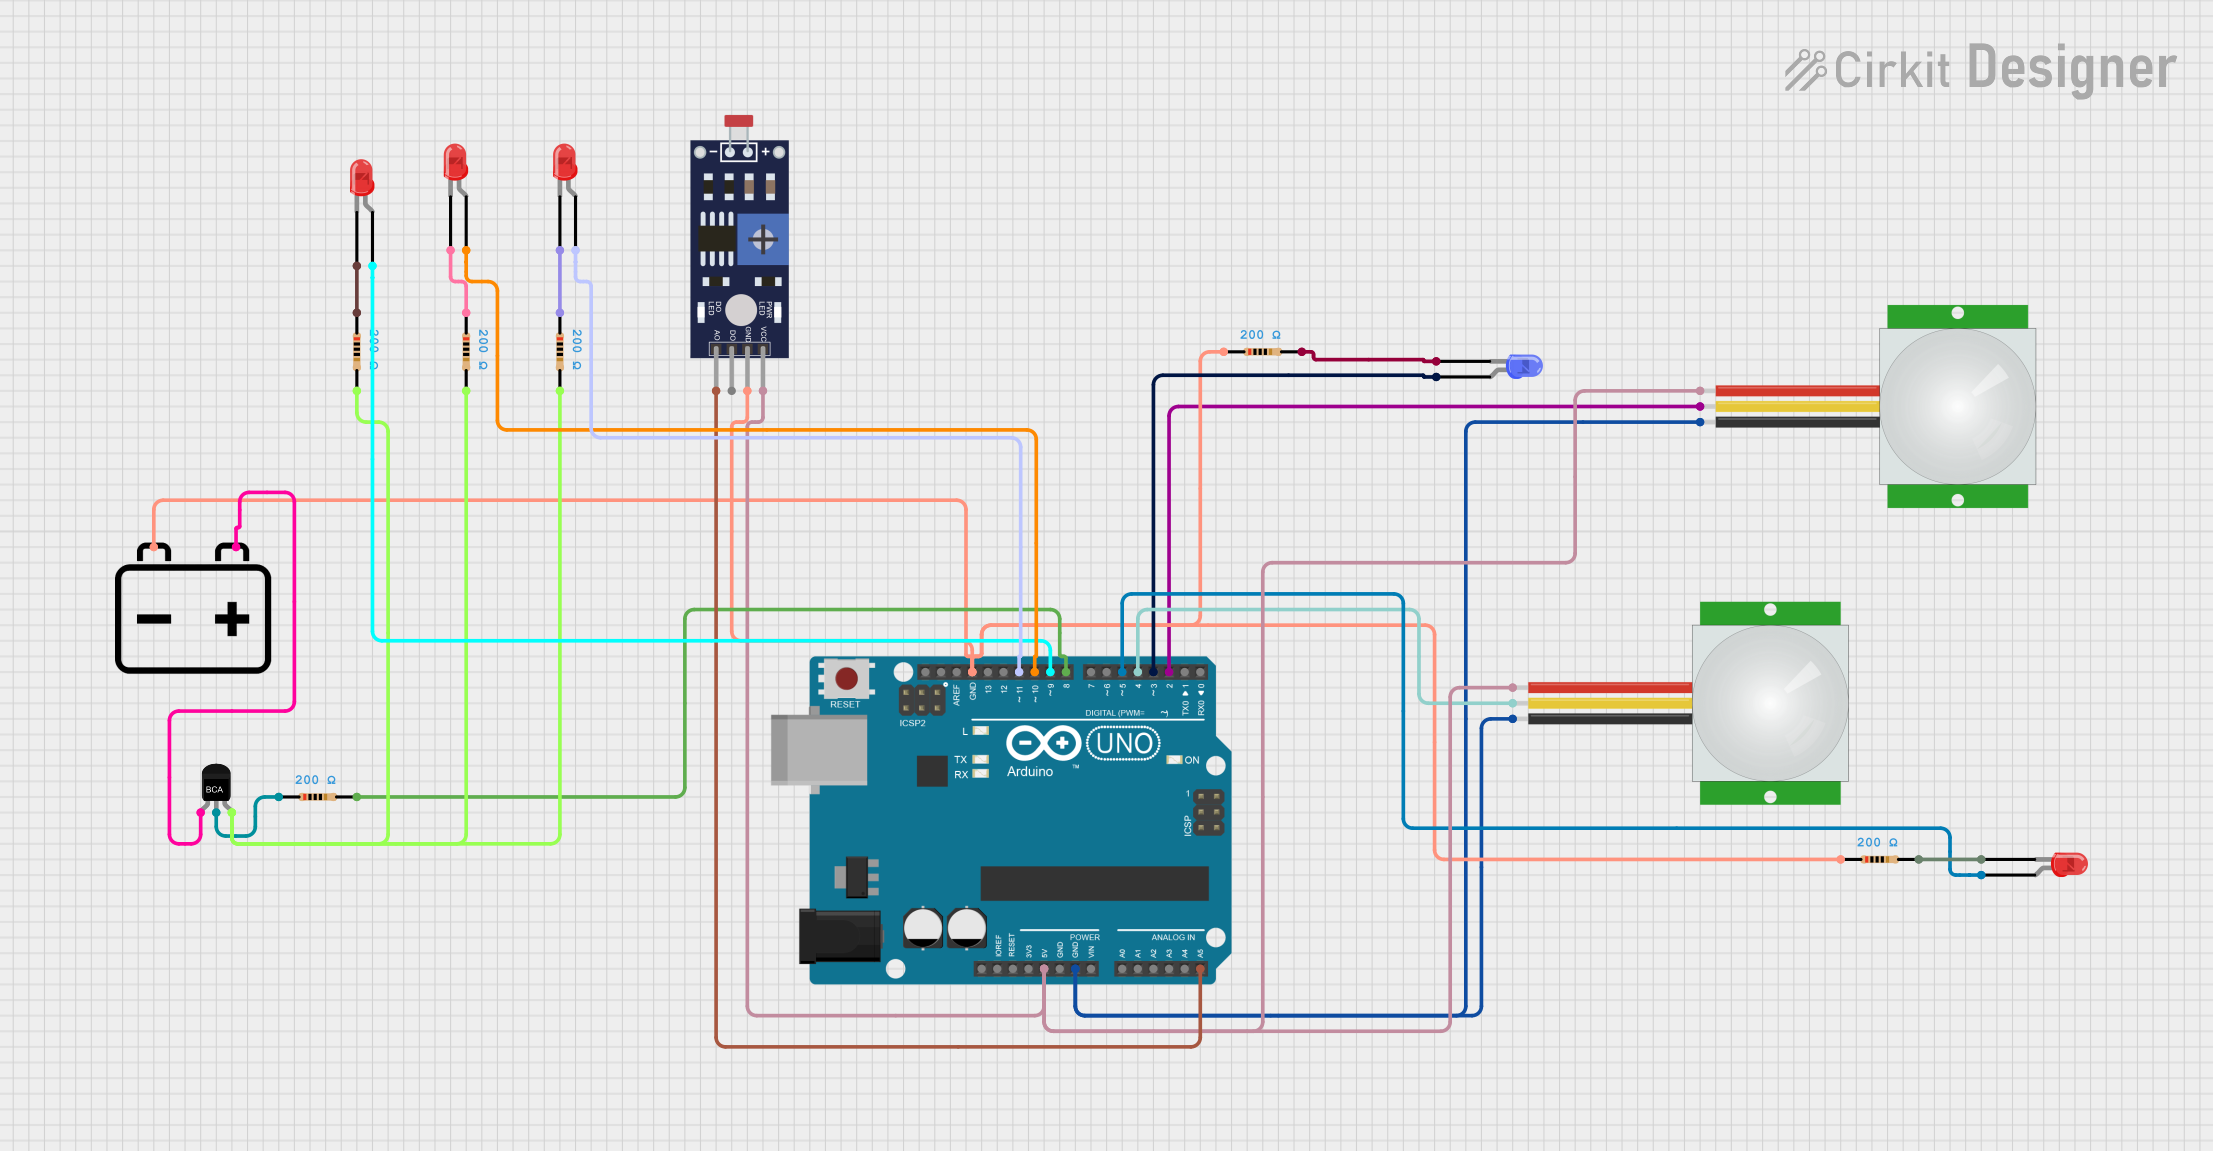
Street Light Control Project Documentation
Summary
This project is a street light control system that uses an LDR (Light Dependent Resistor) sensor to determine day or night and PIR (Passive Infrared) sensors to detect motion. The system controls multiple LEDs to simulate street lights. During the night, three LEDs are turned on via a transistor switch, and an additional LED is turned on when motion is detected.
Component List
Arduino UNO
- Description: Microcontroller board based on the ATmega328P.
- Pins: UNUSED, IOREF, Reset, 3.3V, 5V, GND, Vin, A0, A1, A2, A3, A4, A5, SCL, SDA, AREF, D13, D12, D11, D10, D9, D8, D7, D6, D5, D4, D3, D2, D1, D0
PIR Sensor
- Description: Passive Infrared sensor for motion detection.
- Pins: VDD, SIG, GND
LED: Two Pin (red)
- Description: Red LED with two pins.
- Pins: cathode, anode
LED: Two Pin (blue)
- Description: Blue LED with two pins.
- Pins: cathode, anode
Resistor
- Description: Resistor with a resistance of 200 Ohms.
- Pins: pin1, pin2
12V Battery
- Description: Power source for the circuit.
- Pins: -, +
NPN-Transistor
- Description: NPN transistor for switching.
- Pins: E, C, B
Photoresistor (LDR) Sensor (Wokwi Compatible)
- Description: Light Dependent Resistor sensor for detecting light levels.
- Pins: VCC, GND, DO, AO
Wiring Details
Arduino UNO
5V connected to:
- VCC of Photoresistor (LDR) Sensor
- VDD of PIR Sensor 1
- VDD of PIR Sensor 2
GND connected to:
- GND of PIR Sensor 1
- GND of PIR Sensor 2
- GND of Photoresistor (LDR) Sensor
- pin1 of Resistor 1
- pin1 of Resistor 2
A5 connected to:
- AO of Photoresistor (LDR) Sensor
D11 connected to:
- anode of Red LED 1
D10 connected to:
- anode of Red LED 2
D9 connected to:
- anode of Red LED 3
D8 connected to:
- pin2 of Resistor 3
D5 connected to:
- anode of Red LED 4
D4 connected to:
- SIG of PIR Sensor 1
D3 connected to:
- anode of Blue LED
D2 connected to:
- SIG of PIR Sensor 2
PIR Sensor 1
VDD connected to:
- 5V of Arduino UNO
GND connected to:
- GND of Arduino UNO
SIG connected to:
- D4 of Arduino UNO
PIR Sensor 2
VDD connected to:
- 5V of Arduino UNO
GND connected to:
- GND of Arduino UNO
SIG connected to:
- D2 of Arduino UNO
Red LED 1
anode connected to:
- D11 of Arduino UNO
cathode connected to:
- pin1 of Resistor 4
Red LED 2
anode connected to:
- D10 of Arduino UNO
cathode connected to:
- pin1 of Resistor 5
Red LED 3
anode connected to:
- D9 of Arduino UNO
cathode connected to:
- pin1 of Resistor 6
Red LED 4
anode connected to:
- D5 of Arduino UNO
cathode connected to:
- pin2 of Resistor 2
Blue LED
anode connected to:
- D3 of Arduino UNO
cathode connected to:
- pin2 of Resistor 1
Resistor 1
pin1 connected to:
- GND of Arduino UNO
pin2 connected to:
- cathode of Blue LED
Resistor 2
pin1 connected to:
- GND of Arduino UNO
pin2 connected to:
- cathode of Red LED 4
Resistor 3
pin1 connected to:
- GND of Arduino UNO
pin2 connected to:
- D8 of Arduino UNO
Resistor 4
pin1 connected to:
- cathode of Red LED 1
pin2 connected to:
- GND of Arduino UNO
Resistor 5
pin1 connected to:
- cathode of Red LED 2
pin2 connected to:
- GND of Arduino UNO
Resistor 6
pin1 connected to:
- cathode of Red LED 3
pin2 connected to:
- GND of Arduino UNO
12V Battery
+ connected to:
- E of NPN-Transistor
- connected to:
- GND of Arduino UNO
- GND of Photoresistor (LDR) Sensor
- pin1 of Resistor 1
- pin1 of Resistor 2
NPN-Transistor
E connected to:
-
- of 12V Battery
-
C connected to:
- pin1 of Resistor 3
B connected to:
- pin2 of Resistor 5
- pin2 of Resistor 6
- pin2 of Resistor 4
Photoresistor (LDR) Sensor
VCC connected to:
- 5V of Arduino UNO
GND connected to:
- GND of Arduino UNO
-
- of 12V Battery
AO connected to:
- A5 of Arduino UNO
Code Documentation
/*
 * Street Light Control Project
 * This code controls street lights based on LDR and PIR sensors.
 * - LDR sensor determines day/night.
 * - At night, three LEDs are turned on via a transistor switch.
 * - PIR sensor detects motion to turn on an additional LED.
 */

const int ldrPin = A5; // LDR sensor pin
const int pirPin1 = 2; // PIR sensor 1 pin
const int pirPin2 = 4; // PIR sensor 2 pin
const int ledPin1 = 8; // LED controlled by transistor
const int ledPin2 = 9; // LED controlled by transistor
const int ledPin3 = 10; // LED controlled by transistor
const int motionLedPin = 3; // LED for motion detection

void setup() {
  pinMode(ldrPin, INPUT);
  pinMode(pirPin1, INPUT);
  pinMode(pirPin2, INPUT);
  pinMode(ledPin1, OUTPUT);
  pinMode(ledPin2, OUTPUT);
  pinMode(ledPin3, OUTPUT);
  pinMode(motionLedPin, OUTPUT);
  digitalWrite(ledPin1, LOW);
  digitalWrite(ledPin2, LOW);
  digitalWrite(ledPin3, LOW);
  digitalWrite(motionLedPin, LOW);
}

void loop() {
  int ldrValue = analogRead(ldrPin);
  int pirValue1 = digitalRead(pirPin1);
  int pirValue2 = digitalRead(pirPin2);

  // Check if it is night time
  if (ldrValue < 500) { // Adjust threshold as needed
    digitalWrite(ledPin1, HIGH);
    digitalWrite(ledPin2, HIGH);
    digitalWrite(ledPin3, HIGH);
  } else {
    digitalWrite(ledPin1, LOW);
    digitalWrite(ledPin2, LOW);
    digitalWrite(ledPin3, LOW);
  }

  // Check for motion detection
  if (pirValue1 == HIGH || pirValue2 == HIGH) {
    digitalWrite(motionLedPin, HIGH);
  } else {
    digitalWrite(motionLedPin, LOW);
  }

  delay(100); // Small delay to debounce sensors
}
This code initializes the pins for the LDR sensor, PIR sensors, and LEDs. In the loop function, it reads the LDR value to determine if it is night time and