
ESP8266 NodeMCU Controlled Smart Irrigation System with I2C LCD Display
View and Edit Project In Cirkit Designer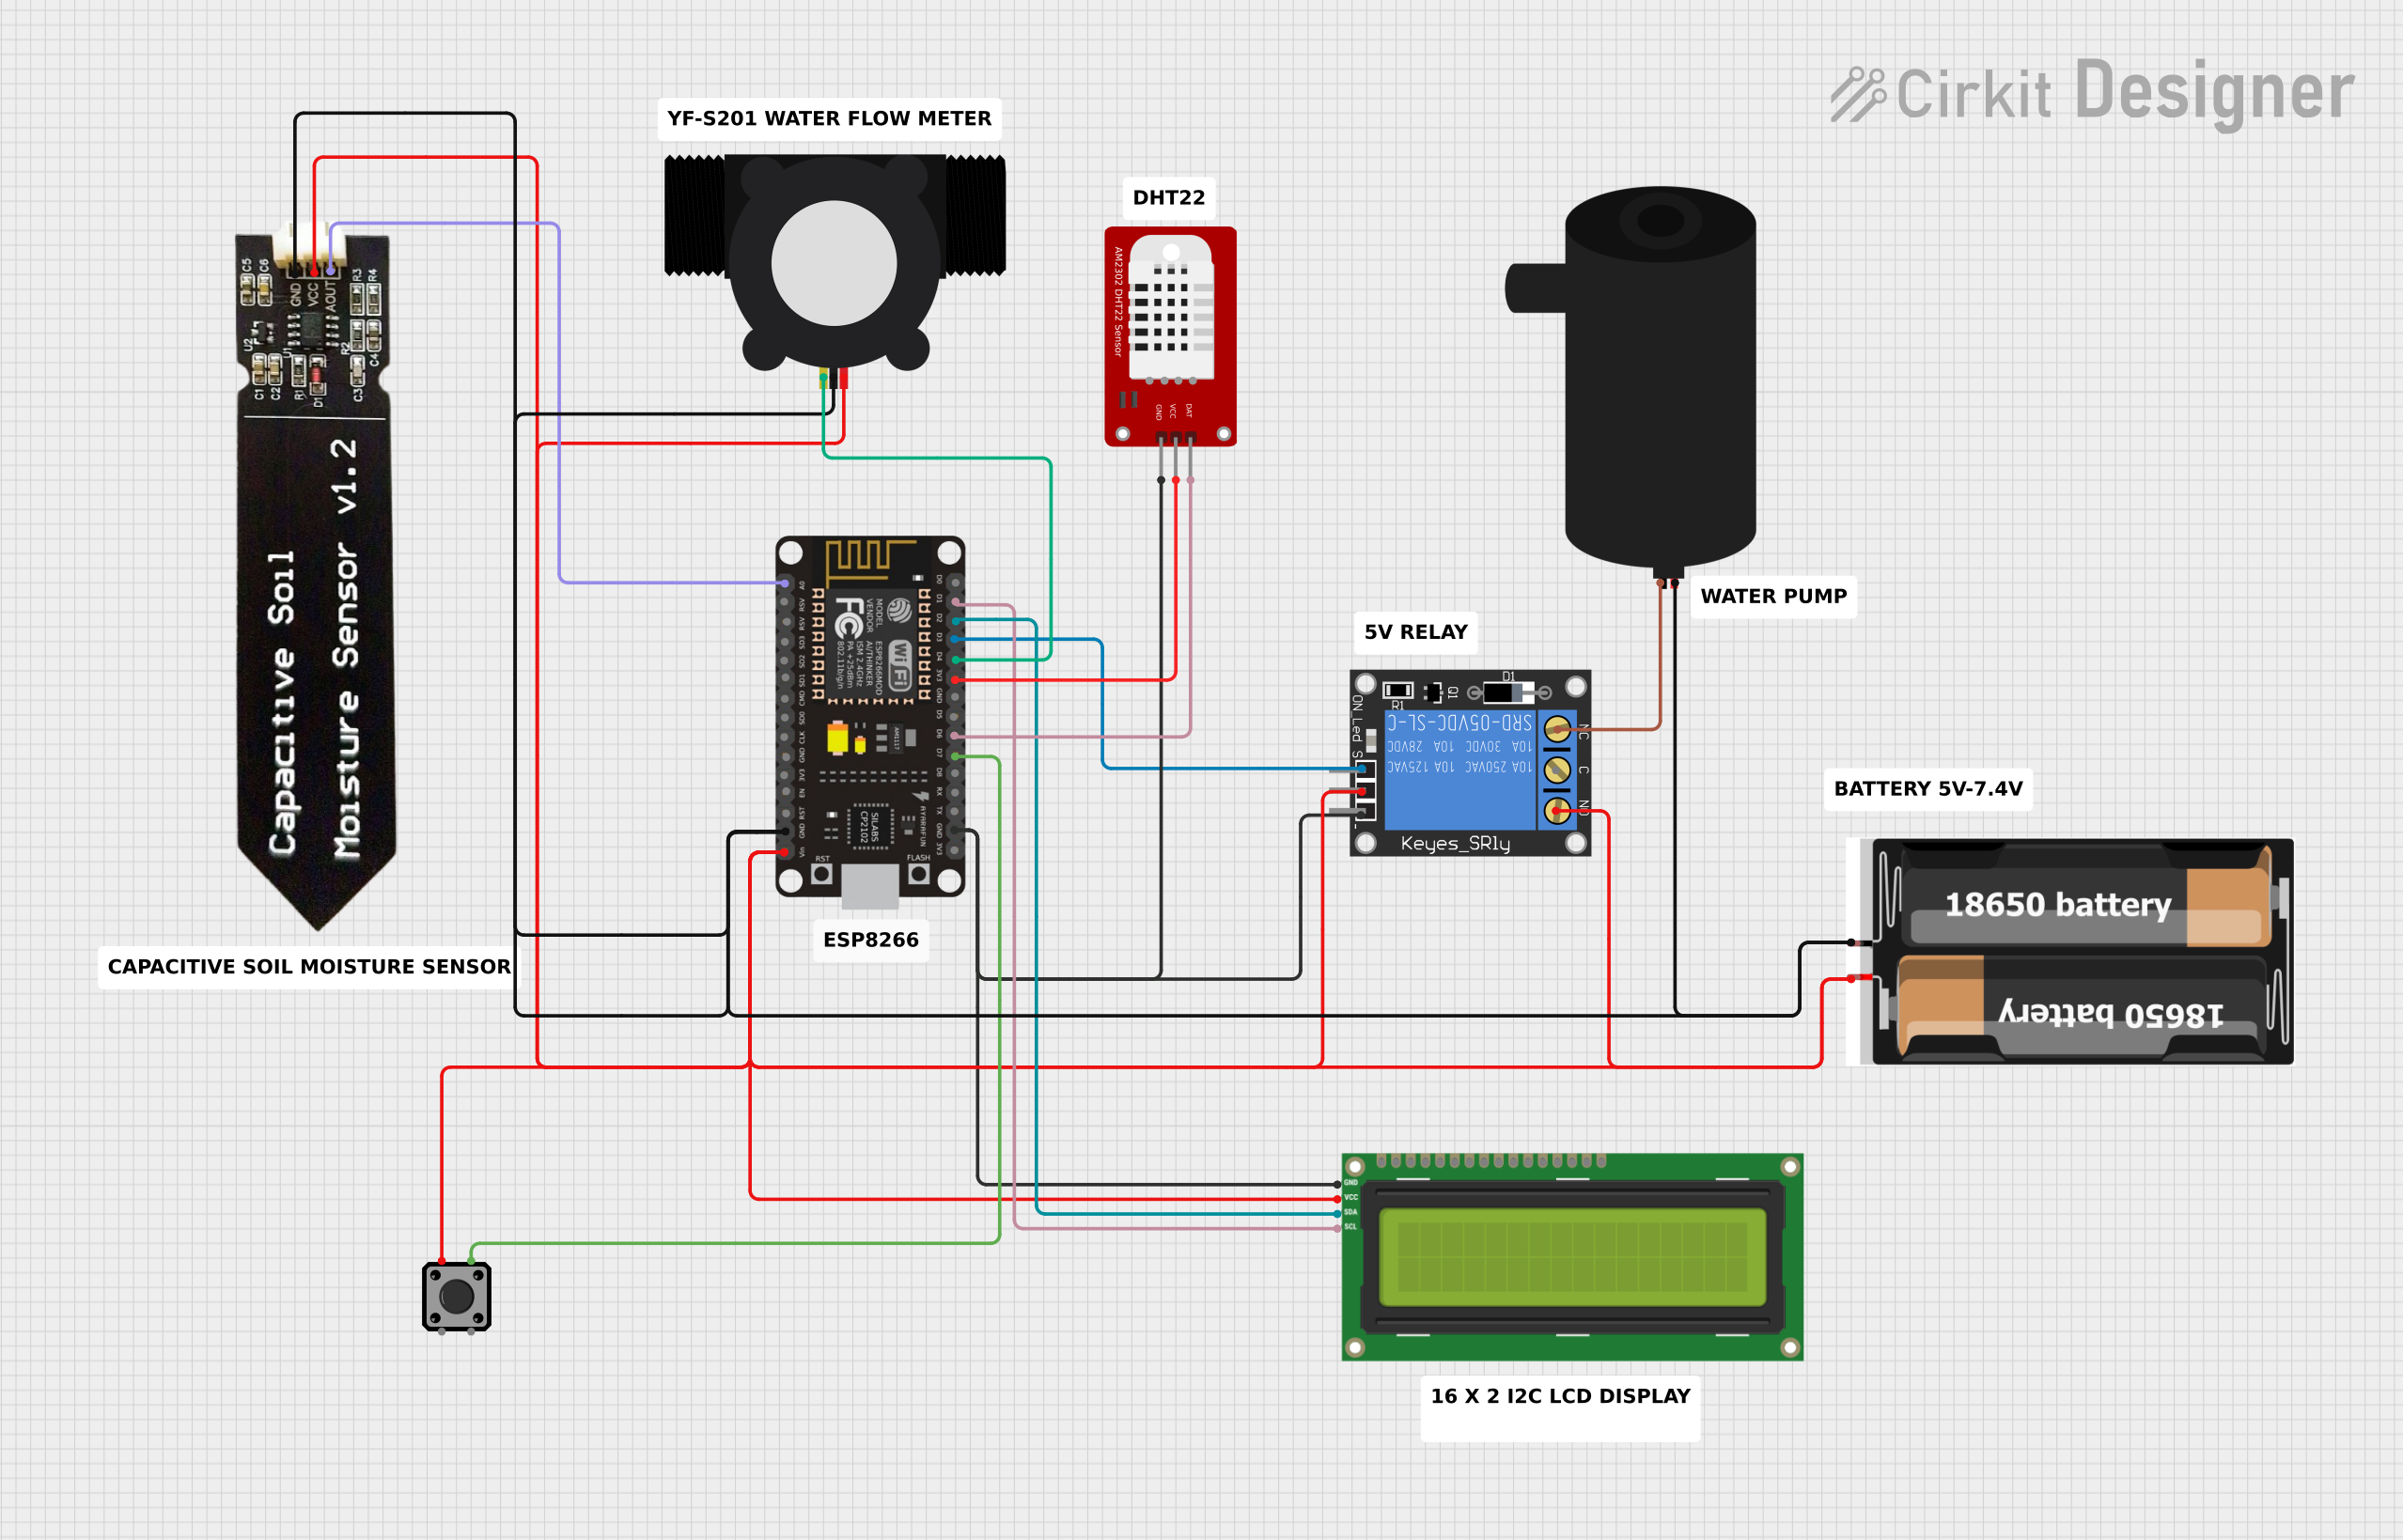
Smart Irrigation System Documentation
Summary
The Smart Irrigation System is designed to automate the watering process for precision farming. It utilizes an ESP8266 NodeMCU microcontroller to monitor soil moisture and ambient temperature/humidity levels. The system displays the sensor data on an I2C LCD screen and controls a water pump through a 1-Channel Relay based on the soil moisture readings. A tactile switch button is included for manual override of the pump. The system is powered by a 2x 18650 battery pack.
Component List
1-Channel Relay (5V 10A)
- Description: A relay module that can be used to control high power devices.
- Purpose: To control the water pump based on the microcontroller's signal.
2x 18650 Battery Pack
- Description: A battery pack providing power to the system.
- Purpose: To supply power to the microcontroller and other components.
I2C LCD 16x2 Screen
- Description: A 16x2 character LCD display with an I2C interface.
- Purpose: To display temperature, humidity, and soil moisture data.
Tactile Switch Buttons - 12mm Square
- Description: A simple push-button switch for user input.
- Purpose: To provide a manual override for the water pump.
Water Pump
- Description: An electric pump for moving water.
- Purpose: To irrigate the soil when activated by the relay.
DHT22
- Description: A sensor for measuring temperature and humidity.
- Purpose: To monitor the ambient temperature and humidity levels.
Capacitive Soil Moisture Sensor V1.2
- Description: A sensor for measuring the moisture content in the soil.
- Purpose: To determine when the soil requires watering.
ESP8266 NodeMCU
- Description: A microcontroller board with Wi-Fi capabilities.
- Purpose: To control the system, read sensor data, and drive the LCD and relay.
YF-S201 Water Flow Meter
- Description: A sensor for measuring the flow rate of water.
- Purpose: To monitor the amount of water being dispensed during irrigation.
Wiring Details
1-Channel Relay (5V 10A)
- Signal: Connected to ESP8266 NodeMCU D3
- Power: Connected to 2x 18650 battery pack VCC
- Ground: Connected to ESP8266 NodeMCU GND
- Normally Open (NO): Connected to water pump positive
- Normally Closed (NC): Not connected
2x 18650 Battery Pack
- VCC: Connected to ESP8266 NodeMCU VIN, I2C LCD VCC, Capacitive Soil Moisture Sensor VCC, and YF-S201 Water Flow Meter VCC
- GND: Connected to ESP8266 NodeMCU GND, I2C LCD GND, Capacitive Soil Moisture Sensor GND, and YF-S201 Water Flow Meter GND
I2C LCD 16x2 Screen
- SCL: Connected to ESP8266 NodeMCU D1
- SDA: Connected to ESP8266 NodeMCU D2
- VCC (5V): Connected to 2x 18650 battery pack VCC
- GND: Connected to ESP8266 NodeMCU GND
Tactile Switch Buttons - 12mm Square
- Pin 1: Connected to 1-Channel Relay (5V 10A) NO
- Pin 2: Connected to ESP8266 NodeMCU D7
Water Pump
- Positive: Connected to 1-Channel Relay (5V 10A) NO
- Negative: Not connected
DHT22
- VCC: Connected to ESP8266 NodeMCU 3V3
- DAT: Connected to ESP8266 NodeMCU D6
- GND: Connected to ESP8266 NodeMCU GND
Capacitive Soil Moisture Sensor V1.2
- VCC: Connected to 2x 18650 battery pack VCC
- AOUT: Connected to ESP8266 NodeMCU A0
- GND: Connected to ESP8266 NodeMCU GND
ESP8266 NodeMCU
- D1 (SCL): Connected to I2C LCD SCL
- D2 (SDA): Connected to I2C LCD SDA
- D3: Connected to 1-Channel Relay signal
- D4: Connected to YF-S201 Water Flow Meter SIG
- D6: Connected to DHT22 DAT
- D7: Connected to Tactile Switch Button pin 2
- 3V3: Connected to DHT22 VCC
- GND: Common ground for all components
- A0: Connected to Capacitive Soil Moisture Sensor AOUT
- VIN: Connected to 2x 18650 battery pack VCC
YF-S201 Water Flow Meter
- SIG: Connected to ESP8266 NodeMCU D4
- VCC: Connected to 2x 18650 battery pack VCC
- GND: Connected to ESP8266 NodeMCU GND
Documented Code
/*
 * Smart Irrigation System for Precision Farming
 * This code controls a smart irrigation system using an ESP8266 NodeMCU.
 * It reads soil moisture and temperature/humidity data, displays information
 * on an I2C LCD, and controls a water pump via a relay based on sensor data.
 */

#include <Wire.h>
#include <LiquidCrystal_I2C.h>
#include <DHT.h>

// Pin definitions
#define DHTPIN D6
#define DHTTYPE DHT22
#define RELAY_PIN D3
#define BUTTON_PIN D7
#define SOIL_MOISTURE_PIN A0

// I2C LCD setup
LiquidCrystal_I2C lcd(0x27, 16, 2);

// DHT sensor setup
DHT dht(DHTPIN, DHTTYPE);

void setup() {
  // Initialize serial communication
  Serial.begin(115200);

  // Initialize LCD
  lcd.begin();
  lcd.backlight();

  // Initialize DHT sensor
  dht.begin();

  // Initialize relay and button pins
  pinMode(RELAY_PIN, OUTPUT);
  pinMode(BUTTON_PIN, INPUT_PULLUP);

  // Initialize soil moisture sensor pin
  pinMode(SOIL_MOISTURE_PIN, INPUT);

  // Initial state of relay
  digitalWrite(RELAY_PIN, LOW);
}

void loop() {
  // Read soil moisture level
  int soilMoistureValue = analogRead(SOIL_MOISTURE_PIN);
  float soilMoisturePercent = map(soilMoistureValue, 0, 1023, 100, 0);

  // Read temperature and humidity
  float h = dht.readHumidity();
  float t = dht.readTemperature();

  // Check if any reads failed
  if (isnan(h) || isnan(t)) {
    Serial.println("Failed to read from DHT sensor!");
    return;
  }

  // Display data on LCD
  lcd.setCursor(0, 0);
  lcd.print("Temp: ");
  lcd.print(t);
  lcd.print(" C");
  lcd.setCursor(0, 1);
  lcd.print("Humidity: ");
  lcd.print(h);
  lcd.print(" %");

  // Print soil moisture to serial monitor
  Serial.print("Soil Moisture: ");
  Serial.print(soilMoisturePercent);
  Serial.println(" %");

  // Control relay based on soil moisture
  if (soilMoisturePercent < 30) {
    digitalWrite(RELAY_PIN, HIGH); // Turn on water pump
  } else {
    digitalWrite(RELAY_PIN, LOW); // Turn off water pump
  }

  // Check if button is pressed
  if (digitalRead(BUTTON_PIN) == LOW) {
    // Manual override to turn on water pump
    digitalWrite(RELAY_PIN, HIGH);
  }

  // Wait before next loop
  delay(2000);
}
This code is responsible for the operation of the Smart Irrigation System. It initializes the sensors and LCD, reads sensor data, displays the data, and controls the water pump based on soil moisture levels. It also provides a manual override function through a button press.