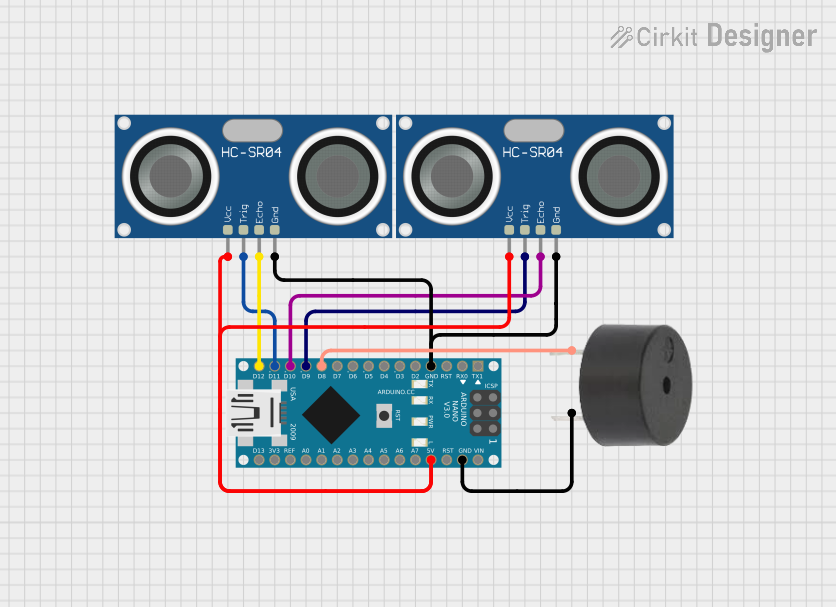
Arduino Nano Controlled Dual HC-SR04 Ultrasonic Sensors with Buzzer Alert System

Circuit Documentation
Summary of the Circuit
This circuit integrates an Arduino Nano microcontroller with two HC-SR04 Ultrasonic Sensors and a buzzer. The Arduino Nano serves as the central processing unit, controlling the ultrasonic sensors to measure distances and triggering the buzzer based on certain conditions. The ultrasonic sensors are used for distance measurement by emitting ultrasonic waves and receiving the echo. The buzzer is used as an output device to provide an audible alert.
Component List
Arduino Nano
- Microcontroller board based on the ATmega328P
- It has a variety of digital and analog I/O pins
- Can be powered via USB or an external power supply
HC-SR04 Ultrasonic Sensor (x2)
- Ultrasonic distance measuring module
- Operates on a 5V power supply
- Has
TRIGandECHOpins for triggering distance measurement and receiving the reflected signal
Buzzer
- An electromechanical component that produces sound
- Typically requires a digital signal to operate
Wiring Details
Arduino Nano
GNDconnected to the ground pins of both HC-SR04 Ultrasonic Sensors and the buzzerD8connected to the buzzer's signal pinD9connected to theTRIGpin of the first HC-SR04 Ultrasonic SensorD10connected to theECHOpin of the first HC-SR04 Ultrasonic SensorD11/MOSIconnected to theTRIGpin of the second HC-SR04 Ultrasonic SensorD12/MISOconnected to theECHOpin of the second HC-SR04 Ultrasonic Sensor5Vconnected to theVCCpins of both HC-SR04 Ultrasonic Sensors
HC-SR04 Ultrasonic Sensor
VCCconnected to the 5V output from the Arduino NanoGNDconnected to the ground on the Arduino NanoTRIGandECHOpins connected to specified digital pins on the Arduino Nano for triggering and receiving
Buzzer
PINconnected to digital pinD8on the Arduino NanoGNDconnected to the ground on the Arduino Nano
Documented Code
void setup() {
  // put your setup code here, to run once:

}

void loop() {
  // put your main code here, to run repeatedly:

}
The provided code is a template with empty setup() and loop() functions. The setup() function is intended for initialization code that runs once at the start, while the loop() function contains code that runs repeatedly, forming the main logic of the microcontroller's program. Specific functionality for interacting with the HC-SR04 Ultrasonic Sensors and the buzzer should be implemented within these functions.