
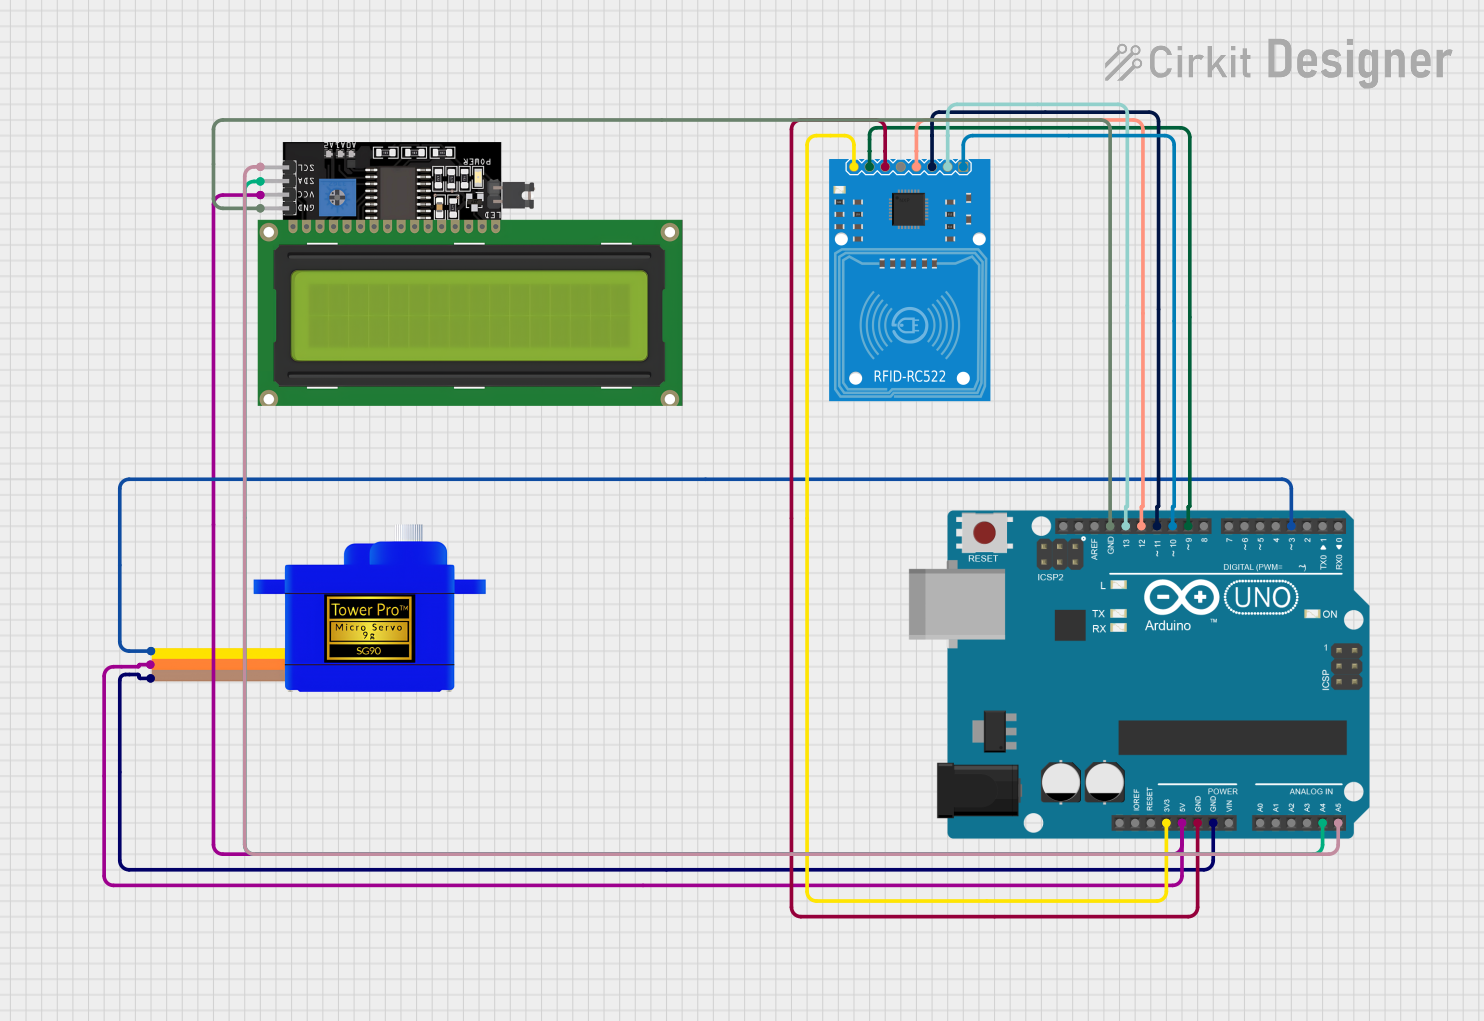
Smart Door Lock System Documentation
Summary
The Smart Door Lock System is designed to control access through a door using RFID technology. The system comprises an Arduino UNO microcontroller, an RFID-RC522 reader, a Servomotor SG90, and an LCD Display 16x4 with I2C interface. The RFID reader scans tags and communicates with the Arduino to validate entry. Upon successful validation, the Arduino commands the servo motor to unlock the door, and the LCD display shows a welcome message. If the tag is not authorized, the LCD will display an access denied message.
Component List
Arduino UNO
- Microcontroller board based on the ATmega328P
- It has 14 digital input/output pins, 6 analog inputs, a 16 MHz quartz crystal, a USB connection, a power jack, an ICSP header, and a reset button.
RFID-RC522
- An RFID reader/writer module that operates at 13.56 MHz
- It interfaces with the Arduino through SPI and has pins for power, ground, reset, and SPI communication.
Servomotor SG90
- A small and lightweight servo motor suitable for projects requiring simple motion.
- It has three pins for control signal, power, and ground.
LCD Display 16x4 I2C
- An alphanumeric liquid crystal display with 16 characters per line and 4 lines.
- It uses the I2C bus for communication, reducing the number of pins required for interfacing with the Arduino.
Wiring Details
Arduino UNO
3.3Vconnected to RFID-RC5223.3V5Vconnected to LCD DisplayVCCand Servomotor SG90VCCGNDconnected to RFID-RC522GND, Servomotor SG90GND, and LCD DisplayGNDA4 (SDA)connected to LCD DisplaySDAA5 (SCL)connected to LCD DisplaySCLD13 (SCK)connected to RFID-RC522SCKD12 (MISO)connected to RFID-RC522MISOD11 (MOSI)connected to RFID-RC522MOSID10 (SS)connected to RFID-RC522SDAD9 (RST_PIN)connected to RFID-RC522RSTD3 (SERVO_PIN)connected to Servomotor SG90SIG
RFID-RC522
3.3VandGNDfor power supplyRST,SDA,SCK,MOSI,MISOfor SPI communication with Arduino UNO
Servomotor SG90
SIGconnected to Arduino UNOD3VCCconnected to Arduino UNO5VGNDconnected to Arduino UNOGND
LCD Display 16x4 I2C
SDAandSCLfor I2C communication with Arduino UNOVCCconnected to Arduino UNO5VGNDconnected to Arduino UNOGND
Documented Code
/*
 * Smart Door Lock Project
 * This Arduino sketch controls a smart door lock system using an RFID reader,
 * a servo motor, and an LCD display. The RFID reader reads tags, and if the
 * tag is authorized, the servo motor unlocks the door and the LCD displays
 * a welcome message.
 */

#include <SPI.h>
#include <MFRC522.h>
#include <Wire.h>
#include <LiquidCrystal_I2C.h>
#include <Servo.h>

#define SS_PIN 10
#define RST_PIN 9
#define SERVO_PIN 3
#define LCD_ADDR 0x27
#define LCD_COLS 16
#define LCD_ROWS 4

MFRC522 rfid(SS_PIN, RST_PIN);
Servo myServo;
LiquidCrystal_I2C lcd(LCD_ADDR, LCD_COLS, LCD_ROWS);

void setup() {
  Serial.begin(9600);
  SPI.begin();
  rfid.PCD_Init();
  myServo.attach(SERVO_PIN);
  myServo.write(0); // Lock position
  lcd.begin();
  lcd.backlight();
  lcd.setCursor(0, 0);
  lcd.print("Scan your card");
}

void loop() {
  if (!rfid.PICC_IsNewCardPresent() || !rfid.PICC_ReadCardSerial()) {
    return;
  }
  String uid = "";
  for (byte i = 0; i < rfid.uid.size; i++) {
    uid += String(rfid.uid.uidByte[i] < 0x10 ? "0" : "");
    uid += String(rfid.uid.uidByte[i], HEX);
  }
  uid.toUpperCase();
  Serial.println(uid);
  if (uid == "YOUR_AUTHORIZED_UID") {
    lcd.clear();
    lcd.setCursor(0, 0);
    lcd.print("Access Granted");
    myServo.write(90); // Unlock position
    delay(5000); // Keep unlocked for 5 seconds
    myServo.write(0); // Lock position
    lcd.clear();
    lcd.setCursor(0, 0);
    lcd.print("Scan your card");
  } else {
    lcd.clear();
    lcd.setCursor(0, 0);
    lcd.print("Access Denied");
    delay(2000);
    lcd.clear();
    lcd.setCursor(0, 0);
    lcd.print("Scan your card");
  }
  rfid.PICC_HaltA();
  rfid.PCD_StopCrypto1();
}
This code is responsible for initializing the components, reading RFID tags, controlling the servo motor, and updating the LCD display based on the tag's authorization status.