
Circuit Documentation
Summary of the Circuit
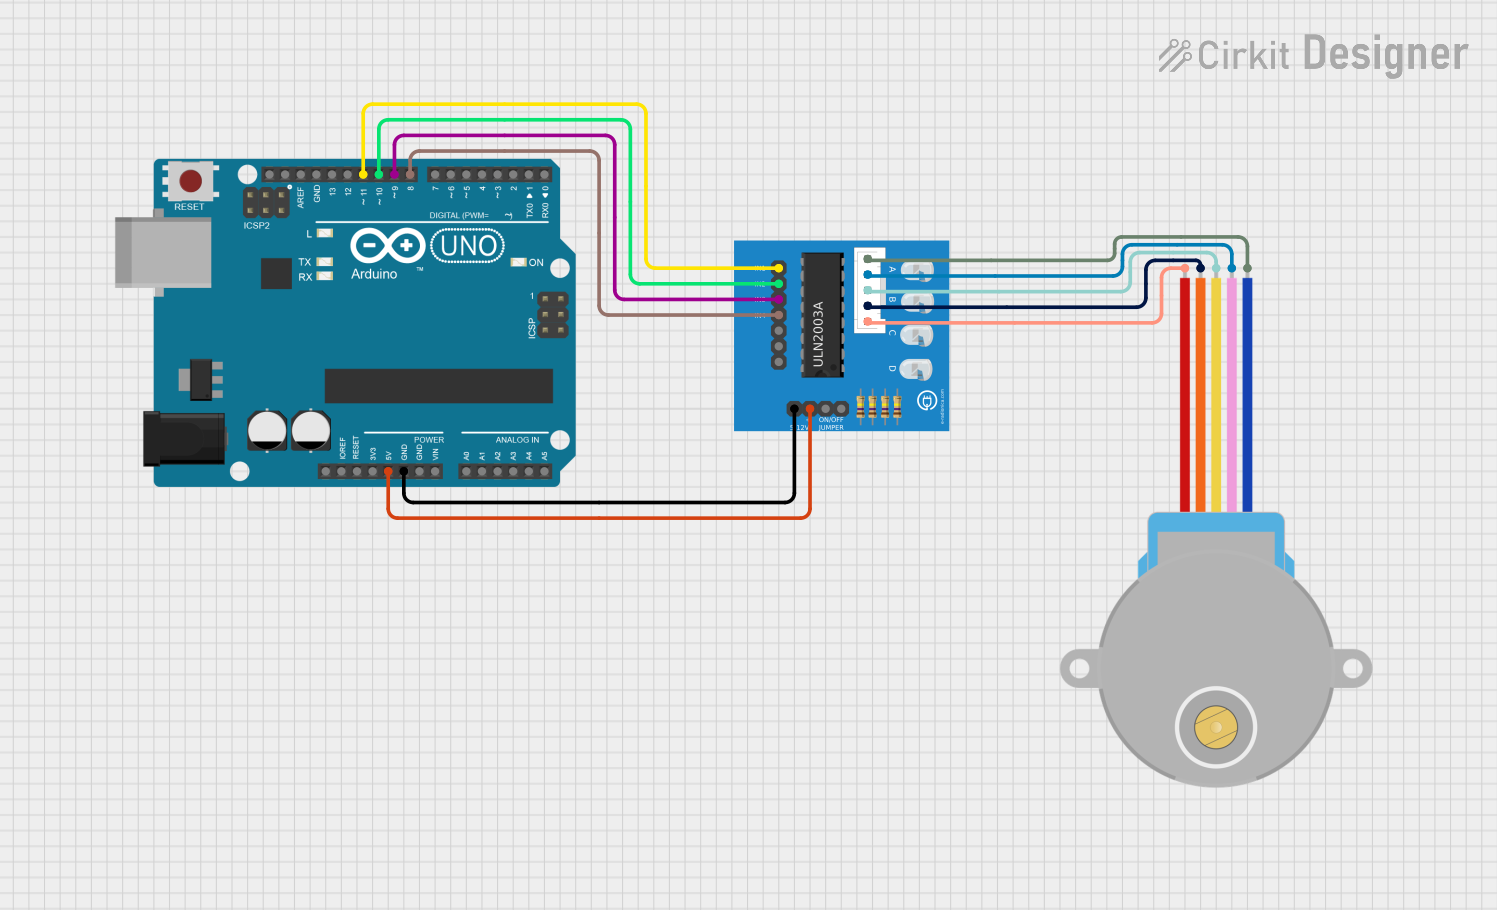
This circuit is designed to control a 28BYJ-48 Stepper Motor using an Arduino UNO microcontroller and a ULN2003A breakout board. The Arduino UNO interfaces with the ULN2003A driver to provide control signals for the stepper motor. The ULN2003A amplifies the control signals from the Arduino and drives the stepper motor accordingly. The circuit is powered by the Arduino's 5V output, which is also supplied to the ULN2003A breakout board.
Component List
Arduino UNO
- Description: A microcontroller board based on the ATmega328P.
- Pins Used: IOREF, Reset, 3.3V, 5V, GND, Vin, A0-A5, SCL, SDA, AREF, D0-D13.
ULN2003A Breakout Board
- Description: A breakout board for the ULN2003A Darlington transistor array, used for driving high-current loads.
- Pins Used: In 1-7, 0V, +5V, ON/OFF jumper switch, BLUE wire, PINK wire, YELLOW wire, ORANGE wire, RED wire.
28BYJ-48 Stepper Motor
- Description: A small, 5-wire, unipolar stepper motor.
- Pins Used: BLUE, PINK, YELLOW, ORANGE, RED.
Wiring Details
Arduino UNO
- D11: Connected to ULN2003A In 1
- D10: Connected to ULN2003A In 2
- D9: Connected to ULN2003A In 3
- D8: Connected to ULN2003A In 4
- GND: Connected to ULN2003A 0V
- 5V: Connected to ULN2003A +5V
ULN2003A Breakout Board
- In 1: Connected to Arduino UNO D11
- In 2: Connected to Arduino UNO D10
- In 3: Connected to Arduino UNO D9
- In 4: Connected to Arduino UNO D8
- 0V: Connected to Arduino UNO GND
- +5V: Connected to Arduino UNO 5V
- BLUE wire: Connected to Stepper Motor BLUE
- PINK wire: Connected to Stepper Motor PINK
- YELLOW wire: Connected to Stepper Motor YELLOW
- ORANGE wire: Connected to Stepper Motor ORANGE
- RED wire: Connected to Stepper Motor RED
28BYJ-48 Stepper Motor
- BLUE: Connected to ULN2003A BLUE wire
- PINK: Connected to ULN2003A PINK wire
- YELLOW: Connected to ULN2003A YELLOW wire
- ORANGE: Connected to ULN2003A ORANGE wire
- RED: Connected to ULN2003A RED wire
Documented Code
Arduino UNO Code (sketch.ino)
void setup() {
  // put your setup code here, to run once:

}

void loop() {
  // put your main code here, to run repeatedly:

}
Note: The provided code is a template and does not contain any functionality to control the stepper motor. The user should implement the control logic within the setup() and loop() functions.