
Arduino UNO with 433MHz RF Module for Wireless Communication
View and Edit Project In Cirkit Designer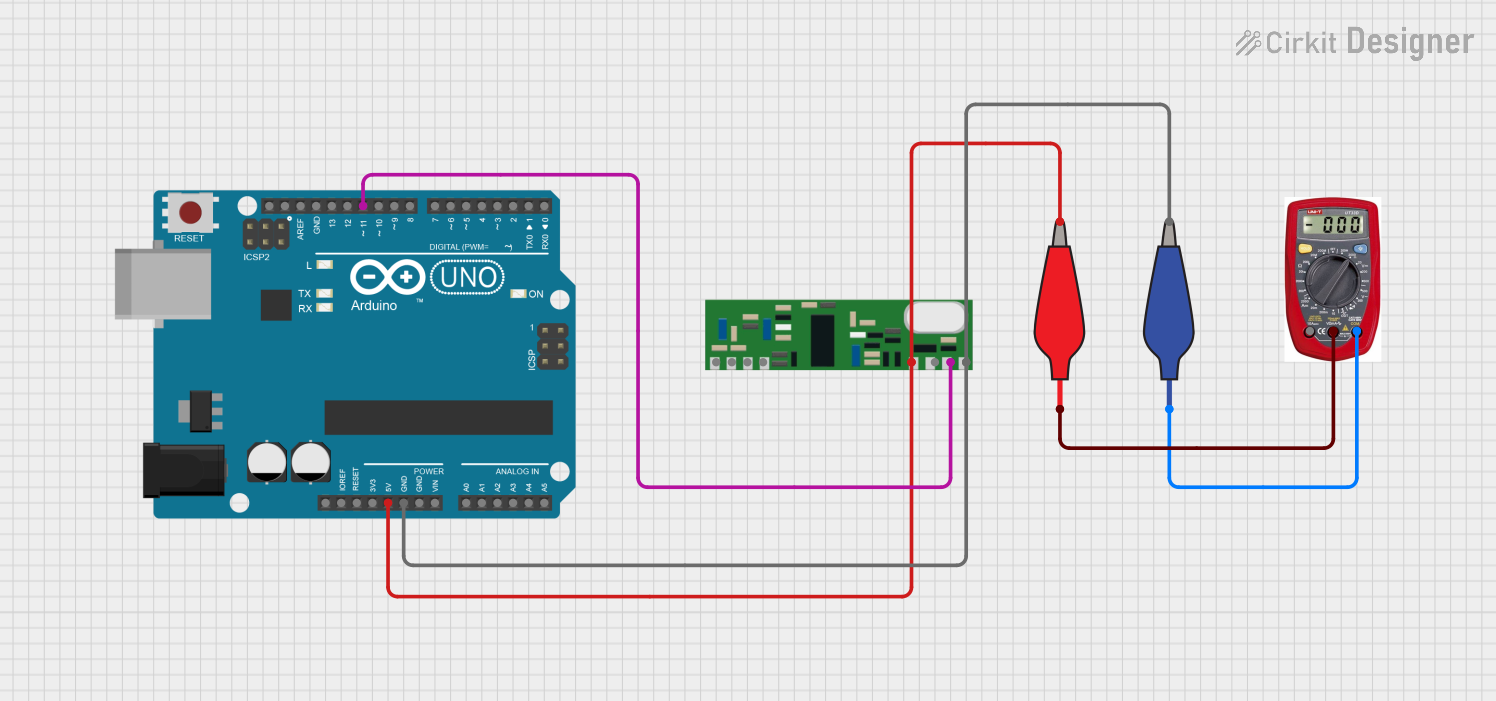
Circuit Documentation
Summary of the Circuit
The circuit described by the provided inputs consists of an Arduino UNO microcontroller, an RXN-433MHz RF module, two alligator clip cables (one red and one blue), and a multimeter. The Arduino UNO is used as the central processing unit, controlling the RXN-433MHz module, which is likely intended for wireless communication. The alligator clip cables are used to make connections between the components and the multimeter, which is used to measure voltage levels in the circuit.
Component List
Arduino UNO
- Description: A microcontroller board based on the ATmega328P.
- Pins: UNUSED, IOREF, Reset, 3.3V, 5V, GND, Vin, A0-A5, SCL, SDA, AREF, D0-D13.
RXN-433MHz RF Module
- Description: A wireless RF module operating at 433MHz.
- Pins: ANT, GND, VCC, NC, DATA.
Alligator Clip Cable (Red)
- Description: A cable with an alligator clip used for making temporary electrical connections.
- Pins: Pin, Alligator.
Alligator Clip Cable (Blue)
- Description: A cable with an alligator clip used for making temporary electrical connections.
- Pins: Pin, Alligator.
Multimeter
- Description: An instrument used to measure electrical properties such as voltage, current, and resistance.
- Pins: COM, V, A.
Wiring Details
Arduino UNO
- 5V connected to RXN-433MHz VCC and red alligator clip cable.
- GND connected to RXN-433MHz GND and blue alligator clip cable.
- D11 connected to RXN-433MHz DATA.
RXN-433MHz RF Module
- VCC connected to Arduino UNO 5V and red alligator clip cable.
- GND connected to Arduino UNO GND and blue alligator clip cable.
- DATA connected to Arduino UNO D11.
Alligator Clip Cable (Red)
- Alligator connected to Arduino UNO 5V and RXN-433MHz VCC.
- Pin connected to multimeter V.
Alligator Clip Cable (Blue)
- Alligator connected to Arduino UNO GND and RXN-433MHz GND.
- Pin connected to multimeter COM.
Multimeter
- V connected to red alligator clip cable Pin.
- COM connected to blue alligator clip cable Pin.
Documented Code
Arduino UNO Code (sketch.ino)
void setup() {
  // put your setup code here, to run once:

}

void loop() {
  // put your main code here, to run repeatedly:

}
Note: The provided code for the Arduino UNO is a template with empty setup and loop functions. This code needs to be populated with instructions to control the RXN-433MHz RF module and to interact with other components in the circuit.