
Circuit Documentation
Summary
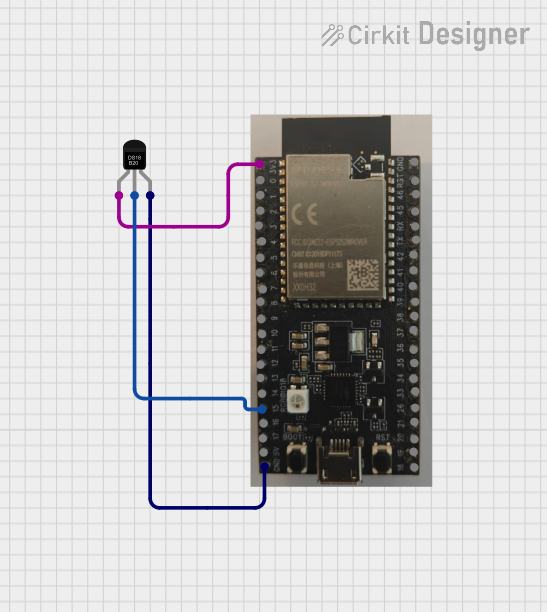
This circuit involves an ESP32-S2-WROVER microcontroller connected to a DS18B20 temperature sensor. The ESP32-S2-WROVER reads temperature data from the DS18B20 sensor and prints it to the Serial Monitor. The DS18B20's data pin (DQ) is connected to GPIO 15 of the ESP32-S2-WROVER, and the sensor is powered by the 3.3V and GND pins of the ESP32-S2-WROVER.
Component List
ESP32-S2-WROVER
- Description: A powerful microcontroller with Wi-Fi and Bluetooth capabilities.
- Pins: 3V3, 0, 1, 2, 3, 4, 5, 6, 7, 8, 9, 10, 11, 12, 13, 14, 15, 16, 17, 5V, GND, 18, 19, 20, 21, 26, 33, 34, 35, 36, 37, 38, 39, 40, 41, 42, TX, RX, 45, 46
DS18B20
- Description: A digital temperature sensor.
- Pins: VDD, DQ, GND
Wiring Details
ESP32-S2-WROVER
- 3V3: Connected to VDD of DS18B20
- GND: Connected to GND of DS18B20
- 15: Connected to DQ of DS18B20
DS18B20
- VDD: Connected to 3V3 of ESP32-S2-WROVER
- GND: Connected to GND of ESP32-S2-WROVER
- DQ: Connected to GPIO 15 of ESP32-S2-WROVER
Code Documentation
/*
 * This Arduino Sketch is designed for an ESP32-S2-WROVER microcontroller
 * connected to a DS18B20 temperature sensor. The DS18B20's data pin (DQ) is
 * connected to GPIO 15 of the ESP32-S2-WROVER. The code reads temperature data
 * from the DS18B20 sensor and prints it to the Serial Monitor.
 */

#include <OneWire.h>
#include <DallasTemperature.h>

// Data wire is connected to GPIO 15
#define ONE_WIRE_BUS 15

// Setup a oneWire instance to communicate with any OneWire devices
OneWire oneWire(ONE_WIRE_BUS);

// Pass our oneWire reference to Dallas Temperature sensor
DallasTemperature sensors(&oneWire);

void setup() {
  // Start serial communication
  Serial.begin(115200);
  // Start up the library
  sensors.begin();
}

void loop() {
  // Request temperature readings
  sensors.requestTemperatures();
  // Fetch and print temperature in Celsius
  float temperatureC = sensors.getTempCByIndex(0);
  Serial.print("Temperature: ");
  Serial.print(temperatureC);
  Serial.println(" °C");
  // Wait 1 second before repeating
  delay(1000);
}
This code initializes the OneWire and DallasTemperature libraries to communicate with the DS18B20 sensor. It sets up serial communication and continuously reads and prints the temperature data from the sensor every second.