
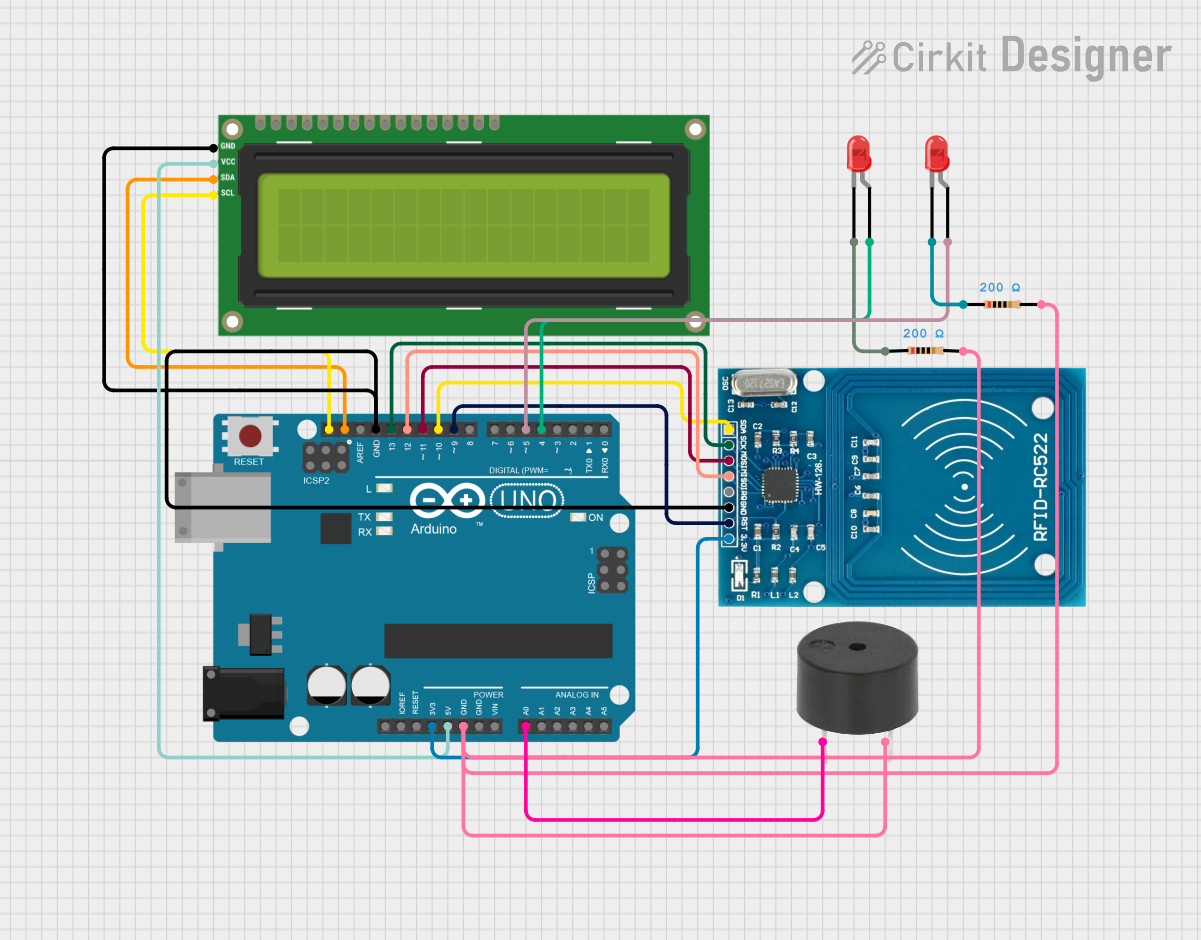
Circuit Documentation
Summary
The circuit consists of an Arduino UNO microcontroller interfaced with an I2C LCD 16x2 screen, an RFID-RC522 module, two red LEDs, two resistors, and a buzzer. The Arduino UNO serves as the central processing unit, controlling the LCD screen for display, the RFID module for reading RFID tags, and managing the LEDs and buzzer for output indications. The I2C protocol is used for communication between the Arduino and the LCD screen, while the RFID module communicates with the Arduino via SPI. The LEDs and buzzer are connected to the Arduino's digital pins and are used to provide visual and auditory feedback.
Component List
I2C LCD 16x2 Screen
- Description: A 16x2 character LCD display with an I2C interface.
- Pins: SCL, SDA, VCC (5V), GND, VDD, VO, RS, RW, E, D0-D7, BLA, BLK
RFID-RC522
- Description: An RFID reader/writer module using the RC522 IC, operating at 13.56 MHz.
- Pins: VCC (3.3V), RST, GND, IRQ, MISO, MOSI, SCK, SDA
Arduino UNO
- Description: A microcontroller board based on the ATmega328P, with digital and analog I/O pins.
- Pins: UNUSED, IOREF, Reset, 3.3V, 5V, GND, Vin, A0-A5, SCL, SDA, AREF, D0-D13, +, -
Resistor (200 Ohms)
- Description: A passive two-terminal electrical component that implements electrical resistance.
- Resistance: 200 Ohms
LED: Two Pin (red)
- Description: A red light-emitting diode with two pins, anode, and cathode.
Buzzer
- Description: An audio signaling device that can be mechanical, electromechanical, or piezoelectric.
Wiring Details
I2C LCD 16x2 Screen
- SCL connected to Arduino UNO SCL
- SDA connected to Arduino UNO SDA
- VCC (5V) connected to Arduino UNO 5V
- GND connected to Arduino UNO GND
RFID-RC522
- VCC (3.3V) connected to Arduino UNO 3.3V
- RST connected to Arduino UNO D9
- GND connected to Arduino UNO GND
- IRQ not connected
- MISO connected to Arduino UNO D12
- MOSI connected to Arduino UNO D11
- SCK connected to Arduino UNO D13
- SDA connected to Arduino UNO D10
Resistor (200 Ohms)
- Two resistors, each with one pin connected to the cathode of a red LED and the other pin connected to Arduino UNO GND.
LED: Two Pin (red)
- Anode of one LED connected to Arduino UNO D5
- Anode of the other LED connected to Arduino UNO D4
- Cathode of each LED connected to a 200 Ohms resistor
Buzzer
- PIN connected to Arduino UNO A0
- GND connected to Arduino UNO GND
Documented Code
/*
Wiring :
--------------
RFID Reader (SPI):
SDA to Arduino D10 (or any other digital pin for SS)
SCK to Arduino D13
MOSI to Arduino D11
MISO to Arduino D12
RST to Arduino D9
GND to Arduino GND
3.3v to Arduino 3.3v
---------------
*/

#include <SPI.h>
#include <MFRC522.h>
#include <Wire.h>
#include <LiquidCrystal_I2C.h>

// RFID pins
#define SS_PIN 10
#define RST_PIN 9

MFRC522 rfid(SS_PIN, RST_PIN);

LiquidCrystal_I2C lcd(0x27, 16, 2);

void setup() {
    Serial.begin(9600);

    // Initialize RFID
    SPI.begin();
    rfid.PCD_Init();

    // Initialize LCD
    lcd.begin(16, 2);
    lcd.backlight();
    lcd.clear();
    lcd.setCursor(0, 0);
    lcd.print("Tempelkan Kartu Pelajar Anda");

    delay(2000);
    lcd.clear();
}

void loop() {
    // look for new cards
    if (!rfid.PICC_IsNewCardPresent() || !rfid.PICC_ReadCardSerial()) {
        return;
    }

    // Display UID on Serial Monitor
    Serial.print("UID tag: ");
    String content = "";
    for (byte i = 0; i < rfid.uid.size; i++) {
        Serial.print(rfid.uid.uidByte[i] < 0x10 ? " 0" : " ");
        Serial.print(rfid.uid.uidByte[i], HEX);
        content.concat(String(rfid.uid.uidByte[i] < 0x10 ? " 0" : " "));
        content.concat(String(rfid.uid.uidByte[i], HEX));
    }
    Serial.println();
    Serial.println();

    // Display UID on LCD
    lcd.clear();
    lcd.setCursor(0, 0);
    lcd.print("RFID UID");
    lcd.setCursor(0, 1);
    lcd.print(content);

    delay(2000);

    // Halt PICC
    rfid.PICC_HaltA();
}
This code is designed to run on the Arduino UNO and handles the initialization and operation of the RFID-RC522 module and the I2C LCD screen. It reads RFID tags and displays the UID on both the Serial Monitor and the LCD screen.