Arduino Nano Battery-Powered Dual Motor Controller
Circuit Documentation
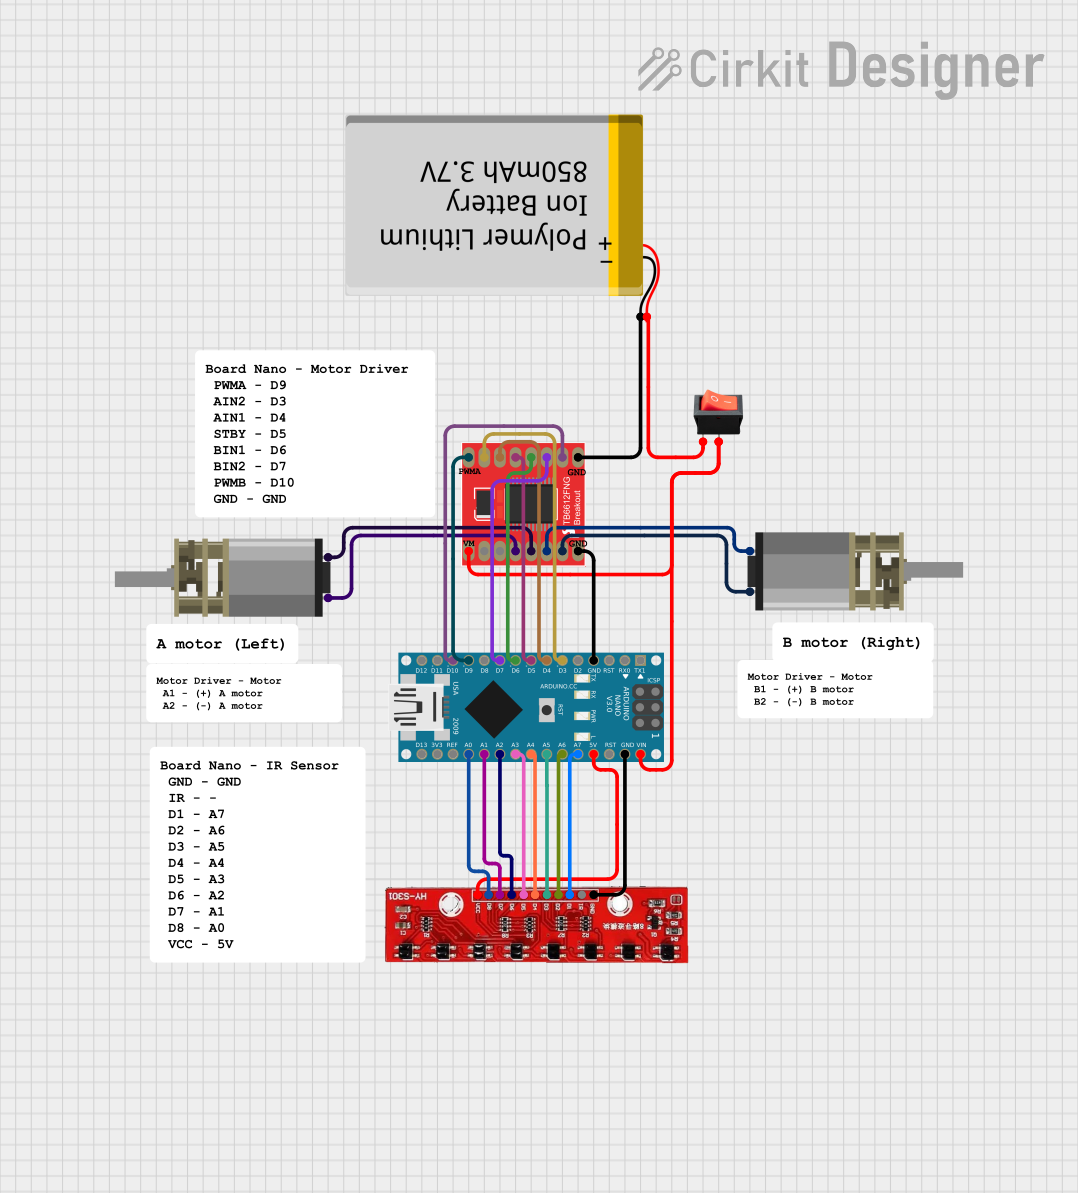
Summary
This document provides a detailed overview of a circuit that includes an Arduino Nano, a Motor Driver (TB6612FNG), two DC Mini Metal Gear Motors, a rocker switch, a Polymer Lithium Ion Battery, and an additional component labeled "01". The circuit is designed to control the motors using the Arduino Nano and the motor driver, with power supplied by the lithium-ion battery and controlled via a rocker switch.
Component List
Arduino Nano
- Description: A small, complete, and breadboard-friendly board based on the ATmega328P.
- Pins: D1/TX, D0/RX, RESET, GND, D2, D3, D4, D5, D6, D7, D8, D9, D10, D11/MOSI, D12/MISO, VIN, 5V, A7, A6, A5, A4, A3, A2, A1, A0, AREF, 3V3, D13/SCK
Motor Driver 1A Dual TB6612FNG
- Description: A motor driver capable of driving two DC motors with a maximum current of 1A.
- Pins: GND, B01, B02, A02, A01, VCC, VM, PWMA, AIN2, AIN1, STBY, BIN1, BIN2, PWMB
DC Mini Metal Gear Motor
- Description: A small DC motor with metal gears for increased durability and torque.
- Pins: IN1, IN2
Rocker Switch
- Description: A simple on/off switch.
- Pins: output, input
Polymer Lithium Ion Battery - 850mAh
- Description: A rechargeable lithium-ion battery with a capacity of 850mAh.
- Pins: GND, VCC
01
- Description: An additional component with multiple pins.
- Pins: GND, IR, D1, D2, D3, D4, D5, D6, D7, D8, VCC
Wiring Details
Arduino Nano
- GND connected to Motor Driver 1A Dual TB6612FNG GND
- D3 connected to Motor Driver 1A Dual TB6612FNG AIN2
- D4 connected to Motor Driver 1A Dual TB6612FNG AIN1
- D5 connected to Motor Driver 1A Dual TB6612FNG STBY
- D6 connected to Motor Driver 1A Dual TB6612FNG BIN1
- D7 connected to Motor Driver 1A Dual TB6612FNG BIN2
- D9 connected to Motor Driver 1A Dual TB6612FNG PWMA
- D10 connected to Motor Driver 1A Dual TB6612FNG PWMB
- VIN connected to Motor Driver 1A Dual TB6612FNG VM and rocker switch output
- GND connected to 01 GND
- 5V connected to 01 VCC
- A7 connected to 01 D1
- A6 connected to 01 D2
- A5 connected to 01 D3
- A4 connected to 01 D4
- A3 connected to 01 D5
- A2 connected to 01 D6
- A1 connected to 01 D7
- A0 connected to 01 D8
Motor Driver 1A Dual TB6612FNG
- GND connected to Arduino Nano GND and Polymer Lithium Ion Battery - 850mAh GND
- AIN2 connected to Arduino Nano D3
- AIN1 connected to Arduino Nano D4
- STBY connected to Arduino Nano D5
- BIN1 connected to Arduino Nano D6
- BIN2 connected to Arduino Nano D7
- PWMA connected to Arduino Nano D9
- PWMB connected to Arduino Nano D10
- VM connected to Arduino Nano VIN and rocker switch output
- B01 connected to DC Mini Metal Gear Motor IN2
- B02 connected to DC Mini Metal Gear Motor IN1
- A02 connected to DC Mini Metal Gear Motor IN2
- A01 connected to DC Mini Metal Gear Motor IN1
DC Mini Metal Gear Motor
- IN2 connected to Motor Driver 1A Dual TB6612FNG B01
- IN1 connected to Motor Driver 1A Dual TB6612FNG B02
- IN2 connected to Motor Driver 1A Dual TB6612FNG A02
- IN1 connected to Motor Driver 1A Dual TB6612FNG A01
Rocker Switch
- output connected to Arduino Nano VIN and Motor Driver 1A Dual TB6612FNG VM
- input connected to Polymer Lithium Ion Battery - 850mAh VCC
Polymer Lithium Ion Battery - 850mAh
- GND connected to Motor Driver 1A Dual TB6612FNG GND
- VCC connected to rocker switch input
01
- GND connected to Arduino Nano GND
- VCC connected to Arduino Nano 5V
- D1 connected to Arduino Nano A7
- D2 connected to Arduino Nano A6
- D3 connected to Arduino Nano A5
- D4 connected to Arduino Nano A4
- D5 connected to Arduino Nano A3
- D6 connected to Arduino Nano A2
- D7 connected to Arduino Nano A1
- D8 connected to Arduino Nano A0
Code Documentation
Arduino Nano Code
void setup() {
  // put your setup code here, to run once:

}

void loop() {
  // put your main code here, to run repeatedly:

}
This code is a basic template for the Arduino Nano. The setup() function is where you initialize your variables, pin modes, start using libraries, etc. The loop() function runs over and over again, allowing your program to change and respond.
This document provides a comprehensive overview of the circuit, including a summary, component list, wiring details, and code documentation. This should serve as a useful reference for understanding and replicating the circuit.