
Circuit Documentation
Summary
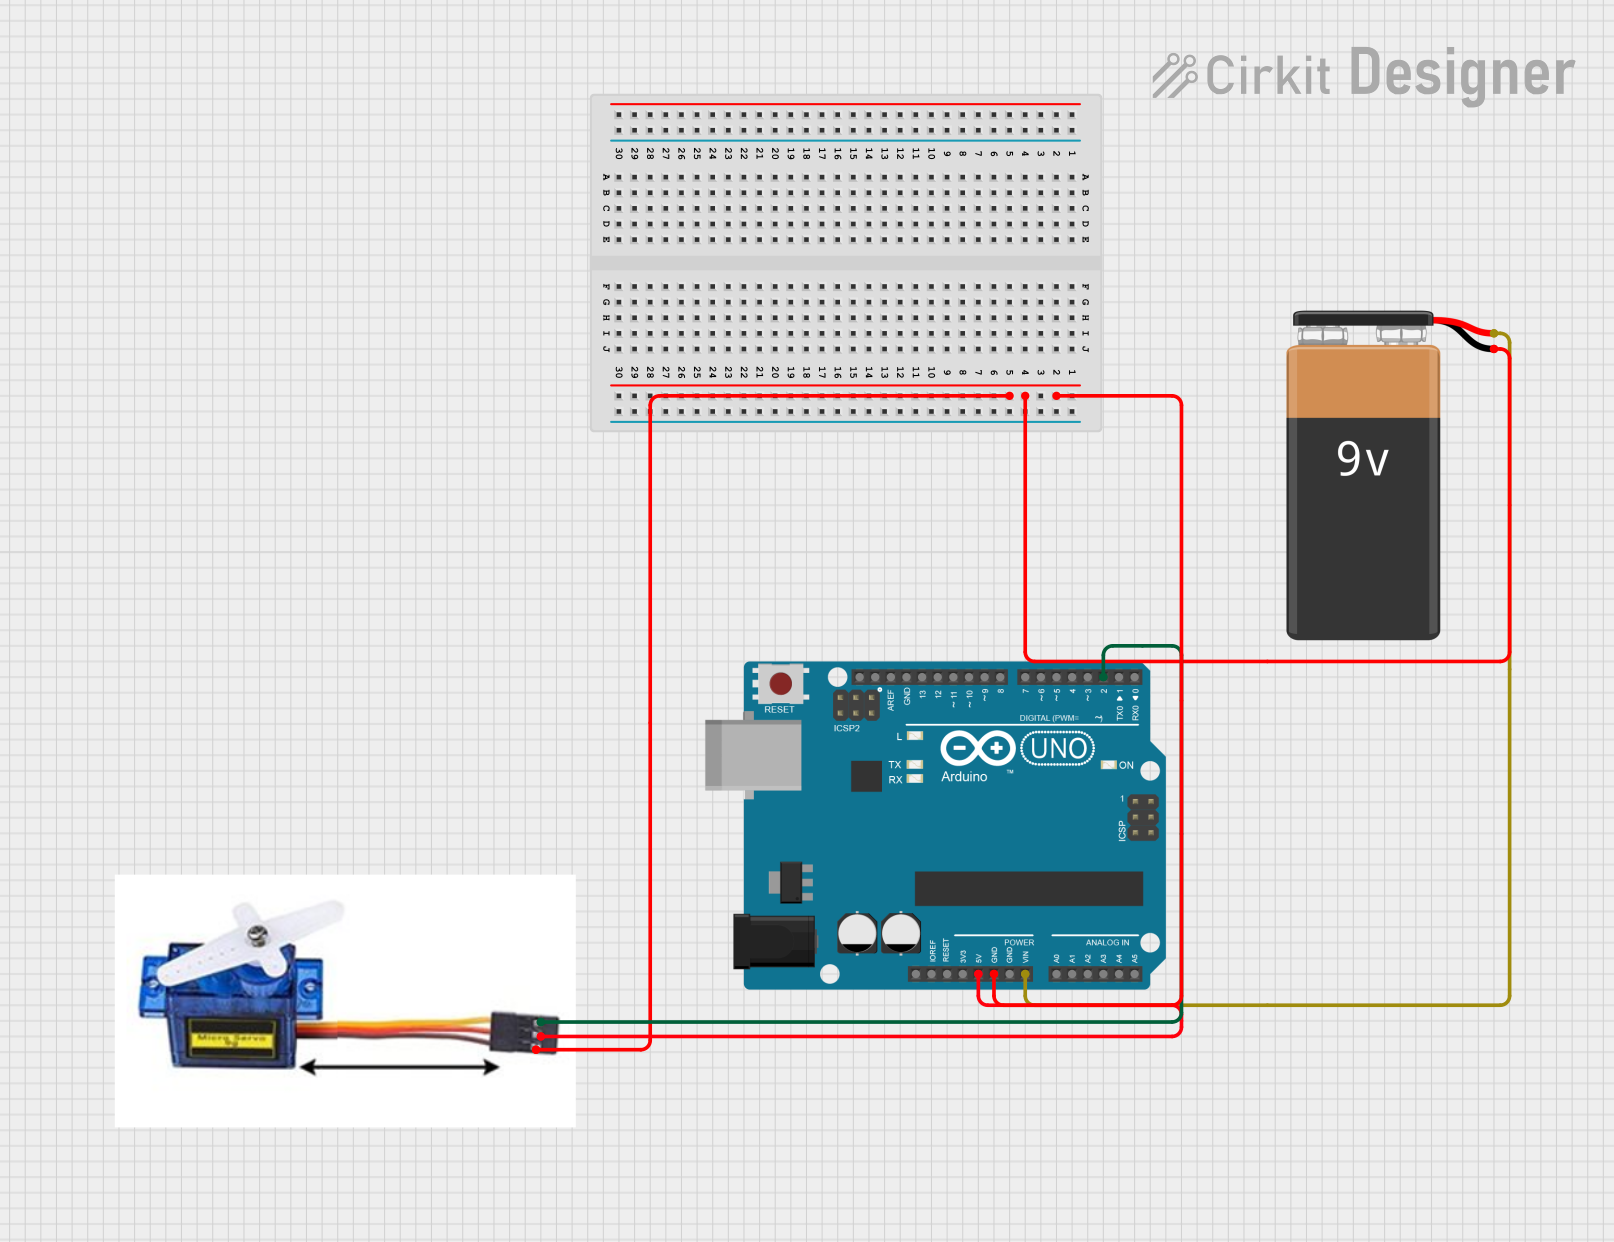
This circuit consists of an Arduino UNO microcontroller, a 9V battery, and a 9G Servo Motor. The Arduino UNO is used to control the servo motor, which is powered by the 9V battery. The servo motor's position is controlled via a PWM signal from the Arduino.
Component List
Arduino UNO
- Description: A microcontroller board based on the ATmega328P.
- Pins: UNUSED, IOREF, Reset, 3.3V, 5V, GND, Vin, A0, A1, A2, A3, A4, A5, SCL, SDA, AREF, D13, D12, D11, D10, D9, D8, D7, D6, D5, D4, D3, D2, D1, D0
9V Battery
- Description: A standard 9V battery used to power the circuit.
- Pins: -, +
Servo Motor 9G
- Description: A small servo motor used for precise control of angular position.
- Pins: VCC 5V, PMW, GND
Wiring Details
Arduino UNO
- 5V: Connected to VCC 5V of the Servo Motor 9G.
- GND: Connected to the GND of the 9V Battery and the GND of the Servo Motor 9G.
- Vin: Connected to the + of the 9V Battery.
- D2: Connected to PMW of the Servo Motor 9G.
9V Battery
- -: Connected to the GND of the Arduino UNO and the GND of the Servo Motor 9G.
- +: Connected to the Vin of the Arduino UNO.
Servo Motor 9G
- VCC 5V: Connected to the 5V of the Arduino UNO.
- PMW: Connected to D2 of the Arduino UNO.
- GND: Connected to the GND of the Arduino UNO and the GND of the 9V Battery.
Code Documentation
// Include Libraries
#include "Arduino.h"
#include "Servo.h"

// Pin Definitions
#define SERVO9G_PIN_SIG 2

// Global variables and defines
const int servo9gRestPosition = 20;  // Starting position
const int servo9gTargetPosition = 150; // Position when event is detected

// Object initialization
Servo servo9g;

// Define vars for testing menu
const int timeout = 10000; // Define timeout of 10 sec
char menuOption = 0;
long time0;

// Setup the essentials for your circuit to work. It runs first every time your circuit is powered with electricity.
void setup()
{
    // Setup Serial which is useful for debugging
    // Use the Serial Monitor to view printed messages
    Serial.begin(9600);
    while (!Serial); // Wait for serial port to connect. Needed for native USB
    Serial.println("start");

    servo9g.attach(SERVO9G_PIN_SIG);
    servo9g.write(servo9gRestPosition);
    delay(100);
    servo9g.detach();
    menuOption = menu();
}

// Main logic of your circuit. It defines the interaction between the components you selected. After setup, it runs over and over again, in an eternal loop.
void loop()
{
    if(menuOption == '1') {
        // 9G Micro Servo - Test Code
        // The servo will rotate to target position and back to resting position with an interval of 500 milliseconds (0.5 seconds)
        servo9g.attach(SERVO9G_PIN_SIG); // 1. Attach the servo to correct pin to control it.
        servo9g.write(servo9gTargetPosition); // 2. Turns servo to target position. Modify target position by modifying the 'ServoTargetPosition' definition above.
        delay(500); // 3. Waits 500 milliseconds (0.5 sec). Change the value in the brackets (500) for a longer or shorter delay in milliseconds.
        servo9g.write(servo9gRestPosition); // 4. Turns servo back to rest position. Modify initial position by modifying the 'ServoRestPosition' definition above.
        delay(500); // 5. Waits 500 milliseconds (0.5 sec). Change the value in the brackets (500) for a longer or shorter delay in milliseconds.
        servo9g.detach(); // 6. Release the servo to conserve power. When detached the servo will NOT hold its position under stress.
    }

    if (millis() - time0 > timeout)
    {
        menuOption = menu();
    }
}

// Menu function for selecting the components to be tested
// Follow serial monitor for instructions
char menu()
{
    Serial.println(F("\nWhich component would you like to test?"));
    Serial.println(F("(1) 9G Micro Servo"));
    Serial.println(F("(menu) send anything else or press on board reset button\n"));
    while (!Serial.available());

    // Read data from serial monitor if received
    while (Serial.available())
    {
        char c = Serial.read();
        if (isAlphaNumeric(c))
        {
            if(c == '1')
                Serial.println(F("Now Testing 9G Micro Servo"));
            else
            {
                Serial.println(F("illegal input!"));
                return 0;
            }
            time0 = millis();
            return c;
        }
    }
}
This code initializes the servo motor and provides a menu for testing the servo motor via the Serial Monitor. The servo motor will rotate to a target position and then return to its resting position, repeating this action every 500 milliseconds.