
Arduino UNO Based Temperature and Humidity Monitoring System
View and Edit Project In Cirkit Designer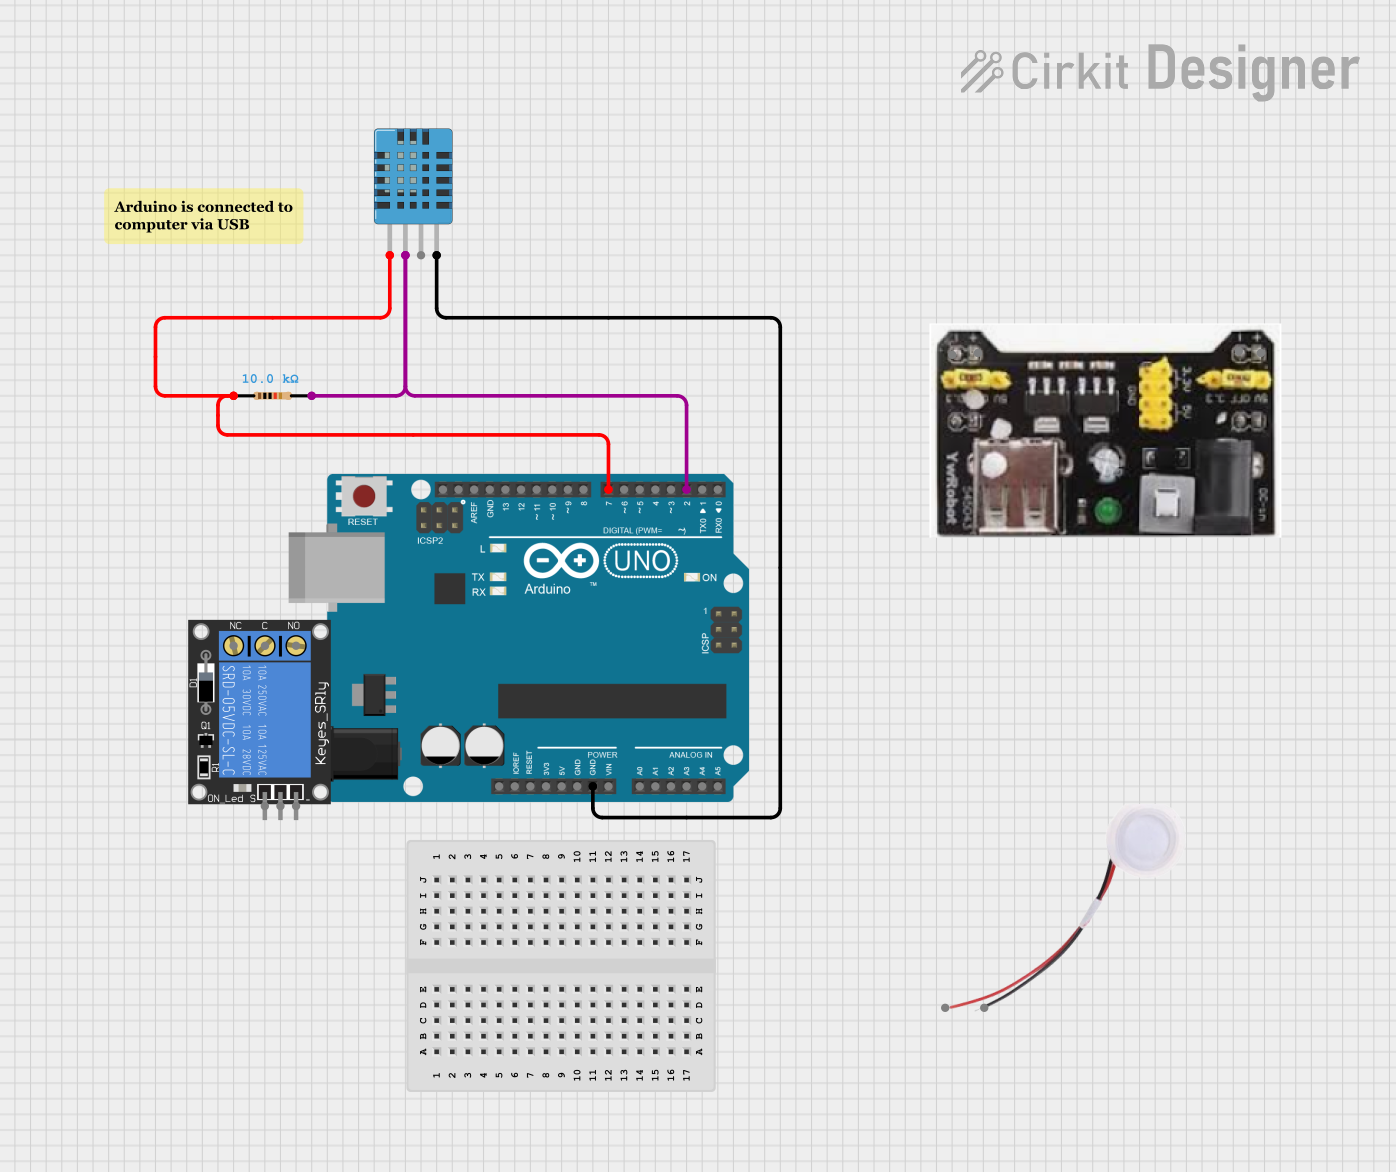
Circuit Documentation
Summary
This circuit is designed to monitor environmental conditions, specifically temperature and humidity, using a DHT11 Humidity and Temperature Sensor. The sensor's data is processed by an Arduino UNO microcontroller, which can then trigger a humidifier connected through a 1-Channel Relay based on the sensor readings. A resistor is included in the circuit for the proper operation of the DHT11 sensor. Power is supplied to the circuit via an MB102 Breadboard Power Supply Module, which can provide both 3.3V and 5V outputs.
Component List
DHT11 Humidity and Temperature Sensor: A sensor that measures the ambient temperature and humidity.
Arduino UNO: A microcontroller board based on the ATmega328P, used for processing sensor data and controlling the relay.
Resistor (10k Ohms): A resistor with a resistance of 10,000 Ohms, used for the DHT11 sensor's pull-up on the data line.
MB102 Breadboard Power Supply Module 3.3V/5V: A power supply module that can provide both 3.3V and 5V outputs, used to power the components on the breadboard.
1-Channel Relay (5V 10A): A relay module that allows the Arduino to control higher power devices, such as the humidifier.
Humidifier: An electronic device that increases the humidity of a room.
Wiring Details
DHT11 Humidity and Temperature Sensor
- VDD to Arduino UNO 5V
- DATA to Arduino UNO Digital Pin 2 through a 10k Ohm resistor
- GND to Arduino UNO GND
Arduino UNO
- 5V to MB102 Breadboard Power Supply Module 5V
- GND to MB102 Breadboard Power Supply Module GND
- Digital Pin 7 to 1-Channel Relay signal pin
- Digital Pin 2 to DHT11 DATA (through a 10k Ohm resistor)
Resistor (10k Ohms)
- One side to Arduino UNO Digital Pin 2
- Other side to DHT11 DATA
MB102 Breadboard Power Supply Module 3.3V/5V
- 5V to Arduino UNO 5V and Humidifier 5V
- GND to Arduino UNO GND and Humidifier GND
1-Channel Relay (5V 10A)
- NC (Normally Closed) not used
- signal to Arduino UNO Digital Pin 7
- C (Common) not used
- power to MB102 Breadboard Power Supply Module 5V
- NO (Normally Open) to Humidifier 5V
- ground to MB102 Breadboard Power Supply Module GND
Humidifier
- 5V to 1-Channel Relay Normally Open (NO) pin
- GND to MB102 Breadboard Power Supply Module GND
Documented Code
The code for the Arduino UNO is written in C++ and is designed to interface with the DHT11 sensor using the Adafruit DHT library. The code initializes the sensor, reads temperature and humidity data, and prints the results to the serial monitor. The relay control logic to turn on/off the humidifier based on the sensor readings would be implemented in the main loop, but this part of the code is not provided in the input.
#include <Adafruit_Sensor.h>
#include <DHT.h>
#include <DHT_U.h>

#define DHTPIN 2     // Digital pin connected to the DHT sensor
#define DHTTYPE    DHT11     // DHT 11

DHT_Unified dht(DHTPIN, DHTTYPE);

uint32_t delayMS;

void setup() {
  Serial.begin(9600);
  dht.begin();
  Serial.println(F("DHTxx Unified Sensor Example"));
  sensor_t sensor;
  dht.temperature().getSensor(&sensor);
  Serial.println(F("------------------------------------"));
  Serial.println(F("Temperature Sensor"));
  Serial.print  (F("Sensor Type: ")); Serial.println(sensor.name);
  Serial.print  (F("Driver Ver:  ")); Serial.println(sensor.version);
  Serial.print  (F("Unique ID:   ")); Serial.println(sensor.sensor_id);
  Serial.print  (F("Max Value:   ")); Serial.print(sensor.max_value); Serial.println(F("°C"));
  Serial.print  (F("Min Value:   ")); Serial.print(sensor.min_value); Serial.println(F("°C"));
  Serial.print  (F("Resolution:  ")); Serial.print(sensor.resolution); Serial.println(F("°C"));
  Serial.println(F("------------------------------------"));
  dht.humidity().getSensor(&sensor);
  Serial.println(F("Humidity Sensor"));
  Serial.print  (F("Sensor Type: ")); Serial.println(sensor.name);
  Serial.print  (F("Driver Ver:  ")); Serial.println(sensor.version);
  Serial.print  (F("Unique ID:   ")); Serial.println(sensor.sensor_id);
  Serial.print  (F("Max Value:   ")); Serial.print(sensor.max_value); Serial.println(F("%"));
  Serial.print  (F("Min Value:   ")); Serial.print(sensor.min_value); Serial.println(F("%"));
  Serial.print  (F("Resolution:  ")); Serial.print(sensor.resolution); Serial.println(F("%"));
  Serial.println(F("------------------------------------"));
  delayMS = sensor.min_delay / 1000;
}

void loop() {
  delay(delayMS);
  sensors_event_t event;
  dht.temperature().getEvent(&event);
  if (isnan(event.temperature)) {
    Serial.println(F("Error reading temperature!"));
  }
  else {
    Serial.print(F("Temperature: "));
    Serial.print(event.temperature);
    Serial.println(F("°C"));
  }
  dht.humidity().getEvent(&event);
  if (isnan(event.relative_humidity)) {
    Serial.println(F("Error reading humidity!"));
  }
  else {
    Serial.print(F("Humidity: "));
    Serial.print(event.relative_humidity);
    Serial.println(F("%"));
  }
}
The code includes the necessary library headers, defines the pin and sensor type, initializes the sensor, and then in the loop function, it reads the temperature and humidity data and prints it to the serial monitor. The delayMS variable is used to ensure that the sensor is not read more frequently than its minimum sampling rate.