
Arduino UNO-Based Intelligent Water Dispensing System with LCD Display and Keypad Control
View and Edit Project In Cirkit Designer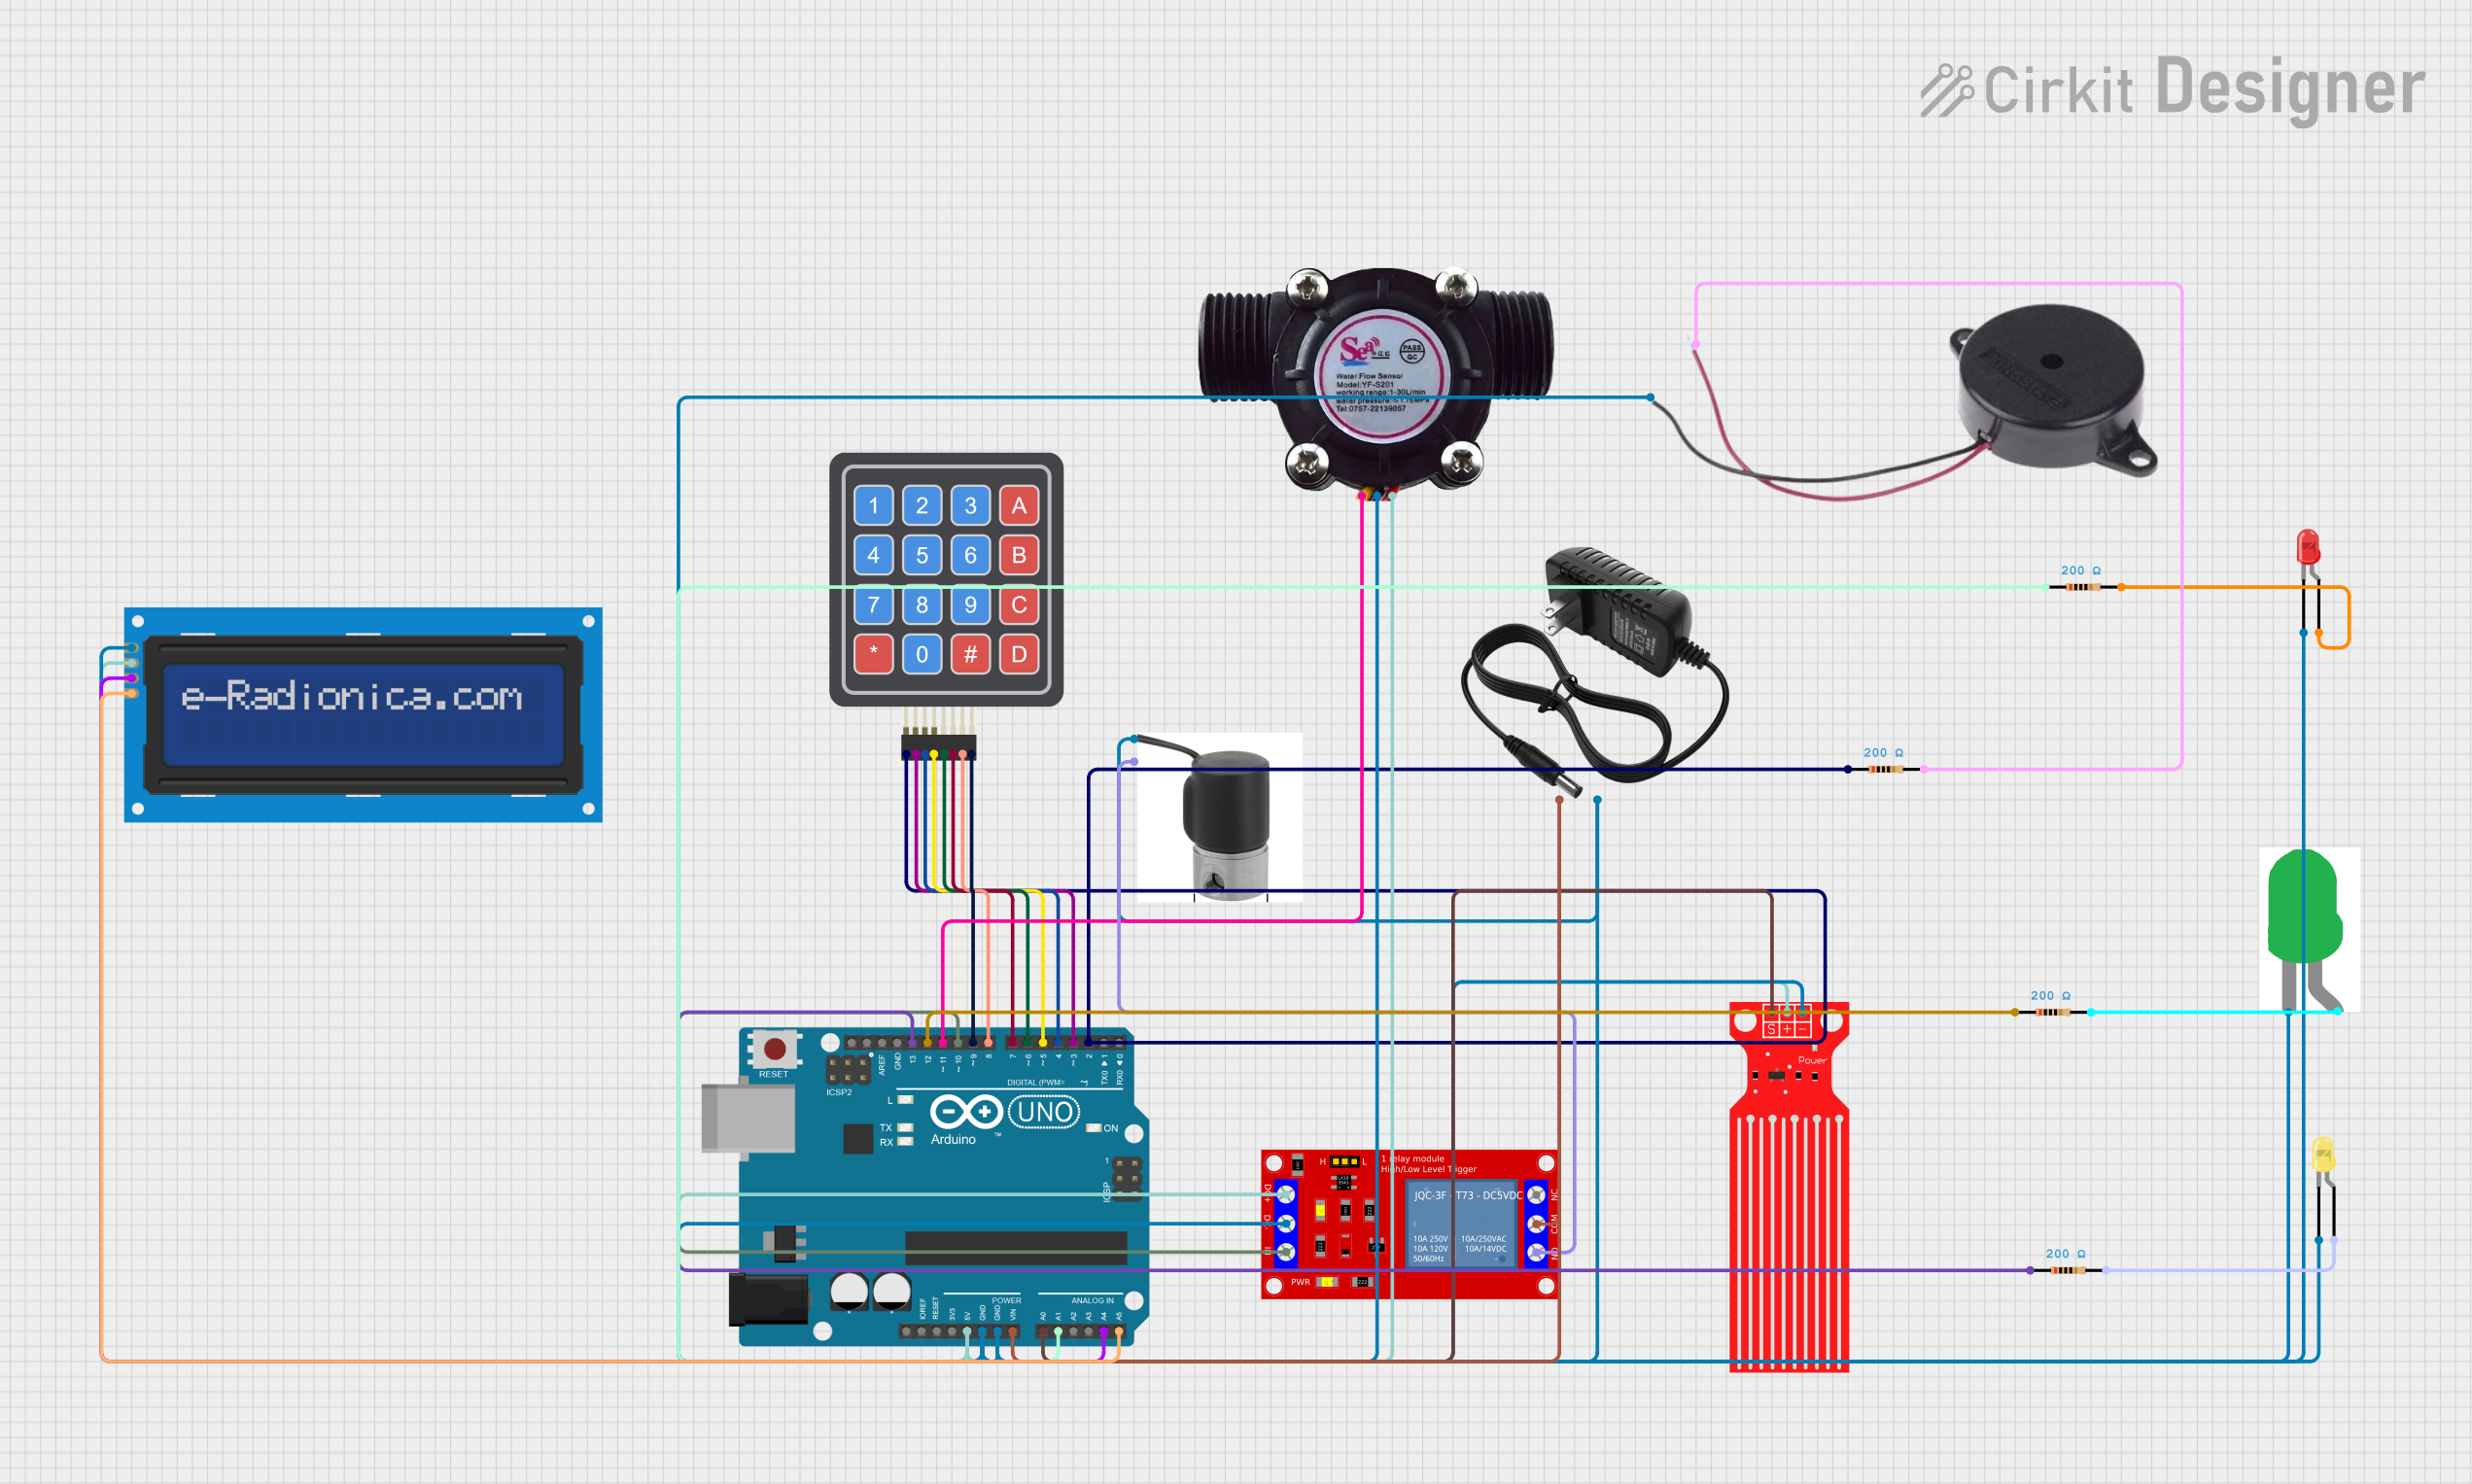
Intelligent Water Dispensing System Documentation
Summary
This document provides a detailed overview of the Intelligent Water Dispensing System. The system is designed to dispense a specified amount of water using an Arduino UNO microcontroller, a solenoid valve, a relay module, and various sensors and indicators. The system allows users to input the desired amount of water to be dispensed via a serial interface, and it controls the water flow accordingly. The system also monitors the water level and displays relevant information on an LCD screen.
Component List
Arduino UNO
- Description: Microcontroller board based on the ATmega328P.
- Pins: UNUSED, IOREF, Reset, 3.3V, 5V, GND, Vin, A0, A1, A2, A3, A4, A5, SCL, SDA, AREF, D13, D12, D11, D10, D9, D8, D7, D6, D5, D4, D3, D2, D1, D0
4x4 Keypad (Simulator)
- Description: 4x4 matrix keypad for user input.
- Pins: R1, C4, R2, C2, R3, R4, C1, C3
Solenoid Valve 12V
- Description: Valve that controls the flow of water.
- Pins: GND, 12V
1 Channel 5V Relay Module
- Description: Relay module to control high voltage devices.
- Pins: VCC+, VCC- (GND), IN, N.O., COM, N.C.
Water Flow Sensor
- Description: Sensor to measure the flow rate of water.
- Pins: Signal, Vcc, GND
Water Level Sensor
- Description: Sensor to measure the water level.
- Pins: SIG, VCC, GND
LED: Two Pin (green)
- Description: Green LED indicator.
- Pins: cathode, anode
LED: Two Pin (red)
- Description: Red LED indicator.
- Pins: cathode, anode
LED: Two Pin (yellow)
- Description: Yellow LED indicator.
- Pins: cathode, anode
Buzzer
- Description: Buzzer for audio alerts.
- Pins: POSITIVE, NEGATIVE
12V Power Supply
- Description: Power supply for the circuit.
- Pins: +, -
Resistor (200 Ohms)
- Description: Resistor to limit current.
- Pins: pin1, pin2
LCD Screen 16x2 I2C
- Description: LCD screen for displaying information.
- Pins: SCL, SDA, VCC, GND
Wiring Details
Arduino UNO
- 5V: Connected to VCC of Water Level Sensor, VCC of Water Flow Sensor, VCC+ of Relay Module, and VCC of LCD Screen.
- GND: Connected to GND of Water Level Sensor, GND of Water Flow Sensor, VCC- (GND) of Relay Module, GND of LCD Screen, GND of Solenoid Valve, NEGATIVE of Buzzer, and cathodes of Green, Red, and Yellow LEDs.
- Vin: Connected to + of 12V Power Supply.
- A0: Connected to SIG of Water Level Sensor.
- A1: Connected to pin1 of a Resistor.
- A4: Connected to SDA of LCD Screen.
- A5: Connected to SCL of LCD Screen.
- D13: Connected to pin1 of a Resistor.
- D12: Connected to pin1 of a Resistor.
- D11: Connected to Signal of Water Flow Sensor.
- D10: Connected to IN of Relay Module.
- D9: Connected to C4 of Keypad.
- D8: Connected to C3 of Keypad.
- D7: Connected to C2 of Keypad.
- D6: Connected to C1 of Keypad.
- D5: Connected to R4 of Keypad.
- D4: Connected to R3 of Keypad.
- D3: Connected to R2 of Keypad.
- D2: Connected to R1 of Keypad and pin1 of a Resistor.
4x4 Keypad (Simulator)
- C4: Connected to D9 of Arduino UNO.
- C3: Connected to D8 of Arduino UNO.
- C2: Connected to D7 of Arduino UNO.
- C1: Connected to D6 of Arduino UNO.
- R4: Connected to D5 of Arduino UNO.
- R3: Connected to D4 of Arduino UNO.
- R2: Connected to D3 of Arduino UNO.
- R1: Connected to D2 of Arduino UNO and pin1 of a Resistor.
Solenoid Valve 12V
- GND: Connected to GND of Arduino UNO.
- 12V: Connected to N.O. of Relay Module.
1 Channel 5V Relay Module
- VCC+: Connected to 5V of Arduino UNO.
- VCC- (GND): Connected to GND of Arduino UNO.
- IN: Connected to D10 of Arduino UNO.
- N.O.: Connected to 12V of Solenoid Valve.
- COM: Connected to + of 12V Power Supply.
Water Flow Sensor
- Signal: Connected to D11 of Arduino UNO.
- Vcc: Connected to 5V of Arduino UNO.
- GND: Connected to GND of Arduino UNO.
Water Level Sensor
- SIG: Connected to A0 of Arduino UNO.
- VCC: Connected to 5V of Arduino UNO.
- GND: Connected to GND of Arduino UNO.
LED: Two Pin (green)
- cathode: Connected to GND of Arduino UNO.
- anode: Connected to pin2 of a Resistor.
LED: Two Pin (red)
- cathode: Connected to GND of Arduino UNO.
- anode: Connected to pin2 of a Resistor.
LED: Two Pin (yellow)
- cathode: Connected to GND of Arduino UNO.
- anode: Connected to pin2 of a Resistor.
Buzzer
- POSITIVE: Connected to pin2 of a Resistor.
- NEGATIVE: Connected to GND of Arduino UNO.
12V Power Supply
- +: Connected to Vin of Arduino UNO and COM of Relay Module.
- -: Connected to GND of Arduino UNO.
Resistor (200 Ohms)
- pin1: Connected to A1, D13, D12, and D2 of Arduino UNO.
- pin2: Connected to anode of Green LED, anode of Red LED, anode of Yellow LED, and POSITIVE of Buzzer.
LCD Screen 16x2 I2C
- SCL: Connected to A5 of Arduino UNO.
- SDA: Connected to A4 of Arduino UNO.
- VCC: Connected to 5V of Arduino UNO.
- GND: Connected to GND of Arduino UNO.
Code Documentation
// Pin Definitions
const int relayPin = 8;           // Relay connected to pin 8 (to control water flow)
float maxTankVolume = 100.0;       // Maximum volume of the supply tank in liters (e.g., 10 liters)
float remainingVolume = maxTankVolume;  // Remaining volume in the supply tank (starts with maxTankVolume in liters)
float waterDispenseAmount = 0;    // Amount of water to be dispensed (in liters)
bool dispensingInProgress = false;  // Flag to check if dispensing is in progress

void setup() {
  // Initialize Serial communication
  Serial.begin(9600);

  // Set relay pin as output
  pinMode(relayPin, OUTPUT);
  digitalWrite(relayPin, LOW);  // Start with the relay off

  // Initial message
  Serial.println("Intelligent Water Dispensing System");
  Serial.println("Enter the desired water amount in liters and press enter:");
}

void loop() {
  // Check if data is available on Serial Monitor
  if (!dispensingInProgress && Serial.available() > 0) {
    // Read the input water amount in liters
    float inputLiters = Serial.parseFloat();
    if (inputLiters > 0) {
      waterDispenseAmount = inputLiters;  // Store the input in liters
      Serial.print("Water Dispense Amount: ");
      Serial.print(inputLiters);
      Serial.println(" liters");

      // Start dispensing water
      dispensingInProgress = true;
      dispenseWater(waterDispenseAmount);
    } else {
      Serial.println("Please enter a valid number greater than 0.");
    }