
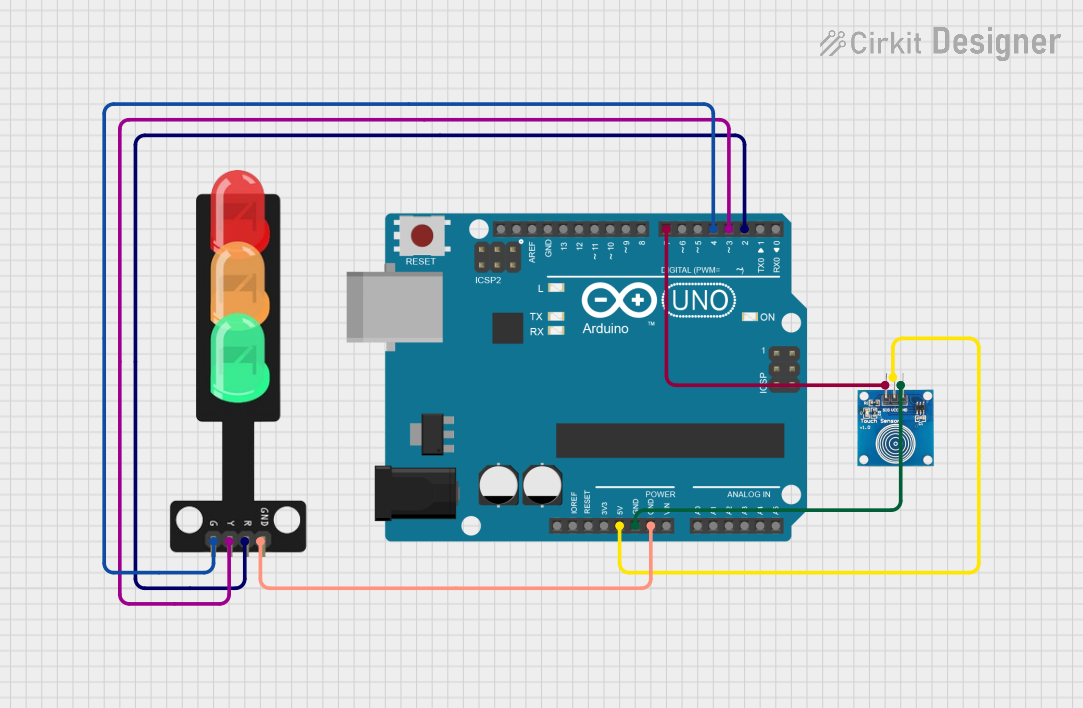
Traffic Light Control Circuit Documentation
Summary
This circuit is designed to control a traffic light system using an Arduino UNO microcontroller and a touch sensor. The system operates by cycling through the traffic light states (red, yellow, green, off) in response to touch sensor inputs. The Arduino UNO is programmed to detect touch events and switch the corresponding traffic light LED on or off based on the current state of the system.
Component List
Arduino UNO
- Description: A microcontroller board based on the ATmega328P.
- Purpose: Acts as the central processing unit for the traffic light control system, reading touch sensor inputs and controlling the state of the traffic light LEDs.
Traffic Light
- Description: A simple traffic light module with three LEDs (Red, Yellow, Green).
- Purpose: Provides visual indication of the traffic light state controlled by the Arduino UNO.
Touch Sensor
- Description: A capacitive touch sensor module.
- Purpose: Serves as the user interface for changing the state of the traffic light system.
Wiring Details
Arduino UNO
- 5V: Provides power to the touch sensor.
- GND: Common ground for the touch sensor and traffic light.
- D7: Connected to the touch sensor's IO pin to read touch events.
- D4: Connected to the traffic light's Green LED.
- D3: Connected to the traffic light's Yellow LED.
- D2: Connected to the traffic light's Red LED.
Traffic Light
- Green: Connected to Arduino UNO's D4 pin.
- Yellow: Connected to Arduino UNO's D3 pin.
- Red: Connected to Arduino UNO's D2 pin.
- GND: Shared ground with Arduino UNO.
Touch Sensor
- IO: Connected to Arduino UNO's D7 pin to send touch events.
- VCC: Powered by Arduino UNO's 5V pin.
- GND: Shared ground with Arduino UNO.
Documented Code
/*
 * This Arduino sketch controls a traffic light system using a touch sensor.
 * When the touch sensor is pressed, the red LED turns on. On the next press,
 * the yellow LED turns on. On the next press, the green LED turns on. On the
 * next press, all LEDs turn off. This cycle repeats with each subsequent press.
 */

const int redLEDPin = 2;    // Pin connected to Red LED
const int yellowLEDPin = 3; // Pin connected to Yellow LED
const int greenLEDPin = 4;  // Pin connected to Green LED
const int touchPin = 7;     // Pin connected to Touch Sensor

int currentState = 0;       // Current state of the traffic light
int lastTouchState = LOW;   // Previous state of the touch sensor

void setup() {
  pinMode(redLEDPin, OUTPUT);
  pinMode(yellowLEDPin, OUTPUT);
  pinMode(greenLEDPin, OUTPUT);
  pinMode(touchPin, INPUT);
  digitalWrite(redLEDPin, LOW);
  digitalWrite(yellowLEDPin, LOW);
  digitalWrite(greenLEDPin, LOW);
}

void loop() {
  int touchState = digitalRead(touchPin);

  // Check for touch sensor press
  if (touchState == HIGH && lastTouchState == LOW) {
    currentState = (currentState + 1) % 4;
    updateTrafficLight();
  }

  lastTouchState = touchState;
}

void updateTrafficLight() {
  switch (currentState) {
    case 0:
      digitalWrite(redLEDPin, LOW);
      digitalWrite(yellowLEDPin, LOW);
      digitalWrite(greenLEDPin, LOW);
      break;
    case 1:
      digitalWrite(redLEDPin, HIGH);
      digitalWrite(yellowLEDPin, LOW);
      digitalWrite(greenLEDPin, LOW);
      break;
    case 2:
      digitalWrite(redLEDPin, LOW);
      digitalWrite(yellowLEDPin, HIGH);
      digitalWrite(greenLEDPin, LOW);
      break;
    case 3:
      digitalWrite(redLEDPin, LOW);
      digitalWrite(yellowLEDPin, LOW);
      digitalWrite(greenLEDPin, HIGH);
      break;
  }
}
This code is responsible for the operation of the traffic light system. It initializes the pins connected to the LEDs and the touch sensor, reads the state of the touch sensor, and updates the traffic light LEDs accordingly. The updateTrafficLight function controls which LED is turned on based on the current state, which is cycled through each time the touch sensor is pressed.