
Arduino UNO Controlled nMOS Transistor Array with Resistor Network
View and Edit Project In Cirkit Designer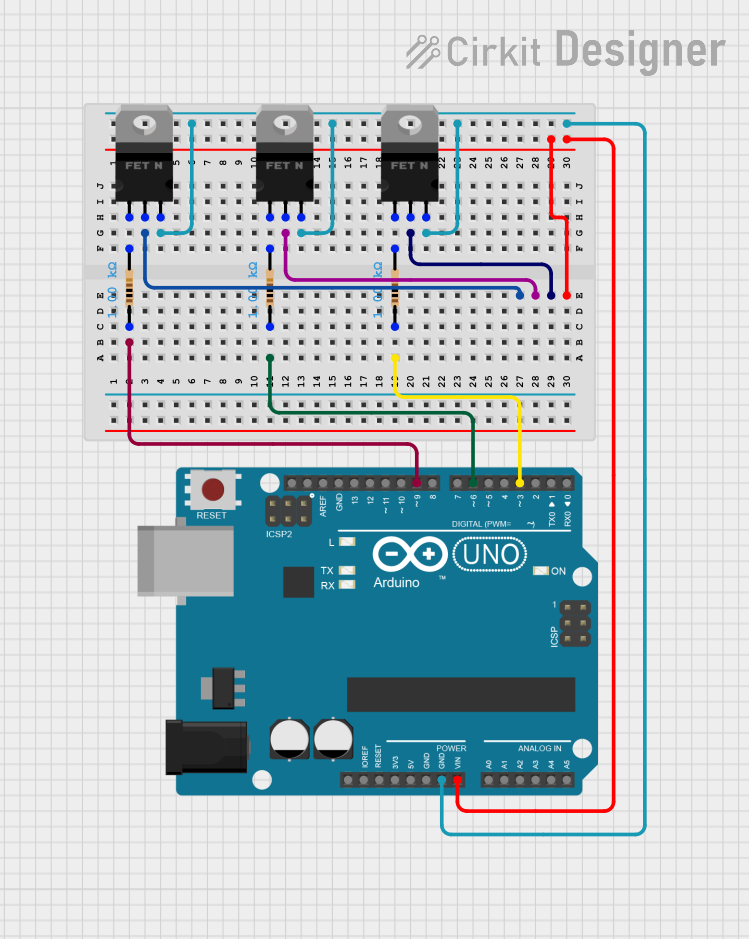
Circuit Documentation
Summary
This document provides a detailed overview of a circuit that includes nMOS transistors, resistors, and an Arduino UNO microcontroller. The circuit is designed to control the gates of the nMOS transistors using the Arduino, with resistors connected to the gates for current limiting. The sources of the transistors are connected to the ground, and the drains are left unconnected in this configuration.
Component List
nMOS Transistor (MOSFET)
- Description: nMOS Transistor used for switching applications.
- Pins: gate, drain, source
Resistor
- Description: Resistor used for current limiting.
- Pins: pin1, pin2
- Properties:
- Resistance: 1000 Ohms
Arduino UNO
- Description: Microcontroller board based on the ATmega328P.
- Pins: UNUSED, IOREF, Reset, 3.3V, 5V, GND, Vin, A0, A1, A2, A3, A4, A5, SCL, SDA, AREF, D13, D12, D11, D10, D9, D8, D7, D6, D5, D4, D3, D2, D1, D0
Wiring Details
nMOS Transistor (MOSFET)
Instance 1:
- Gate: Connected to pin2 of Resistor (Instance 1)
- Drain: Not connected
- Source: Connected to GND of Arduino UNO
Instance 2:
- Gate: Connected to pin2 of Resistor (Instance 2)
- Drain: Not connected
- Source: Connected to GND of Arduino UNO
Instance 3:
- Gate: Connected to pin2 of Resistor (Instance 3)
- Drain: Not connected
- Source: Connected to GND of Arduino UNO
Resistor
Instance 1:
- Pin1: Connected to D9 of Arduino UNO
- Pin2: Connected to gate of nMOS Transistor (Instance 1)
Instance 2:
- Pin1: Connected to D6 of Arduino UNO
- Pin2: Connected to gate of nMOS Transistor (Instance 2)
Instance 3:
- Pin1: Connected to D3 of Arduino UNO
- Pin2: Connected to gate of nMOS Transistor (Instance 3)
Arduino UNO
- D9: Connected to pin1 of Resistor (Instance 1)
- D6: Connected to pin1 of Resistor (Instance 2)
- D3: Connected to pin1 of Resistor (Instance 3)
- GND: Connected to source of all nMOS Transistors
- Vin: Not connected
Documented Code
Arduino UNO Code (sketch.ino)
void setup() {
  // put your setup code here, to run once:

}

void loop() {
  // put your main code here, to run repeatedly:

}
Additional Documentation (documentation.txt)
This document provides a comprehensive overview of the circuit, including the components used, their connections, and the code running on the Arduino UNO.