
Arduino UNO Based Weather Station with I2C Sensors and LCD Display
View and Edit Project In Cirkit Designer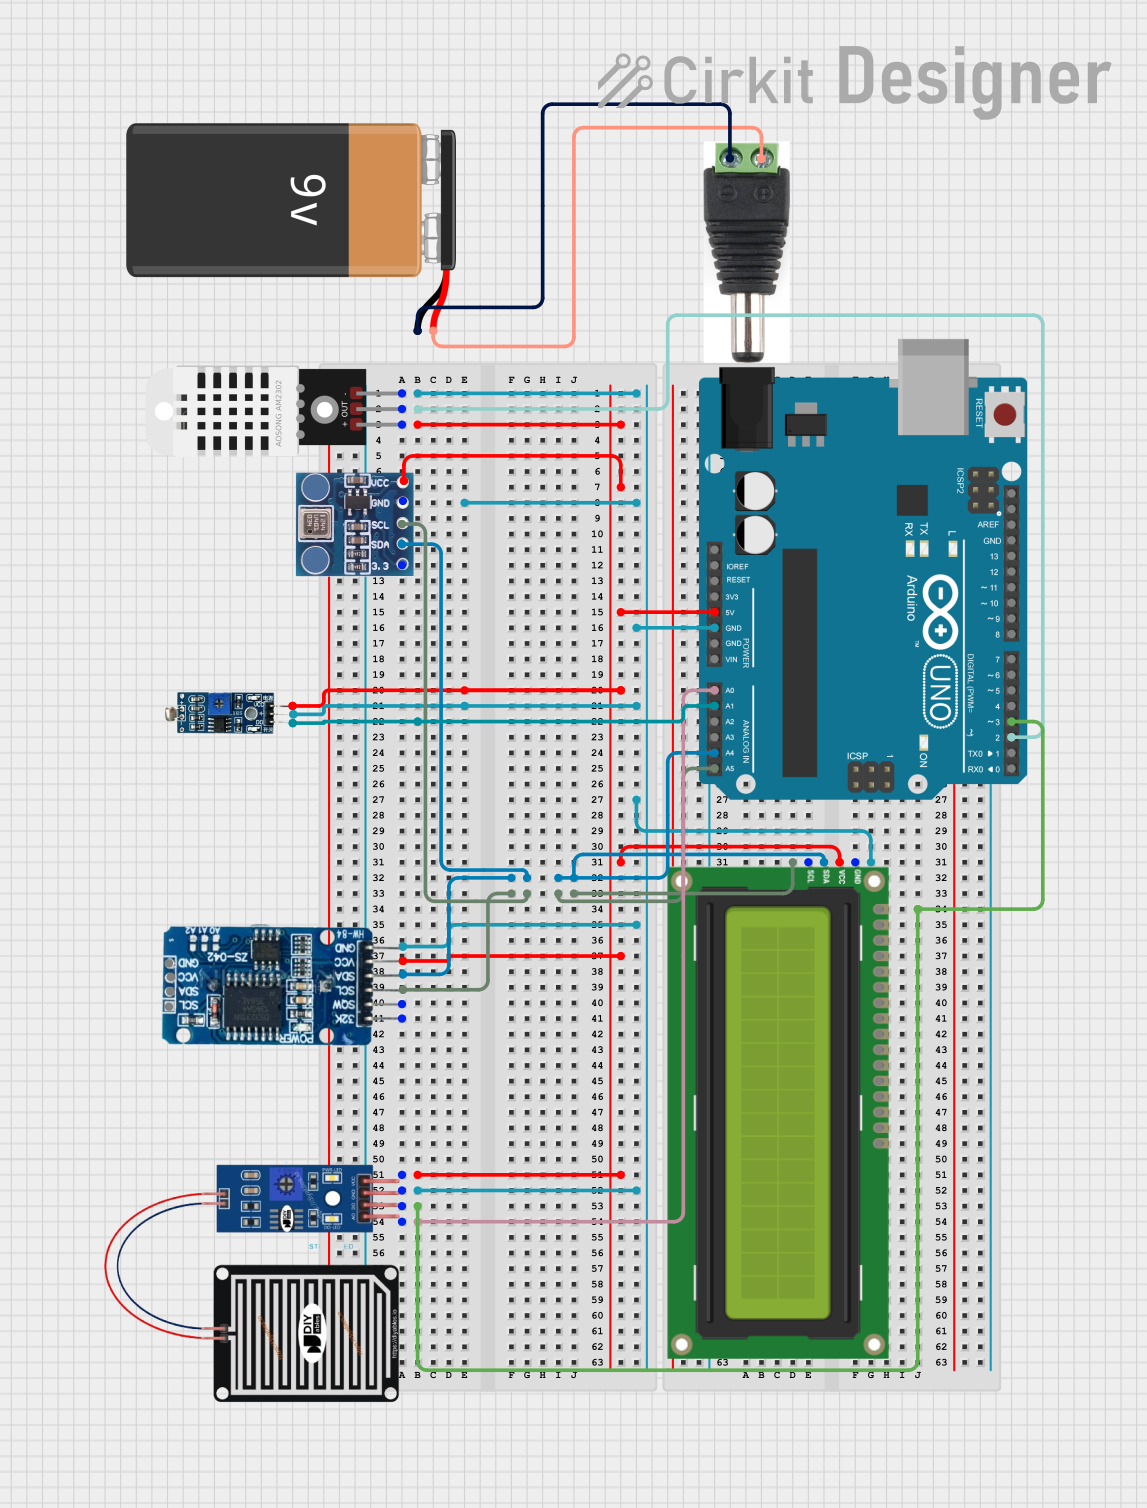
Weather Station Circuit Documentation
Summary
The circuit is designed to create a weather station that measures temperature, humidity, atmospheric pressure, and light intensity, and detects rain. It uses an Arduino UNO as the central microcontroller to interface with various sensors including a DHT22 for temperature and humidity, a BMP180 for atmospheric pressure, an RTC DS3231 for real-time clock functionality, an LDR module for light intensity, and a rain sensor. The data from these sensors is displayed on an I2C LCD 16x2 screen. The circuit is powered by a 9V battery connected through a 2.1mm male connector.
Component List
- DHT22: A sensor for measuring temperature and humidity.
- Arduino UNO: A microcontroller board based on the ATmega328P, used as the main controller for the circuit.
- BMP180: A sensor for measuring atmospheric pressure.
- RTC DS3231: A real-time clock module for maintaining accurate time.
- I2C LCD 16x2 Screen: A 16x2 character LCD display with an I2C interface.
- 9V Battery: A standard 9V battery providing power to the circuit.
- 2.1mm Male Connector: A connector used to interface the 9V battery with the circuit.
- Rain Sensor: A sensor used to detect rain.
- LDR Module 3 pin: A light-dependent resistor module for measuring light intensity.
Wiring Details
DHT22
+to Arduino UNO 5VOutto Arduino UNO Digital Pin 2-to Ground
Arduino UNO
A5to I2C SCL line (shared with other I2C devices)GNDto Ground (common ground)5Vto power line (shared with other components)D3to Rain Sensor Digital OutputA0to Rain Sensor Analog OutputA1to LDR Module Digital OutputA4to I2C SDA line (shared with other I2C devices)D2to DHT22 Output
BMP180
3.3(Not connected in this configuration)SDAto Arduino UNO A4 (I2C Data)SCLto Arduino UNO A5 (I2C Clock)GNDto GroundVCCto Arduino UNO 5V
RTC DS3231
32K(Not used in this configuration)SQW(Not used in this configuration)SCLto Arduino UNO A5 (I2C Clock)SDAto Arduino UNO A4 (I2C Data)VCCto Arduino UNO 5VGNDto Ground
I2C LCD 16x2 Screen
SCLto Arduino UNO A5 (I2C Clock)SDAto Arduino UNO A4 (I2C Data)VCC (5V)to Arduino UNO 5VGNDto Ground
9V Battery
+to 2.1mm Male Connector+-to 2.1mm Male Connector-
2.1mm Male Connector
+from 9V Battery+-from 9V Battery-
Rain Sensor
AOto Arduino UNO Analog Pin A0DOto Arduino UNO Digital Pin D3GRDto GroundVCCto Arduino UNO 5V
LDR Module 3 pin
VCCto Arduino UNO 5VGNDto GroundDOto Arduino UNO Analog Pin A1
Documented Code
#include <Wire.h>
#include <Adafruit_Sensor.h>
#include <Adafruit_BMP085_U.h>
#include <DHT.h>
#include <LiquidCrystal_I2C.h>
#include <RTClib.h>  // RTC library for DS3231 or DS1307

#define DHTPIN 2       // Change pin according to your ESP8266 GPIO
#define DHTTYPE DHT22  // Type of DHT sensor
DHT dht(DHTPIN, DHTTYPE);

Adafruit_BMP085_Unified bmp = Adafruit_BMP085_Unified(10085);

// ESP8266 uses GPIO4 (D2) and GPIO5 (D1) for I2C by default
LiquidCrystal_I2C lcd(0x27, 16, 2);  // LCD I2C address

RTC_DS3231 rtc; // Initialize RTC object

void setup() {
  Serial.begin(115200);  // Use a higher baud rate for ESP8266
  dht.begin();

  // Initialize the BMP180 sensor
  if (!bmp.begin()) {
    Serial.println("Could not find a valid BMP085 sensor, check wiring!");
    while (1);
  }

  // Initialize RTC
  if (!rtc.begin()) {
    Serial.println("Couldn't find RTC");
    while (1);
  }

  // Check if RTC lost power
  if (rtc.lostPower()) {
    Serial.println("RTC lost power, setting the time!");
    // The following line sets the RTC to the compile time
    rtc.adjust(DateTime(F(_DATE), F(TIME_)));
  }

  lcd.begin(16, 2);  // Initialize LCD
  lcd.backlight();   // Turn on backlight

  // Display welcome message
  lcd.clear();
  lcd.setCursor(0, 0);
  lcd.print("Weather Station");
  delay(2000); // Display for 2 seconds
}

void loop() {
  delay(2000);

  // Read temperature and humidity from DHT22
  float humidity = dht.readHumidity();
  float temperature = dht.readTemperature();

  if (isnan(humidity) || isnan(temperature)) {
    Serial.println("Failed to read from DHT sensor!");
  } else {
    Serial.print("Humidity: ");
    Serial.print(humidity);
    Serial.print(" %\t");
    Serial.print("Temperature: ");
    Serial.print(temperature);
    Serial.println(" *C");
  }

  // Read pressure from BMP180
  sensors_event_t event;
  bmp.getEvent(&event);
  if (event.pressure) {
    Serial.print("Pressure: ");
    Serial.print(event.pressure);
    Serial.println(" hPa");
  } else {
    Serial.println("Failed to read from BMP180!");
  }

  // Get current time from RTC
  DateTime now = rtc.now();

  // Display values on the LCD

    // Display the time on LCD
  lcd.clear();
  lcd.setCursor(0, 0);
  lcd.print("Time: ");
  lcd.print(now.hour(), DEC);
  lcd.print(":");
  lcd.print(now.minute(), DEC);
  lcd.print(":");
  lcd.print(now.second(), DEC);
  lcd.setCursor(0, 1);
  lcd.print("Date: ");
  lcd.print(now.day(), DEC);
  lcd.print("/");
  lcd.print(now.month(), DEC);
  lcd.print("/");
  lcd.print(now.year(), DEC);

  delay(2000); // Update every 2 seconds
  lcd.clear();
  lcd.setCursor(0, 0);
  lcd.print("Temp: ");
  lcd.print(temperature);
  lcd.print(" C");
  lcd.setCursor(0, 1);
  lcd.print("Hum: ");
  lcd.print(humidity);
  lcd.print(" %");

  delay(2000); // Update every 2 seconds

  lcd.clear();
  lcd.setCursor(0, 0);
  lcd.print("Pressure: ");
  lcd.print(event.pressure);
  lcd.print(" hPa");
  lcd.setCursor(0, 1);
  lcd.print("Rain: ");
  lcd.print(analogRead(A0));  // Use the appropriate pin for rain sensor

  delay(2000);  // Update every 2 seconds

  lcd.clear();
  lcd.setCursor(0, 0);
  lcd.print("LDR: ");
  lcd.print(analogRead(A1));  // Use the appropriate pin for LDR
  lcd.setCursor(0, 1);
  lcd.print("Light Int.");

  delay(2000);  // Update every 2 seconds
}
This code is designed to run on an Arduino UNO and interfaces with the various sensors to collect data, which is then displayed on the LCD screen. The code includes initialization and error checking for each sensor, as well as functions to read and display the sensor data. The RTC module is used to display the current time and date. The LCD screen displays the weather station's welcome message, temperature, humidity, pressure, rain sensor data, and light intensity in a rotating fashion, updating every 2 seconds.