
Arduino and NodeMCU Based RFID Smart Attendance System with WiFi Connectivity
View and Edit Project In Cirkit Designer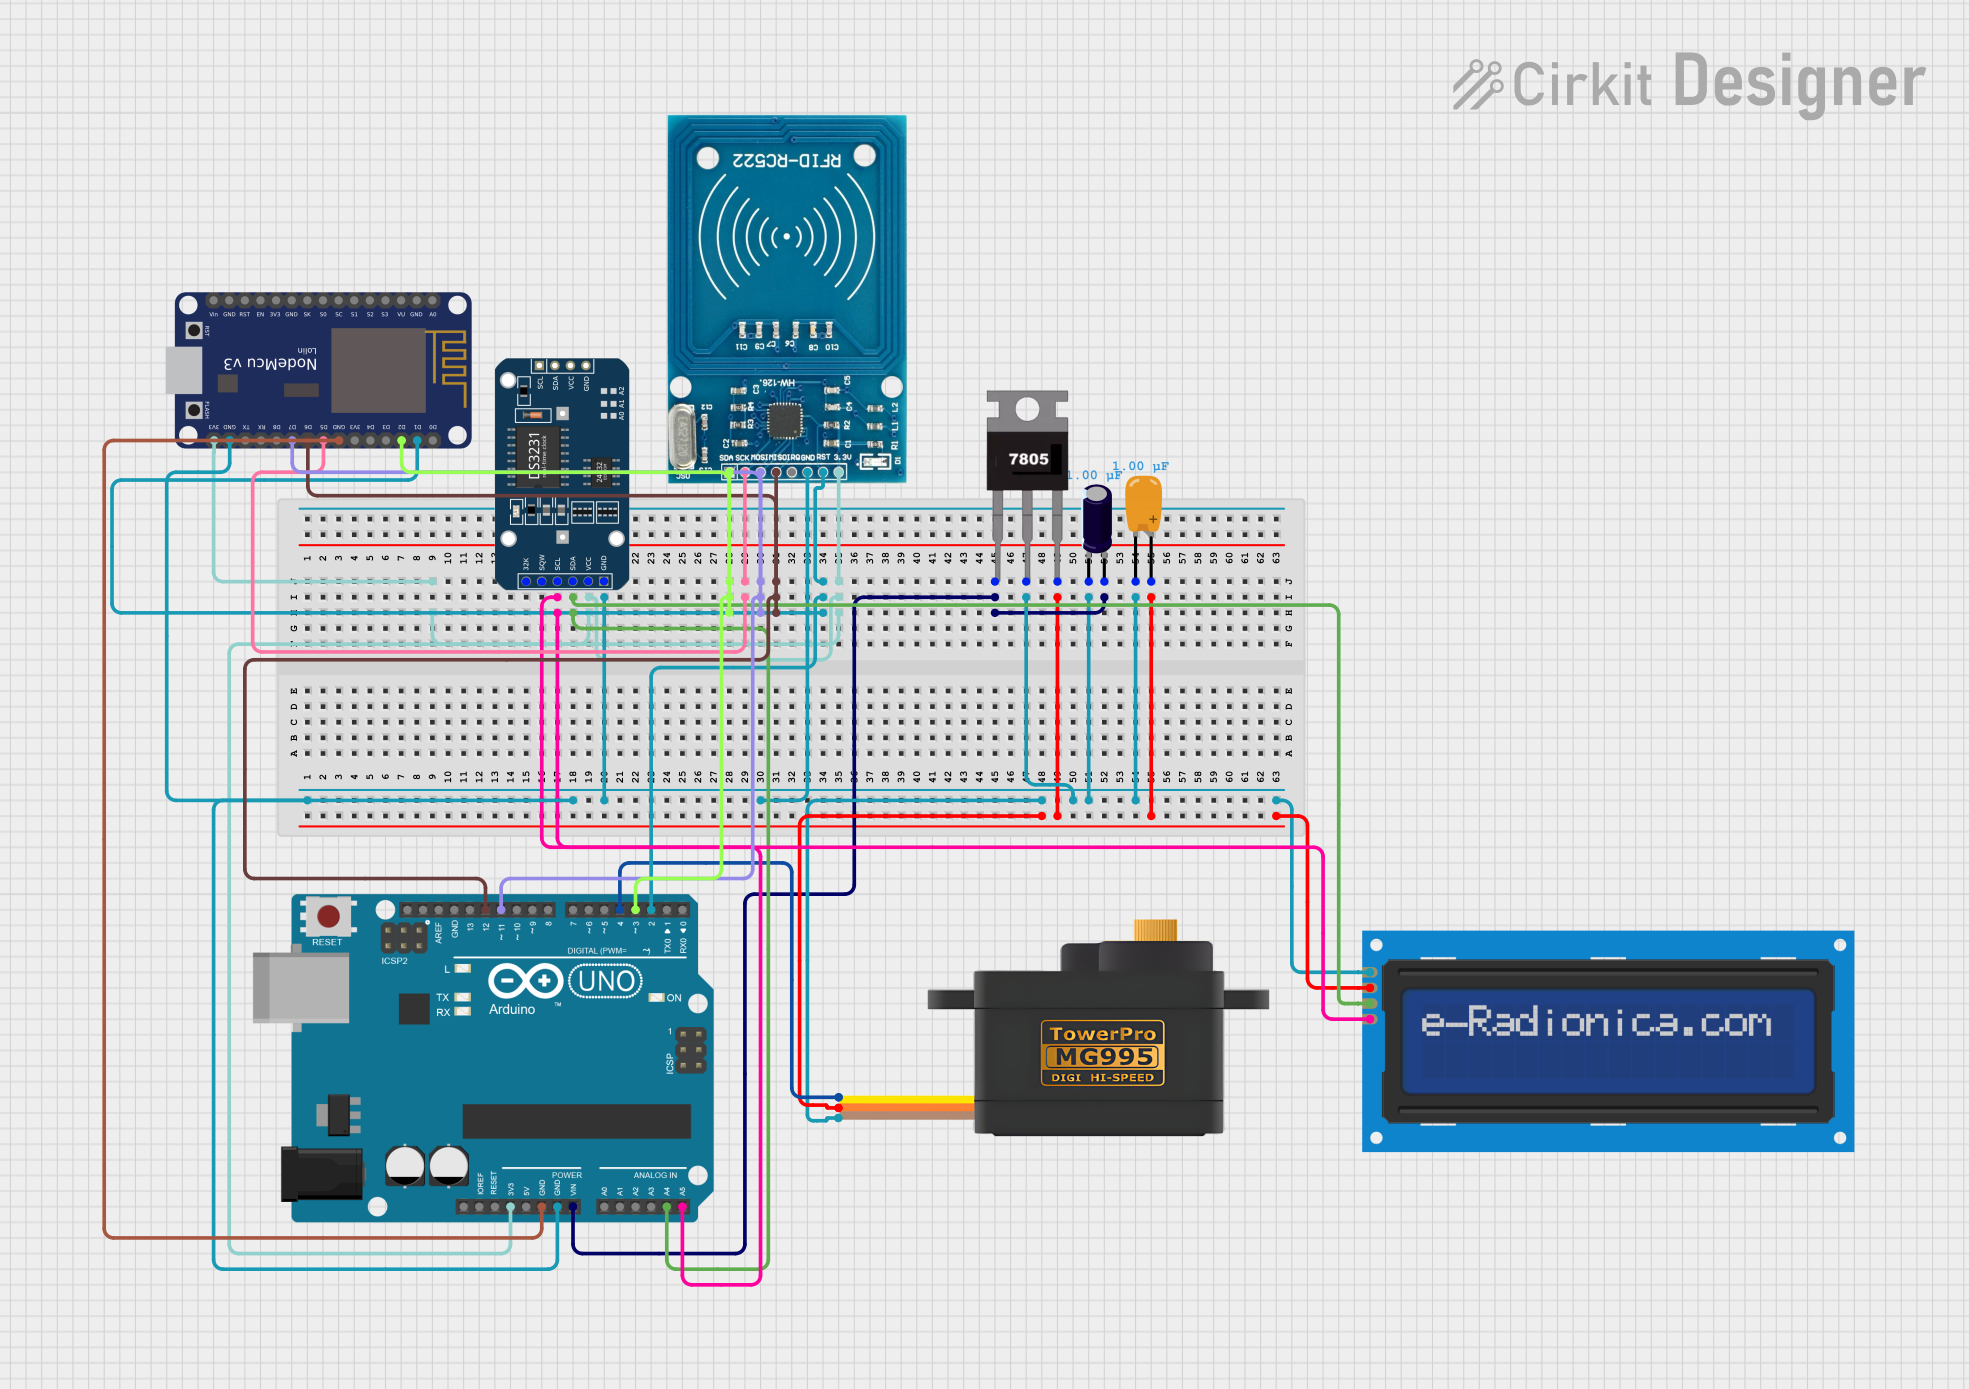
Circuit Documentation
Summary
The circuit is designed to create an RFID-based smart attendance system. It integrates various components including an RFID reader, a servo motor, an LCD screen, a real-time clock (RTC), and a microcontroller with WiFi connectivity. The system reads RFID tags, displays attendance information on the LCD, and sends data to an online server. The Arduino UNO serves as the primary controller, interfaced with the NodeMCU V3 ESP8266 for network connectivity.
Component List
Electrolytic Capacitor
- Description: A capacitor used for filtering and power smoothing applications.
- Capacitance: 1 µF
7805 Voltage Regulator
- Description: A voltage regulator that outputs a stable 5V from a higher voltage input.
NodeMCU V3 ESP8266
- Description: A microcontroller board with integrated WiFi, used for network connectivity.
RFID-RC522
- Description: An RFID reader module for reading RFID tags.
Tantalum Capacitor
- Description: A capacitor with stable capacitance, used for decoupling and filtering.
- Capacitance: 1 µF
Servomotor MG995
- Description: A high-torque servomotor used for actuation.
LCD screen 16x2 I2C
- Description: An alphanumeric liquid crystal display with an I2C interface for showing information.
DS3231 RTC
- Description: A real-time clock module for keeping track of the current time and date.
Arduino UNO
- Description: A microcontroller board based on the ATmega328P, used as the main controller in this circuit.
Wiring Details
Electrolytic Capacitor
- Negative (-) pin connected to the ground (GND).
- Positive (+) pin connected to the input voltage (Vin) of the 7805 voltage regulator.
7805 Voltage Regulator
- Input (Vin) pin connected to the positive (+) pin of the Electrolytic Capacitor.
- Ground (Gnd) pin connected to the common ground (GND) net.
- Output (Vout) pin connected to the positive (+) pin of the Tantalum Capacitor and the VCC pin of the Servomotor MG995 and LCD screen 16x2 I2C.
NodeMCU V3 ESP8266
- Analog (A0), Digital (D0-D8), RX, TX, 3V3, EN, RST, Vin, and GND pins are used for interfacing with other components and power connections.
RFID-RC522
- VCC (3.3V) pin connected to the 3.3V net.
- RST, IRQ, MISO, MOSI, SCK, and SDA pins connected to corresponding pins on the NodeMCU V3 ESP8266 and Arduino UNO for SPI communication.
- GND pin connected to the common ground (GND) net.
Tantalum Capacitor
- Negative (-) pin connected to the ground (GND).
- Positive (+) pin connected to the output (Vout) of the 7805 voltage regulator.
Servomotor MG995
- Signal (SIG) pin connected to the D4 pin of the Arduino UNO.
- VCC pin connected to the output (Vout) of the 7805 voltage regulator.
- Ground (GND) pin connected to the common ground (GND) net.
LCD screen 16x2 I2C
- SCL and SDA pins connected to the I2C bus (SCL and SDA pins of the Arduino UNO and DS3231 RTC).
- VCC pin connected to the output (Vout) of the 7805 voltage regulator.
- GND pin connected to the common ground (GND) net.
DS3231 RTC
- VCC pin connected to the 3.3V net.
- SCL and SDA pins connected to the I2C bus (SCL and SDA pins of the Arduino UNO and LCD screen 16x2 I2C).
- GND pin connected to the common ground (GND) net.
Arduino UNO
- IOREF, Reset, 3.3V, 5V, Vin, A0-A5, SCL, SDA, AREF, D0-D13 pins are used for interfacing with other components and power connections.
Documented Code
/*
 * RFID Based Smart Attendance System
 * This code interfaces with an RFID reader, a servo motor, an LCD screen, and
 * connects to a WiFi network to send attendance data to an online database.
 * Components:
 * - RFID-RC522 connected to Arduino UNO
 * - Servo motor connected to Arduino UNO
 * - LCD screen 16x2 I2C connected to Arduino UNO
 * - DS3231 RTC connected to Arduino UNO
 * - NodeMCU V3 ESP8266 for WiFi connectivity
 */

#include <SPI.h>
#include <MFRC522.h>
#include <Servo.h>
#include <Wire.h>
#include <LiquidCrystal_I2C.h>
#include <ESP8266WiFi.h>
#include <ESP8266HTTPClient.h>

// RFID
#define SS_PIN 10
#define RST_PIN 9
MFRC522 rfid(SS_PIN, RST_PIN);

// Servo
Servo myServo;

// LCD
LiquidCrystal_I2C lcd(0x27, 16, 2);

// WiFi credentials
const char* ssid = "your_SSID";
const char* password = "your_PASSWORD";

// Server
const char* serverName = "http://yourserver.com/attendance.php";

void setup() {
  Serial.begin(9600);
  SPI.begin();
  rfid.PCD_Init();

  // Servo setup
  myServo.attach(4);
  myServo.write(0);  // Initial position

  // LCD setup
  lcd.init();
  lcd.backlight();
  lcd.setCursor(0, 0);
  lcd.print("RFID Attendance");

  // Connect to WiFi
  WiFi.begin(ssid, password);
  while (WiFi.status() != WL_CONNECTED) {
    delay(1000);
    Serial.println("Connecting to WiFi...");
  }
  Serial.println("Connected to WiFi");
}

void loop() {
  // Look for new cards
  if (!rfid.PICC_IsNewCardPresent() || !rfid.PICC_ReadCardSerial()) {
    return;
  }

  // Show UID on serial monitor
  Serial.print("UID tag: ");
  String content = "";
  for (byte i = 0; i < rfid.uid.size; i++) {
    content.concat(String(rfid.uid.uidByte[i] < 0x10 ? "0" : ""));
    content.concat(String(rfid.uid.uidByte[i], HEX));
  }
  content.toUpperCase();
  Serial.println(content);

  // Send UID to the server
  sendUIDToServer(content);

  // Display on LCD
  lcd.clear();
  lcd.setCursor(0, 0);
  lcd.print("ID: ");
  lcd.print(content);

  // Simulate attendance by moving the servo
  myServo.write(90);
  delay(1000);
  myServo.write(0);

  delay(3000);
}

void sendUIDToServer(String uid) {
  if (WiFi.status() == WL_CONNECTED) {
    HTTPClient http;
    String serverPath = serverName + "?id=" + uid;

    http.begin(serverPath.c_str());
    int httpResponseCode = http.GET();
    if (httpResponseCode > 0) {
      String payload = http.getString();
      Serial.println(payload);
    } else {
      Serial.print("Error on sending POST: ");
      Serial.println(httpResponseCode);
    }
    http.end();
  }
}
This code is designed to be uploaded to an Arduino UNO microcontroller. It initializes the RFID reader, servo motor, LCD screen, and WiFi module, and contains the main loop that reads RFID tags, moves the servo, displays information on the LCD, and sends data to a server.