Cirkit Designer
Your all-in-one circuit design IDE
Home /
Project Documentation
Arduino UNO-Based Bluetooth-Controlled Robotic Vehicle with IR Sensors and DC Motors
Circuit Documentation
Summary
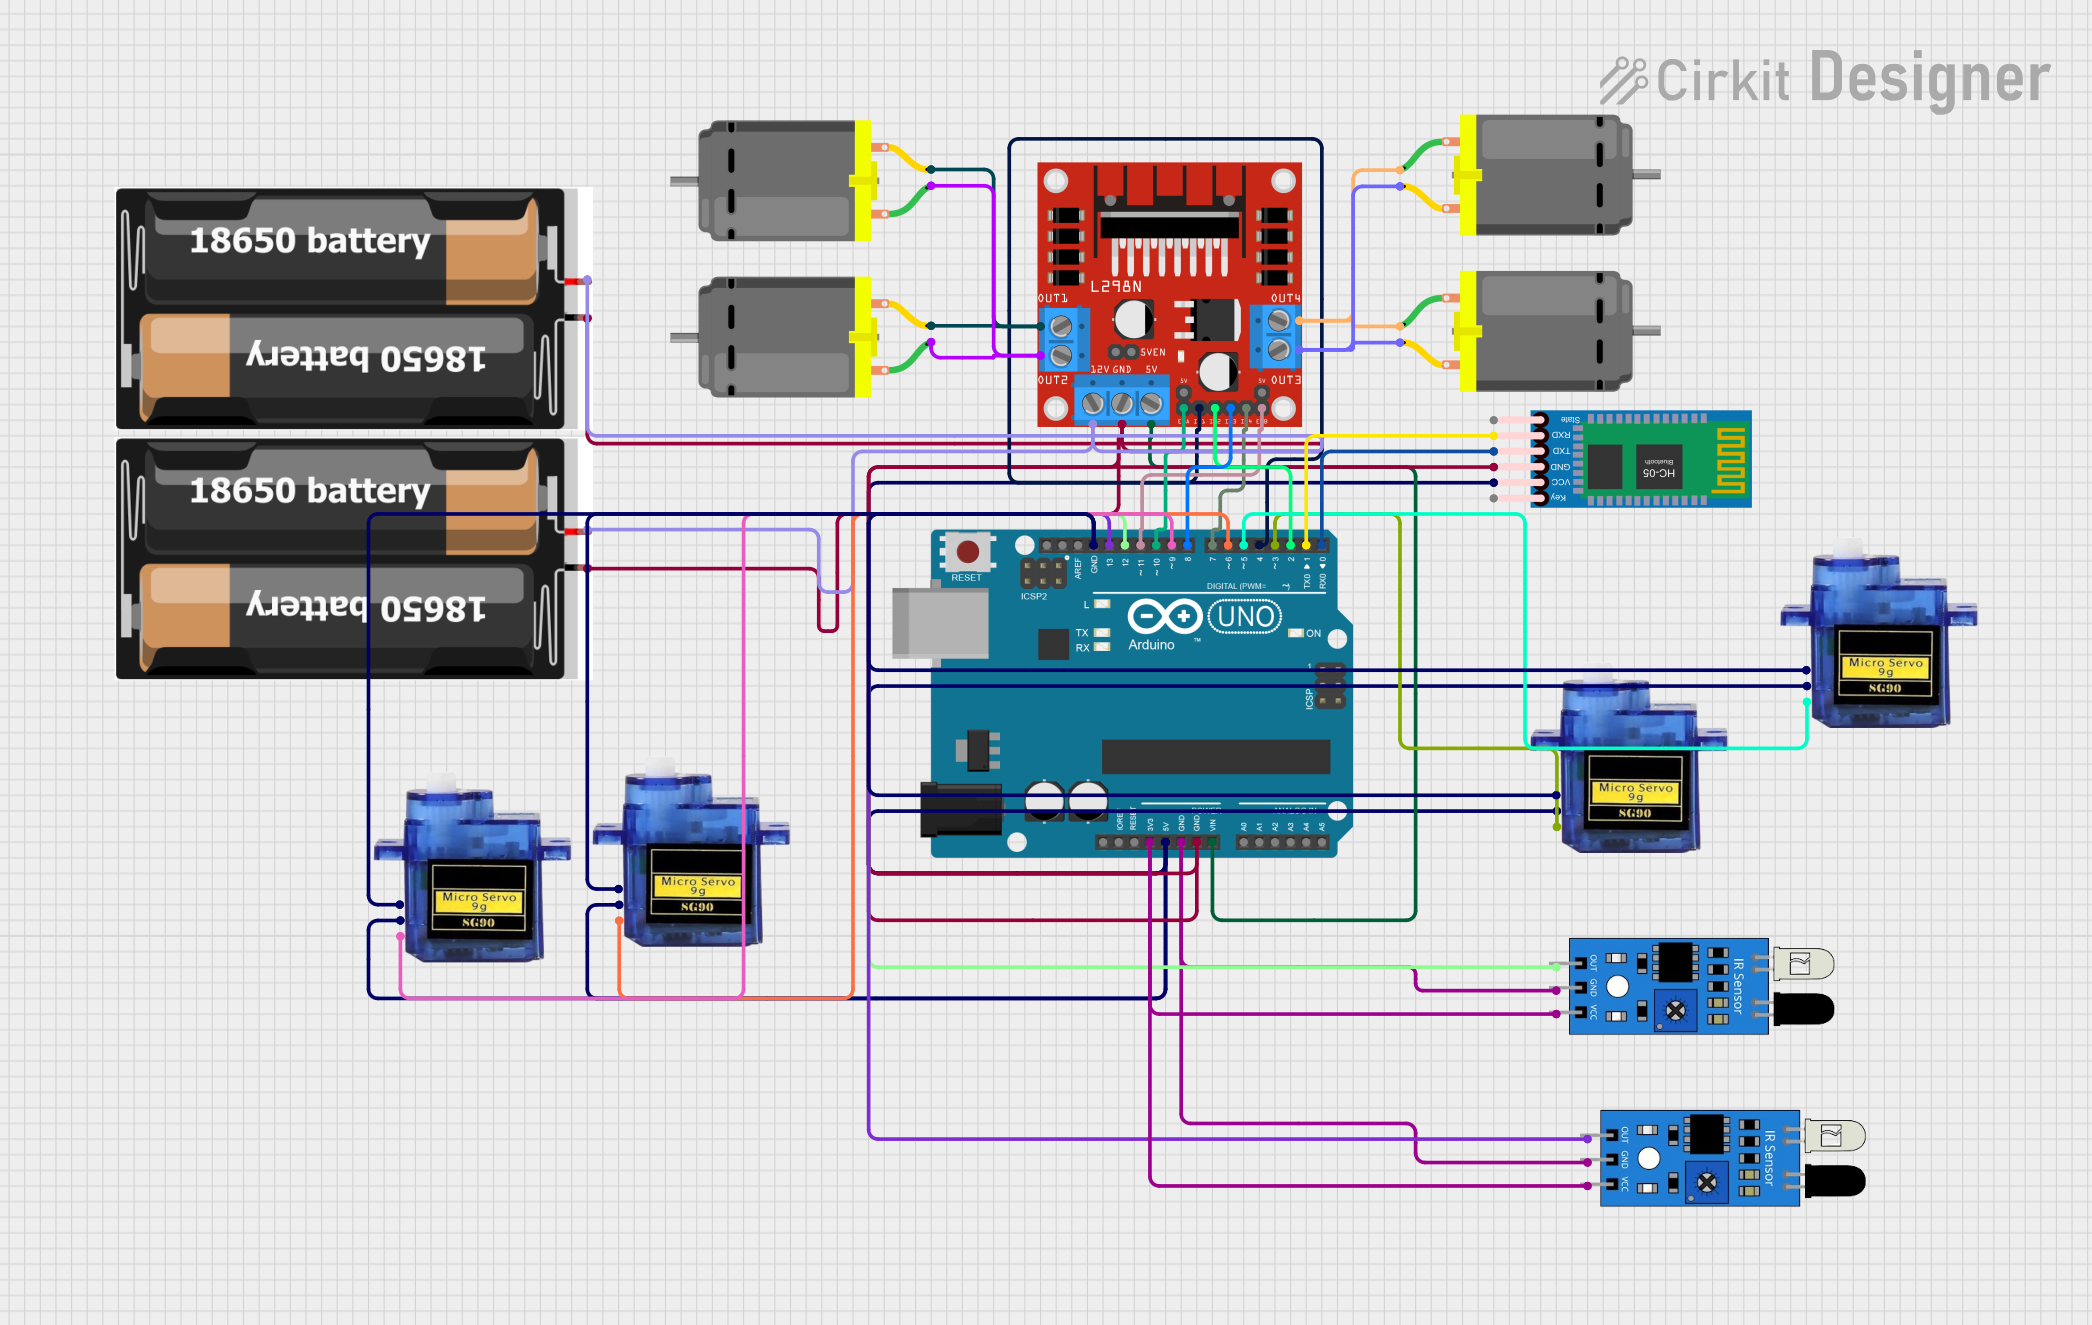
This document provides a detailed overview of a circuit design that includes an Arduino UNO microcontroller, multiple sensors, motors, and a Bluetooth module. The circuit is designed to control various components such as IR sensors, DC motors, and micro servos, and it includes code for the Arduino UNO to manage these components.
Component List
Arduino UNO
- Description: A microcontroller board based on the ATmega328P.
- Pins: UNUSED, IOREF, Reset, 3.3V, 5V, GND, Vin, A0, A1, A2, A3, A4, A5, SCL, SDA, AREF, D13, D12, D11, D10, D9, D8, D7, D6, D5, D4, D3, D2, D1, D0
2x 18650 Battery
- Description: A power source consisting of two 18650 batteries.
- Pins: vcc, gnd
IR Sensor
- Description: An infrared sensor used for object detection.
- Pins: out, gnd, vcc
L298N DC Motor Driver
- Description: A dual H-Bridge motor driver for controlling DC motors.
- Pins: OUT1, OUT2, 12V, GND, 5V, OUT3, OUT4, 5V-ENA-JMP-I, 5V-ENA-JMP-O, +5V-J1, +5V-J2, ENA, IN1, IN2, IN3, IN4, ENB
HC-05 Bluetooth Module
- Description: A Bluetooth module for wireless communication.
- Pins: Key, VCC, GND, TXD, RXD, State
DC Motor
- Description: A direct current motor.
- Pins: pin 1, pin 2
Micro Servo 9G
- Description: A small servo motor for precise control.
- Pins: GND, +5V, PWM
Wiring Details
Arduino UNO
- 3.3V: Connected to vcc of both IR sensors.
- 5V: Connected to +5V of all Micro Servo 9G motors and VCC of the HC-05 Bluetooth Module.
- GND: Connected to gnd of both IR sensors, L298N DC motor driver, both 2x 18650 batteries, HC-05 Bluetooth Module, and GND of all Micro Servo 9G motors.
- Vin: Connected to 5V of the L298N DC motor driver.
- D13: Connected to out of the second IR sensor.
- D12: Connected to out of the first IR sensor.
- D11: Connected to ENB of the L298N DC motor driver.
- D10: Connected to ENA of the L298N DC motor driver.
- D9: Connected to PWM of the first Micro Servo 9G motor.
- D8: Connected to IN3 of the L298N DC motor driver.
- D7: Connected to IN4 of the L298N DC motor driver.
- D6: Connected to PWM of the second Micro Servo 9G motor.
- D5: Connected to PWM of the third Micro Servo 9G motor.
- D4: Connected to IN1 of the L298N DC motor driver.
- D3: Connected to PWM of the fourth Micro Servo 9G motor.
- D2: Connected to IN2 of the L298N DC motor driver.
- D1: Connected to RXD of the HC-05 Bluetooth Module.
- D0: Connected to TXD of the HC-05 Bluetooth Module.
2x 18650 Battery
- vcc: Connected to 12V of the L298N DC motor driver.
- gnd: Connected to GND of the L298N DC motor driver and Arduino UNO.
IR Sensor
- vcc: Connected to 3.3V of the Arduino UNO.
- gnd: Connected to GND of the Arduino UNO.
- out: First sensor connected to D12 of the Arduino UNO, second sensor connected to D13 of the Arduino UNO.
L298N DC Motor Driver
- GND: Connected to GND of the Arduino UNO and 2x 18650 batteries.
- 5V: Connected to Vin of the Arduino UNO.
- 12V: Connected to vcc of the 2x 18650 batteries.
- OUT1: Connected to pin 2 of the first and second DC motors.
- OUT2: Connected to pin 1 of the first and second DC motors.
- OUT3: Connected to pin 2 of the third and fourth DC motors.
- OUT4: Connected to pin 1 of the third and fourth DC motors.
- ENA: Connected to D10 of the Arduino UNO.
- ENB: Connected to D11 of the Arduino UNO.
- IN1: Connected to D4 of the Arduino UNO.
- IN2: Connected to D2 of the Arduino UNO.
- IN3: Connected to D8 of the Arduino UNO.
- IN4: Connected to D7 of the Arduino UNO.
HC-05 Bluetooth Module
- VCC: Connected to 5V of the Arduino UNO.
- GND: Connected to GND of the Arduino UNO.
- TXD: Connected to D0 of the Arduino UNO.
- RXD: Connected to D1 of the Arduino UNO.
DC Motor
- pin 1: Connected to OUT2 of the L298N DC motor driver for the first and second motors, and OUT4 for the third and fourth motors.
- pin 2: Connected to OUT1 of the L298N DC motor driver for the first and second motors, and OUT3 for the third and fourth motors.
Micro Servo 9G
- +5V: Connected to 5V of the Arduino UNO.
- GND: Connected to GND of the Arduino UNO.
- PWM: First motor connected to D9, second motor connected to D6, third motor connected to D5, and fourth motor connected to D3 of the Arduino UNO.
Documented Code
Arduino UNO Code
#define Trig 8
#define Echo 9

const int in21 = 4;    // L298N-2 pin 4
const int in22 = 5;    // L298N-2 pin 5
const int in23 = 6;    // L298N-2 pin 6
const int in24 = 7;    // L298N-2 pin 7
const int enA = 10;    // L298N-2 pin 10
const int enB = 11;    // L298N-2 pin 11

void setup()
{
  pinMode(Trig, OUTPUT); // выход
  pinMode(Echo, INPUT); // вход

  pinMode(in21, OUTPUT);      // выход на L298n
  pinMode(in22, OUTPUT);      // выход на L298n
  pinMode(in23, OUTPUT);      // выход на L298n
  pinMode(in24, OUTPUT);      // выход на L298n
}

unsigned int impulseTime=0;
unsigned int distance_sm=0;

void loop()
{
  digitalWrite(Trig, HIGH);
  delayMicroseconds(10); // 10 микросекунд
  digitalWrite(Trig, LOW);
  impulseTime=pulseIn(Echo, HIGH); // замеряем длину импульса
  distance_sm=impulseTime/58; // переводим в сантиметры

  if (distance_sm>25) // если расстояние более 25 сантиметров
  {
      digitalWrite(in21, LOW);
      digitalWrite(in22, HIGH);
      analogWrite(enA, 60);
      analogWrite(enB, 60);
      digitalWrite(in23, HIGH);
      digitalWrite(in24, LOW);
  }
  else
  {
      digitalWrite(in21, HIGH);
      digitalWrite(in22, LOW);
      analogWrite(enA, 100);
      analogWrite(enB, 100);
      digitalWrite(in23, HIGH);
      digitalWrite(in24, LOW);
      delay(1100); // если застряет или не выезжает из угла  - измените время поворота. сейчас там стоит 1,1 с.
  }
  delay(50);
}
IR Sensor Code
void setup() {
  // put your setup code here, to run once:
}

void loop() {
  // put your main code here, to run repeatedly:
}
L298N DC Motor Driver Code
void setup() {
  // put your setup code here, to run once:
}

void loop() {
  // put your main code here, to run repeatedly:
}