
Arduino UNO and HC-06 Bluetooth Controlled DC Motor System with Battery Power
View and Edit Project In Cirkit Designer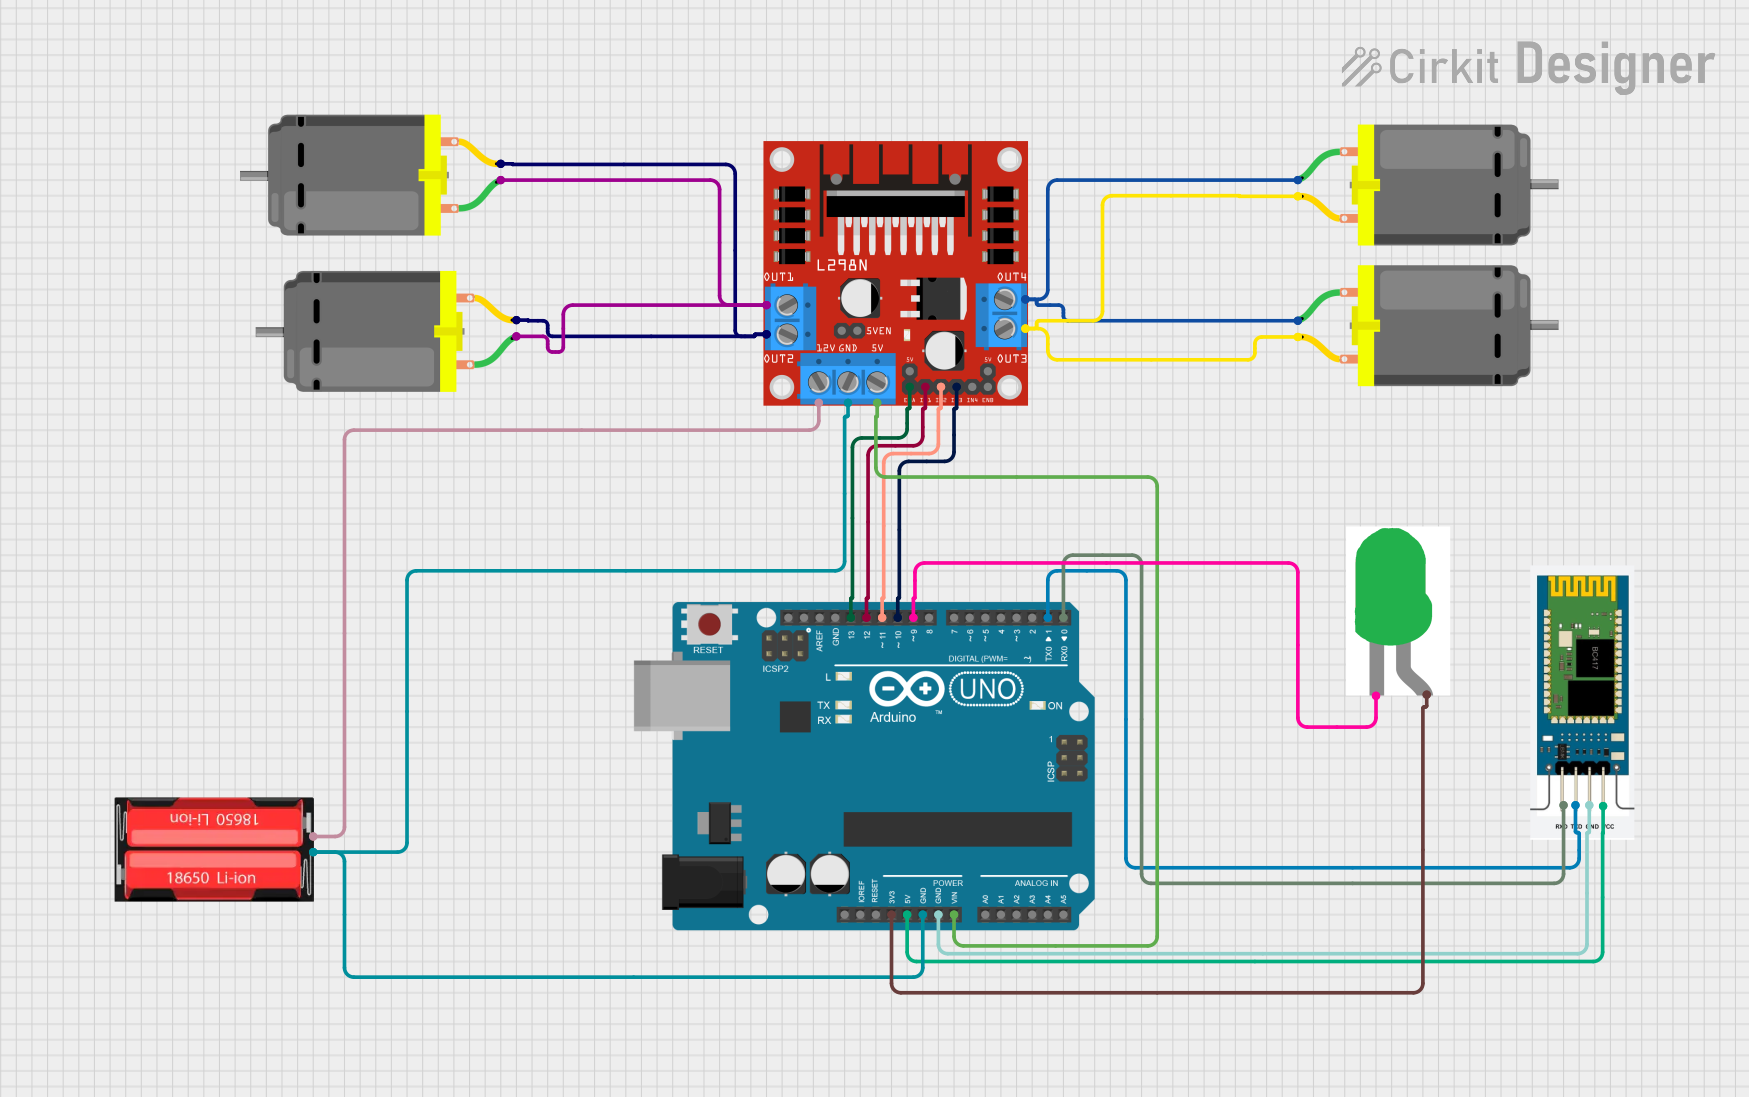
Circuit Documentation
Summary
This document provides a detailed overview of a circuit that includes a power source, a motor driver, multiple DC motors, an Arduino UNO microcontroller, an HC-06 Bluetooth module, and an LED. The circuit is designed to control the DC motors via the motor driver, with the Arduino UNO serving as the central control unit. The HC-06 module allows for wireless communication, and the LED serves as an indicator.
Component List
18650 Li-Ion Battery
- Pins: Positive, Negative
- Description: A rechargeable lithium-ion battery.
- Purpose: Provides power to the circuit.
DC Motor
- Pins: pin 1, pin 2
- Description: A motor that runs on direct current.
- Purpose: Converts electrical energy into mechanical motion.
HC-06 Bluetooth Module
- Pins: RXD, TXD, GND, VCC
- Description: A Bluetooth module for wireless communication.
- Purpose: Enables wireless communication with the Arduino UNO.
Arduino UNO
- Pins: UNUSED, IOREF, Reset, 3.3V, 5V, GND, Vin, A0, A1, A2, A3, A4, A5, SCL, SDA, AREF, D13, D12, D11, D10, D9, D8, D7, D6, D5, D4, D3, D2, D1, D0
- Description: A microcontroller board based on the ATmega328P.
- Purpose: Serves as the central control unit for the circuit.
L298N DC Motor Driver
- Pins: OUT1, OUT2, 12V, GND, 5V, OUT3, OUT4, 5V-ENA-JMP-I, 5V-ENA-JMP-O, +5V-J1, +5V-J2, ENA, IN1, IN2, IN3, IN4, ENB
- Description: A dual H-Bridge motor driver.
- Purpose: Controls the speed and direction of the DC motors.
LED: Two Pin (green)
- Pins: cathode, anode
- Description: A green light-emitting diode.
- Purpose: Serves as an indicator.
Wiring Details
18650 Li-Ion Battery
- Positive connected to 12V of L298N DC Motor Driver
- Negative connected to GND of L298N DC Motor Driver and GND of Arduino UNO
DC Motor 1
- pin 1 connected to OUT4 of L298N DC Motor Driver
- pin 2 connected to OUT3 of L298N DC Motor Driver
DC Motor 2
- pin 1 connected to OUT1 of L298N DC Motor Driver
- pin 2 connected to OUT2 of L298N DC Motor Driver
HC-06 Bluetooth Module
- VCC connected to 5V of Arduino UNO
- GND connected to GND of Arduino UNO
- TXD connected to D1 of Arduino UNO
- RXD connected to D0 of Arduino UNO
Arduino UNO
- 3.3V connected to anode of LED
- GND connected to Negative of 18650 Li-Ion Battery and GND of HC-06 Bluetooth Module
- Vin connected to 5V of L298N DC Motor Driver
- D13 connected to ENA of L298N DC Motor Driver
- D12 connected to IN1 of L298N DC Motor Driver
- D11 connected to IN2 of L298N DC Motor Driver
- D10 connected to IN3 of L298N DC Motor Driver
- D9 connected to cathode of LED
- D1 connected to TXD of HC-06 Bluetooth Module
- D0 connected to RXD of HC-06 Bluetooth Module
L298N DC Motor Driver
- 12V connected to Positive of 18650 Li-Ion Battery
- GND connected to Negative of 18650 Li-Ion Battery and GND of Arduino UNO
- 5V connected to Vin of Arduino UNO
- ENA connected to D13 of Arduino UNO
- IN1 connected to D12 of Arduino UNO
- IN2 connected to D11 of Arduino UNO
- IN3 connected to D10 of Arduino UNO
- OUT4 connected to pin 1 of DC Motor 1
- OUT3 connected to pin 2 of DC Motor 1
- OUT1 connected to pin 1 of DC Motor 2
- OUT2 connected to pin 2 of DC Motor 2
LED: Two Pin (green)
- anode connected to 3.3V of Arduino UNO
- cathode connected to D9 of Arduino UNO
Documented Code
Arduino UNO Code
void setup() {
  // put your setup code here, to run once:

}

void loop() {
  // put your main code here, to run repeatedly:

}
This code is a basic template for the Arduino UNO. The setup function is used to initialize any settings, and the loop function contains the main code that runs repeatedly.