
Arduino UNO and HX711 Load Sensor Interface with Dual Axis Joystick and LED Indicators
View and Edit Project In Cirkit Designer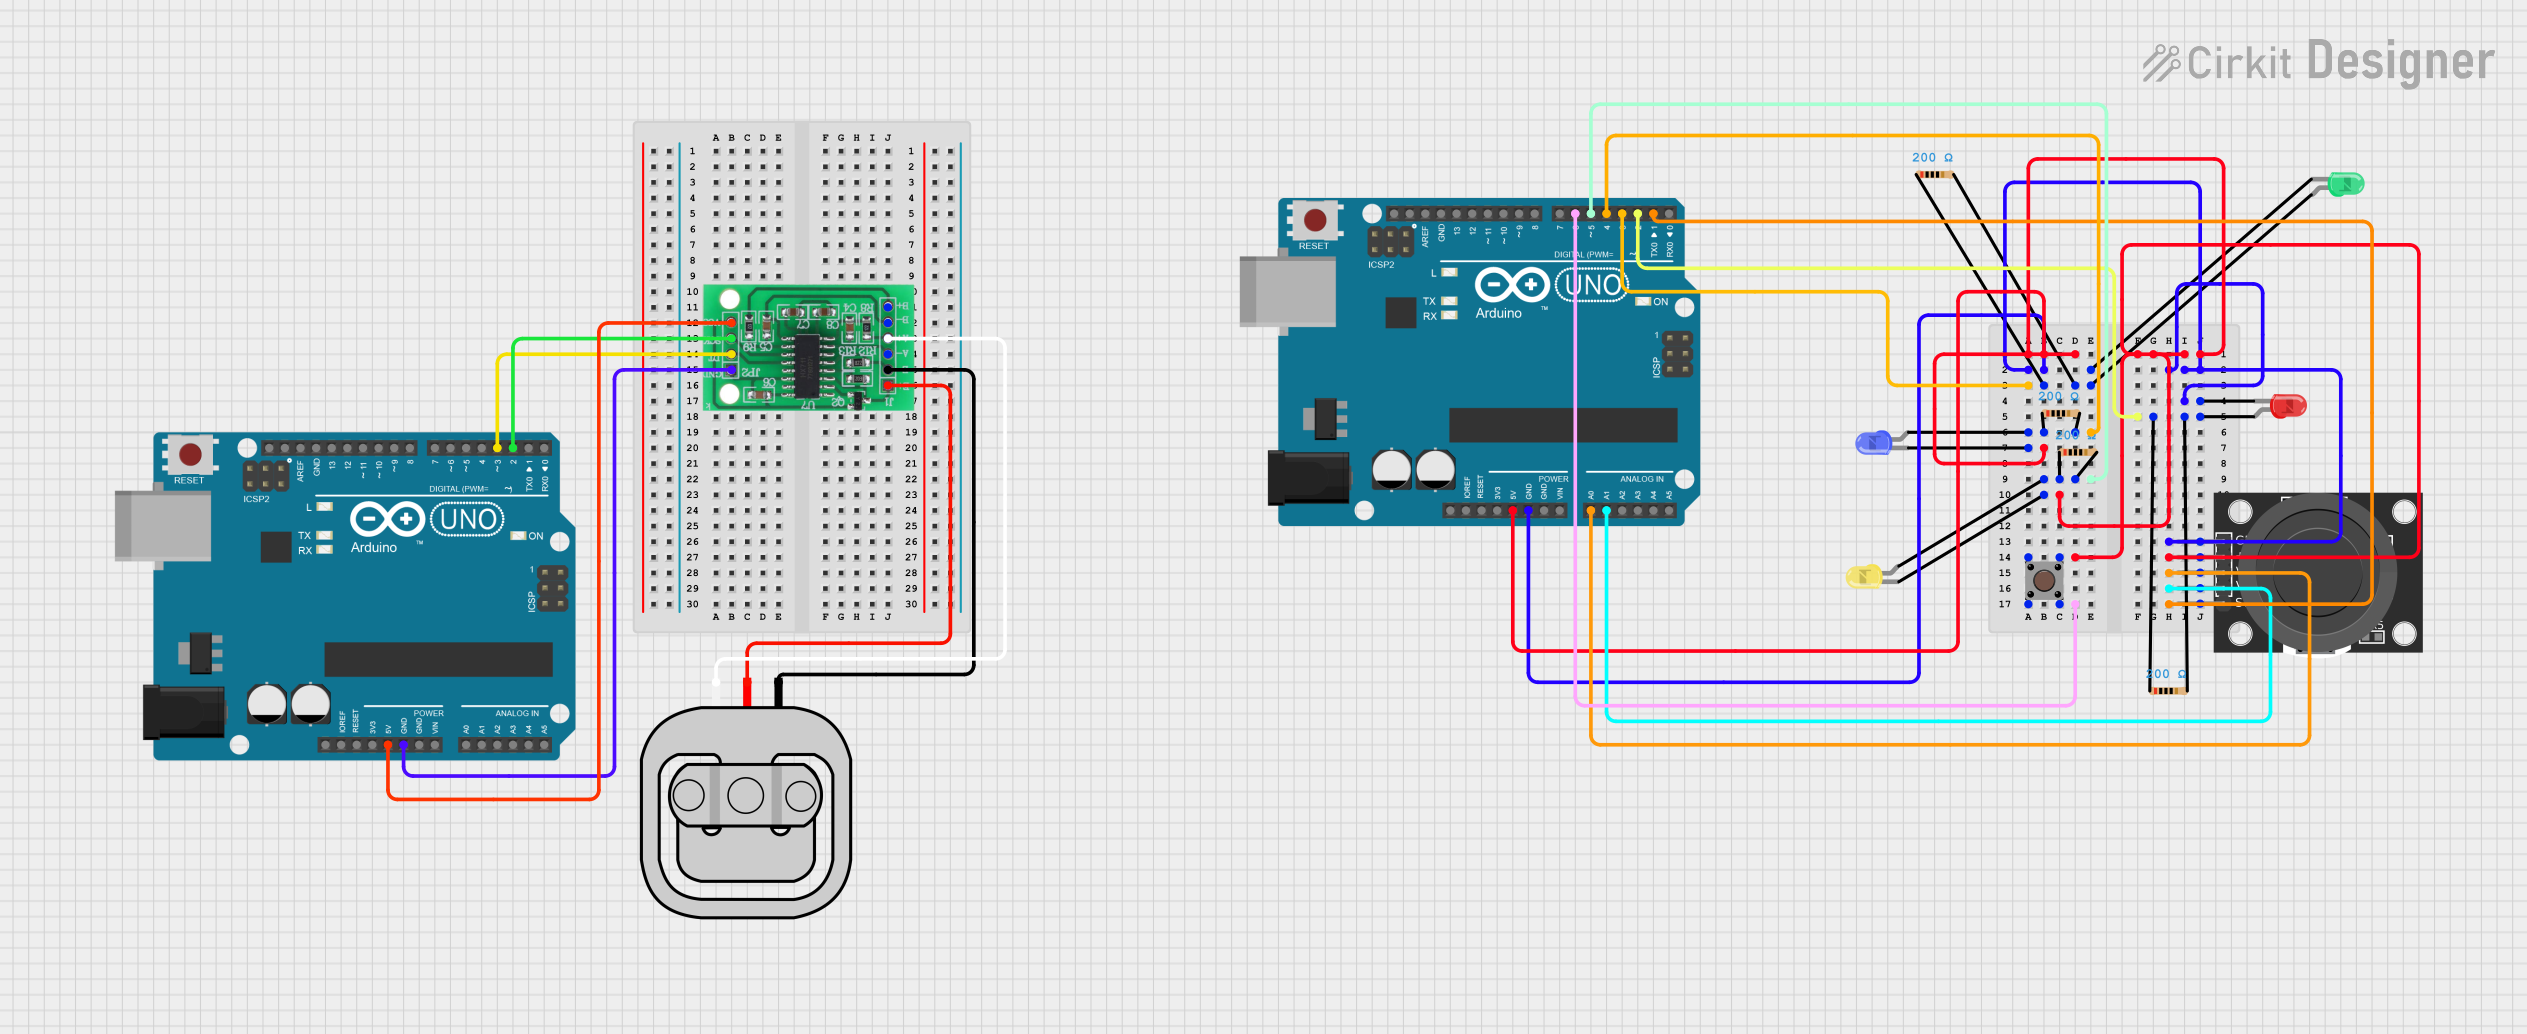
Circuit Documentation
Summary
This circuit involves an Arduino UNO microcontroller interfacing with an HX711 bridge sensor interface, a load sensor, a dual-axis joystick module, several LEDs, resistors, and a pushbutton. The circuit is designed to read data from the load sensor and joystick, and control the LEDs based on the input.
Component List
HX711 - Bridge Sensor Interface
- Description: Interface for bridge sensors like load cells.
- Pins: E+, E-, A-, A+, B-, B+, GND, DATA (OUT), SCK (IN), 3.3/3.5V Supply
Arduino UNO
- Description: Microcontroller board based on the ATmega328P.
- Pins: UNUSED, IOREF, Reset, 3.3V, 5V, GND, Vin, A0, A1, A2, A3, A4, A5, SCL, SDA, AREF, D13, D12, D11, D10, D9, D8, D7, D6, D5, D4, D3, D2, D1, D0
Load Sensor - 50kg
- Description: Sensor to measure weight up to 50kg.
- Pins: W, R, B
KY-023 Dual Axis Joystick Module
- Description: Joystick module with X and Y axis and a switch.
- Pins: GND, +5V, VRx, VRy, SW
LED: Two Pin (green)
- Description: Green LED.
- Pins: cathode, anode
LED: Two Pin (yellow)
- Description: Yellow LED.
- Pins: cathode, anode
LED: Two Pin (blue)
- Description: Blue LED.
- Pins: cathode, anode
LED: Two Pin (red)
- Description: Red LED.
- Pins: cathode, anode
Resistor (200 Ohms)
- Description: Resistor with 200 Ohms resistance.
- Pins: pin1, pin2
Pushbutton
- Description: Simple pushbutton.
- Pins: Pin 3 (out), Pin 4 (out), Pin 1 (in), Pin 2 (in)
Wiring Details
HX711 - Bridge Sensor Interface
- 3.3/3.5V Supply connected to 5V of Arduino UNO
- SCK - CLOCK (IN) connected to D2 of Arduino UNO
- A+ connected to W of Load Sensor - 50kg
- DATA (OUT) connected to D3 of Arduino UNO
- GND - GROUND connected to GND of Arduino UNO
- E- connected to B of Load Sensor - 50kg
- E+ connected to R of Load Sensor - 50kg
Arduino UNO
- 5V connected to 3.3/3.5V Supply of HX711 - Bridge Sensor Interface
- D2 connected to SCK - CLOCK (IN) of HX711 - Bridge Sensor Interface
- D3 connected to DATA (OUT) of HX711 - Bridge Sensor Interface
- GND connected to GND - GROUND of HX711 - Bridge Sensor Interface
- 5V connected to +5V of KY-023 Dual Axis Joystick Module
- GND connected to GND of KY-023 Dual Axis Joystick Module
- D3 connected to pin2 of Resistor and anode of LED: Two Pin (green)
- D2 connected to pin2 of Resistor and anode of LED: Two Pin (red)
- D4 connected to pin2 of Resistor and anode of LED: Two Pin (blue)
- D5 connected to pin2 of Resistor and anode of LED: Two Pin (yellow)
- A0 connected to VRx of KY-023 Dual Axis Joystick Module
- A1 connected to VRy of KY-023 Dual Axis Joystick Module
- D6 connected to Pin 2 (in) of Pushbutton
- D1 connected to SW of KY-023 Dual Axis Joystick Module
Load Sensor - 50kg
- W connected to A+ of HX711 - Bridge Sensor Interface
- B connected to E- of HX711 - Bridge Sensor Interface
- R connected to E+ of HX711 - Bridge Sensor Interface
KY-023 Dual Axis Joystick Module
- +5V connected to 5V of Arduino UNO
- GND connected to GND of Arduino UNO
- VRx connected to A0 of Arduino UNO
- VRy connected to A1 of Arduino UNO
- SW connected to D1 of Arduino UNO
LED: Two Pin (green)
- cathode connected to GND of Arduino UNO
- anode connected to pin1 of Resistor and D3 of Arduino UNO
LED: Two Pin (yellow)
- cathode connected to GND of Arduino UNO
- anode connected to pin1 of Resistor and D5 of Arduino UNO
LED: Two Pin (blue)
- cathode connected to GND of Arduino UNO
- anode connected to pin1 of Resistor and D4 of Arduino UNO
LED: Two Pin (red)
- cathode connected to GND of Arduino UNO
- anode connected to pin1 of Resistor and D2 of Arduino UNO
Resistor (200 Ohms)
- pin1 connected to anode of respective LED
- pin2 connected to respective digital pin of Arduino UNO
Pushbutton
- Pin 3 (out) connected to Pin 1 (in)
- Pin 4 (out) connected to Pin 2 (in) and D6 of Arduino UNO
Documented Code
Arduino UNO (Instance 1)
void setup() {
  // put your setup code here, to run once:

}

void loop() {
  // put your main code here, to run repeatedly:

}
Arduino UNO (Instance 2)
void setup() {
  // put your setup code here, to run once:

}

void loop() {
  // put your main code here, to run repeatedly:

}
This documentation provides a comprehensive overview of the circuit, including a summary, detailed component list, wiring details, and documented code for the microcontrollers.