
Arduino UNO Controlled Motor and LED System with Pushbutton Interface
View and Edit Project In Cirkit Designer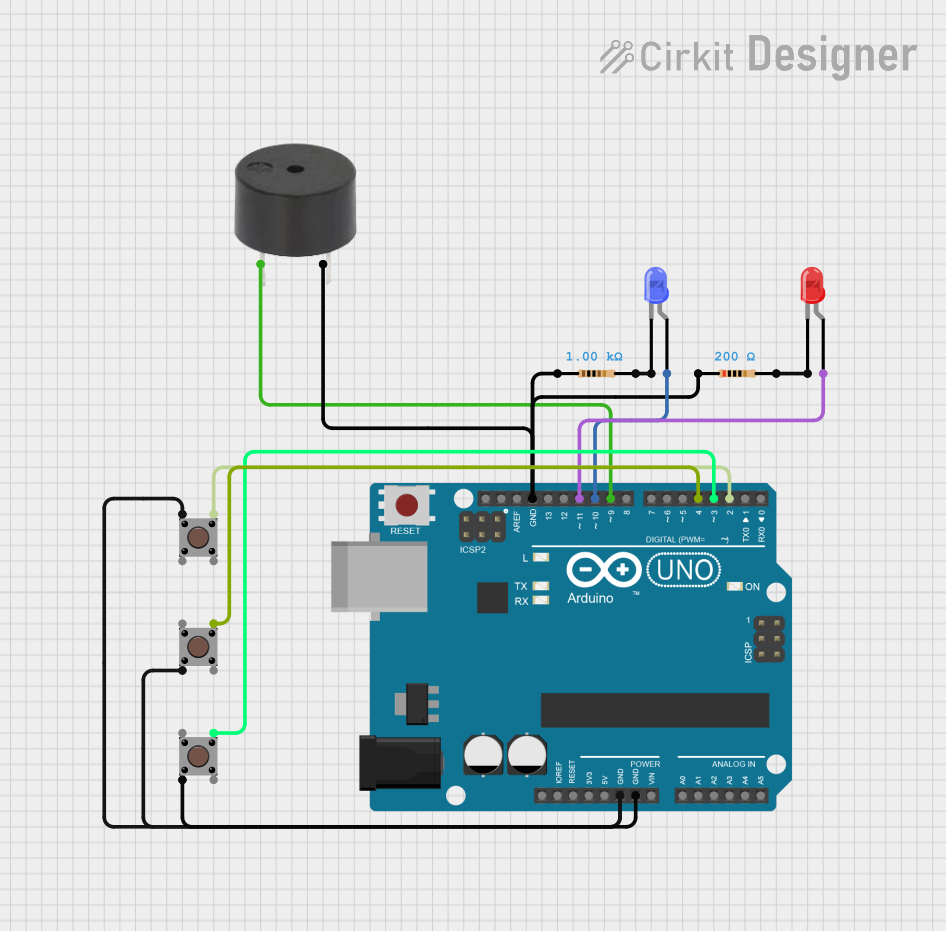
Circuit Documentation
Summary
This circuit is designed to control a DC motor and two LEDs (blue and red) using three pushbuttons. The Arduino UNO microcontroller is the central control unit. The pushbuttons are used to toggle the motor and blue LED, increase the motor speed, and decrease the motor speed. The red LED turns on after 20 seconds when the motor is on. Additionally, a buzzer is included in the circuit.
Component List
Arduino UNO
- Description: Microcontroller board based on the ATmega328P.
- Pins: UNUSED, IOREF, Reset, 3.3V, 5V, GND, Vin, A0, A1, A2, A3, A4, A5, SCL, SDA, AREF, D13, D12, D11, D10, D9, D8, D7, D6, D5, D4, D3, D2, D1, D0
LED: Two Pin (blue)
- Description: Blue LED with two pins (anode and cathode).
- Pins: cathode, anode
LED: Two Pin (red)
- Description: Red LED with two pins (anode and cathode).
- Pins: cathode, anode
Pushbutton
- Description: Pushbutton with four pins.
- Pins: Pin 3 (out), Pin 4 (out), Pin 1 (in), Pin 2 (in)
Resistor (1000 Ohms)
- Description: Resistor with a resistance of 1000 Ohms.
- Pins: pin1, pin2
Resistor (200 Ohms)
- Description: Resistor with a resistance of 200 Ohms.
- Pins: pin1, pin2
Buzzer
- Description: Buzzer with two pins (PIN and GND).
- Pins: PIN, GND
Wiring Details
Arduino UNO
GND is connected to:
- Pin 2 (in) of Pushbutton
- Pin 1 (in) of Pushbutton
- GND of Buzzer
- pin1 of Resistor (200 Ohms)
- pin1 of Resistor (1000 Ohms)
D11 is connected to:
- anode of LED (red)
D10 is connected to:
- anode of LED (blue)
D9 is connected to:
- PIN of Buzzer
D4 is connected to:
- Pin 3 (out) of Pushbutton
D3 is connected to:
- Pin 3 (out) of Pushbutton
D2 is connected to:
- Pin 3 (out) of Pushbutton
LED: Two Pin (blue)
anode is connected to:
- D10 of Arduino UNO
cathode is connected to:
- pin2 of Resistor (1000 Ohms)
LED: Two Pin (red)
anode is connected to:
- D11 of Arduino UNO
cathode is connected to:
- pin2 of Resistor (200 Ohms)
Pushbutton
Pin 2 (in) is connected to:
- GND of Arduino UNO
Pin 1 (in) is connected to:
- GND of Arduino UNO
Pin 3 (out) is connected to:
- D4 of Arduino UNO
- D3 of Arduino UNO
- D2 of Arduino UNO
Resistor (1000 Ohms)
pin1 is connected to:
- GND of Arduino UNO
pin2 is connected to:
- cathode of LED (blue)
Resistor (200 Ohms)
pin1 is connected to:
- GND of Arduino UNO
pin2 is connected to:
- cathode of LED (red)
Buzzer
PIN is connected to:
- D9 of Arduino UNO
GND is connected to:
- GND of Arduino UNO
Code Documentation
/*
 * This Arduino sketch controls a DC motor and LEDs using three pushbuttons.
 * - ON/OFF button toggles the motor and blue LED.
 * - Flame Increase button increases the motor speed.
 * - Flame Decrease button decreases the motor speed.
 * - Red LED turns on after 20 seconds when the motor is on.
 */

// Define pin connections
const int motorPin = 9; // DC Motor connected to digital pin 9
const int blueLEDPin = 10; // Blue LED connected to digital pin 10
const int redLEDPin = 11; // Red LED connected to digital pin 11
const int onOffButtonPin = 2; // ON/OFF button connected to digital pin 2
const int flameIncreaseButtonPin = 3; // Flame Increase button connected to pin 3
const int flameDecreaseButtonPin = 4; // Flame Decrease button connected to pin 4

// Variables to store the state
bool motorState = false;
unsigned long motorOnTime = 0;
int motorSpeed = 0; // Motor speed (0-255)

void setup() {
  // Set pin modes
  pinMode(motorPin, OUTPUT);
  pinMode(blueLEDPin, OUTPUT);
  pinMode(redLEDPin, OUTPUT);
  pinMode(onOffButtonPin, INPUT_PULLUP);
  pinMode(flameIncreaseButtonPin, INPUT_PULLUP);
  pinMode(flameDecreaseButtonPin, INPUT_PULLUP);
}

void loop() {
  // Check ON/OFF button state
  if (digitalRead(onOffButtonPin) == LOW) {
    delay(50); // Debounce delay
    if (digitalRead(onOffButtonPin) == LOW) {
      motorState = !motorState;
      motorOnTime = millis();
      digitalWrite(motorPin, motorState ? HIGH : LOW);
      digitalWrite(blueLEDPin, motorState ? HIGH : LOW);
      delay(500); // Prevent multiple toggles
    }
  }

  // Check Flame Increase button state
  if (digitalRead(flameIncreaseButtonPin) == LOW) {
    delay(50); // Debounce delay
    if (digitalRead(flameIncreaseButtonPin) == LOW) {
      motorSpeed = min(motorSpeed + 25, 255); // Increase speed
      analogWrite(motorPin, motorSpeed);
      delay(500); // Prevent multiple adjustments
    }
  }

  // Check Flame Decrease button state
  if (digitalRead(flameDecreaseButtonPin) == LOW) {
    delay(50); // Debounce delay
    if (digitalRead(flameDecreaseButtonPin) == LOW) {
      motorSpeed = max(motorSpeed - 25, 0); // Decrease speed
      analogWrite(motorPin, motorSpeed);
      delay(500); // Prevent multiple adjustments
    }
  }

  // Turn on Red LED after 20 seconds if motor is on
  if (motorState && (millis() - motorOnTime >= 20000)) {
    digitalWrite(redLEDPin, HIGH);
  } else {
    digitalWrite(redLEDPin, LOW);
  }
}
This code controls the DC motor and LEDs based on the state of the pushbuttons. The motor and blue LED are toggled on and off by the ON/OFF button. The motor speed is increased and decreased by the Flame Increase and Flame Decrease buttons, respectively. The red LED turns on after 20 seconds if the motor is on.