
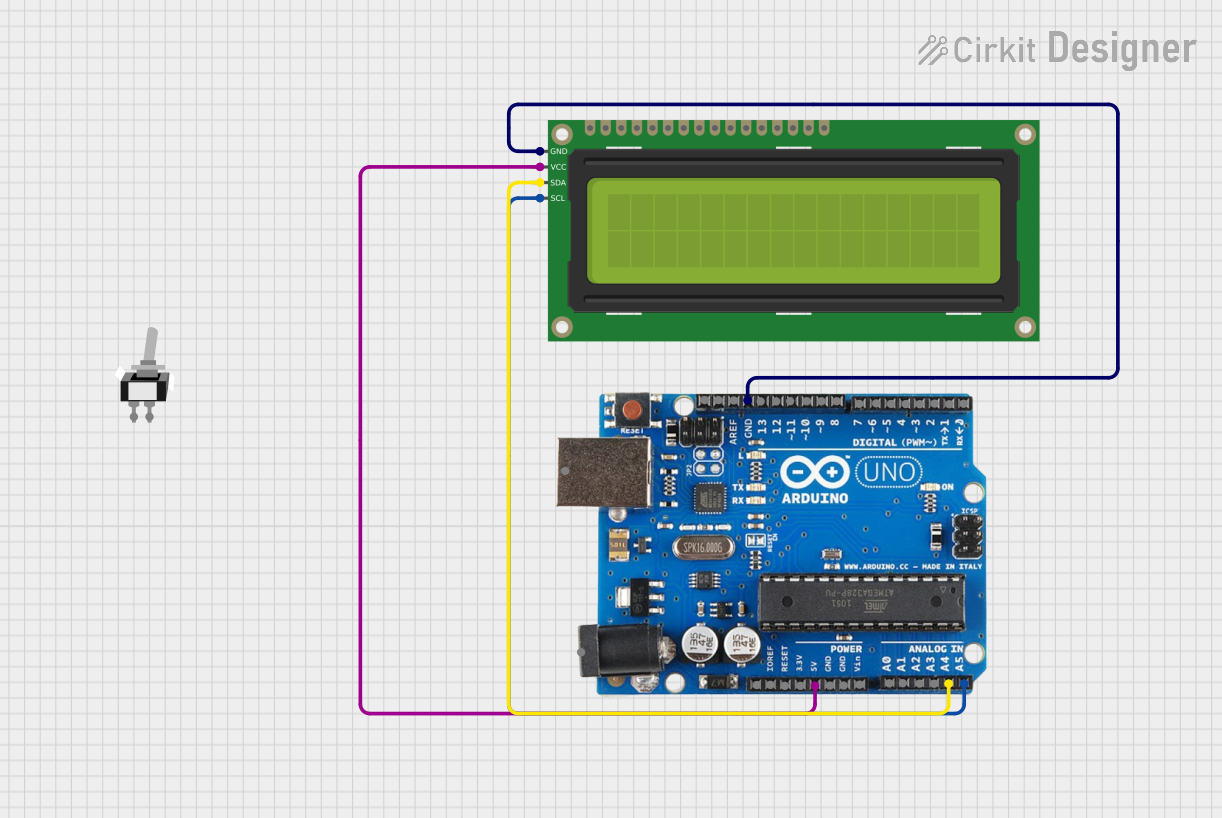
Circuit Documentation
Summary
This circuit consists of an Arduino Uno R3 microcontroller, a 16x2 I2C LCD display, and a toggle switch. The Arduino Uno R3 is used to control the LCD display, which shows messages in a loop. The toggle switch is included in the circuit but is not connected to any other components in this configuration.
Component List
Arduino Uno R3
- Description: A microcontroller board based on the ATmega328P.
- Pins: D8, D9, D10, D11, D12, D13, GND, AREF, SDA, SCL, D0/RX, D1/Tx, D2, D3, D4, D5, 6, D7, A5/SCL, A4/SDA, A3, A2, A1, A0, Vin, 5V, 3.3V, RESET, IOREF, NONE, USB Jack, Power Jack
16x2 I2C LCD
- Description: A 16x2 character LCD display with I2C interface.
- Pins: GND, VCC, SDA, SCL
Toggle Switch SPST
- Description: A single-pole single-throw (SPST) toggle switch.
- Pins: L1, COM
Wiring Details
Arduino Uno R3
- GND: Connected to GND of the 16x2 I2C LCD.
- A5/SCL: Connected to SCL of the 16x2 I2C LCD.
- A4/SDA: Connected to SDA of the 16x2 I2C LCD.
- 5V: Connected to VCC of the 16x2 I2C LCD.
16x2 I2C LCD
- GND: Connected to GND of the Arduino Uno R3.
- SCL: Connected to A5/SCL of the Arduino Uno R3.
- SDA: Connected to A4/SDA of the Arduino Uno R3.
- VCC: Connected to 5V of the Arduino Uno R3.
Toggle Switch SPST
- L1: Not connected.
- COM: Not connected.
Code Documentation
Arduino Uno R3 Code
#include <LiquidCrystal_I2C.h>

LiquidCrystal_I2C lcd(0x27, 16, 2); // I2C address 0x27, 16 column and 2 rows

void setup()
{
  lcd.init(); // initialize the lcd
  lcd.backlight();
}

void loop()
{
  lcd.clear();                 // clear display
  lcd.setCursor(0, 0);         // move cursor to   (0, 0)
  lcd.print("Arduino");        // print message at (0, 0)
  lcd.setCursor(2, 1);         // move cursor to   (2, 1)
  lcd.print("GetStarted.com"); // print message at (2, 1)
  delay(2000);                 // display the above for two seconds

  lcd.clear();                  // clear display
  lcd.setCursor(3, 0);          // move cursor to   (3, 0)
  lcd.print("DIYables");        // print message at (3, 0)
  lcd.setCursor(0, 1);          // move cursor to   (0, 1)
  lcd.print("www.diyables.io"); // print message at (0, 1)
  delay(2000);                  // display the above for two seconds
}
This code initializes the 16x2 I2C LCD display and continuously loops through two messages, displaying each for two seconds. The setup() function initializes the LCD and turns on the backlight. The loop() function clears the display, sets the cursor position, prints the messages, and introduces a delay to keep the messages on the screen for two seconds each.