
Wi-Fi Enabled Soil Nutrient Monitoring System with ESP8266 and NPK Sensor
View and Edit Project In Cirkit Designer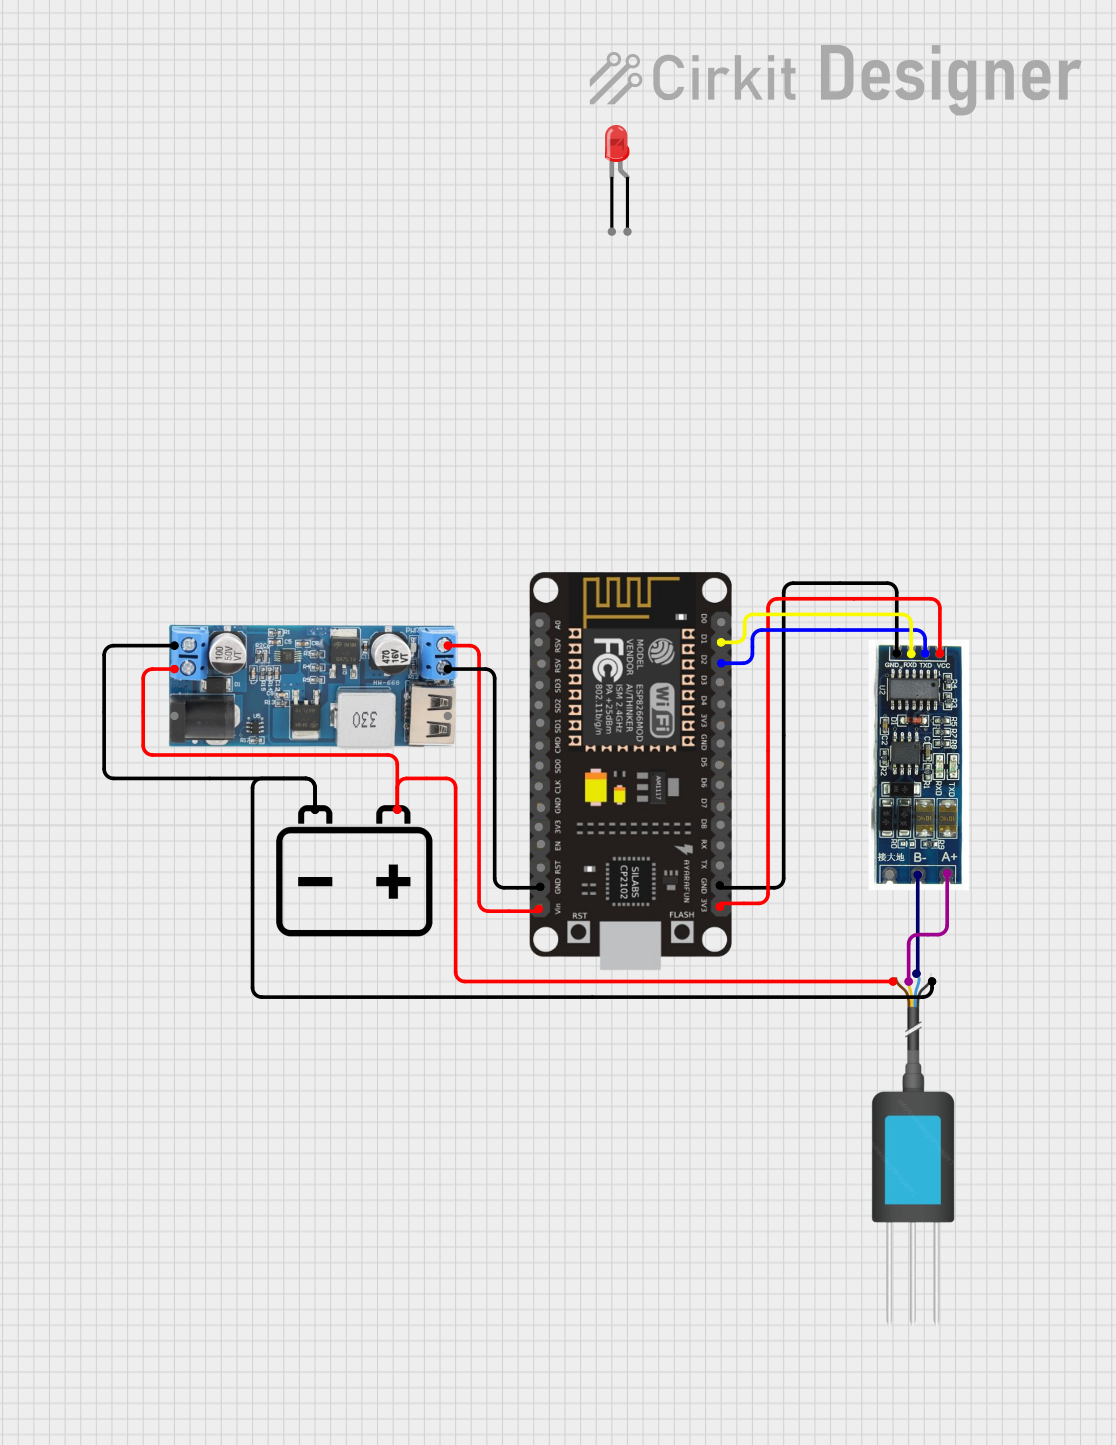
Circuit Documentation
Summary
This circuit is designed to monitor soil parameters using an NPK Soil Sensor and display the data on an OLED screen connected to an ESP8266 NodeMCU. The circuit also includes an RS485 to TTL Converter for communication, a 12V battery for power, and a 12V to 5V Step Down Power Converter to supply the necessary voltage levels. An LED is used to indicate the status of the device.
Component List
NPK Soil Sensor
- Description: Measures the levels of Nitrogen (N), Phosphorus (P), and Potassium (K) in the soil.
- Pins: 12V DC, A, B, GND
ESP8266 NodeMCU
- Description: A microcontroller with built-in Wi-Fi capabilities, used to process sensor data and control the OLED display.
- Pins: D0, D1, D2, D3, D4, 3V3, GND, D5, D6, D7, D8, RX, TX, A0, RSV, SD3, SD2, SD1, CMD, SD0, CLK, EN, RST, VIN
LED: Two Pin (Red)
- Description: Indicates the status of the device.
- Pins: Cathode, Anode
12V Battery
- Description: Provides power to the circuit.
- Pins: -, +
12V to 5V Step Down Power Converter
- Description: Converts 12V from the battery to 5V for the ESP8266 NodeMCU and other components.
- Pins: VIN 9v-36v, VIN+, VIN-, USB OUTPUT 5V, 5V OUTPUT, GND
RS485 to TTL Converter
- Description: Converts RS485 signals to TTL for communication with the ESP8266 NodeMCU.
- Pins: VCC, GND, TXD, RXD, A, B
Wiring Details
NPK Soil Sensor
- 12V DC connected to 12V Battery +
- A connected to RS485 to TTL Converter A
- B connected to RS485 to TTL Converter B
- GND connected to 12V Battery -
ESP8266 NodeMCU
- D1 connected to RS485 to TTL Converter RXD
- D2 connected to RS485 to TTL Converter TXD
- GND connected to RS485 to TTL Converter GND
- 3V3 connected to RS485 to TTL Converter VCC
- GND connected to 12V to 5V Step Down Power Converter GND
- VIN connected to 12V to 5V Step Down Power Converter 5V OUTPUT
LED: Two Pin (Red)
- Cathode connected to GND
- Anode connected to appropriate GPIO pin (not specified in the net list)
12V Battery
- + connected to NPK Soil Sensor 12V DC and 12V to 5V Step Down Power Converter VIN+
- - connected to NPK Soil Sensor GND and 12V to 5V Step Down Power Converter VIN-
12V to 5V Step Down Power Converter
- VIN+ connected to 12V Battery +
- VIN- connected to 12V Battery -
- GND connected to ESP8266 NodeMCU GND
- 5V OUTPUT connected to ESP8266 NodeMCU VIN
RS485 to TTL Converter
- VCC connected to ESP8266 NodeMCU 3V3
- GND connected to ESP8266 NodeMCU GND
- TXD connected to ESP8266 NodeMCU D2
- RXD connected to ESP8266 NodeMCU D1
- A connected to NPK Soil Sensor A
- B connected to NPK Soil Sensor B
Documented Code
ESP8266 NodeMCU Code
#include <Wire.h>
#include <Adafruit_GFX.h>
#include <Adafruit_SSD1306.h>

#define SCREEN_WIDTH 128
#define SCREEN_HEIGHT 64

// OLED display connected to I2C (D1 = SDA, D2 = SCL)
Adafruit_SSD1306 display(SCREEN_WIDTH, SCREEN_HEIGHT, &Wire, -1);

// LED pin definitions
#define RED_LED D6
#define BLUE_LED D7
#define GREEN_LED D8

// Button pin definitions
#define BUTTON1 D3 // To manually cycle parameters

// Parameters data (replace with actual sensor readings)
int nitrogen = 45;
int phosphorus = 30;
int potassium = 60;
float pH = 6.8;
float temperature = 25.5;
float humidity = 70.3;
float ec = 1.2; // Electrical Conductivity

// Debounce variables
bool lastButton1State = LOW;
unsigned long lastDebounceTime1 = 0;
unsigned long debounceDelay = 50;  // 50 ms debounce delay

// Timing variables for automatic parameter cycling
unsigned long lastUpdateTime = 0;
unsigned long displayInterval = 3000; // 3 seconds for each parameter

// Parameter index to cycle through
int parameterIndex = 0;
const int totalParameters = 7; // Total number of parameters

void setup() {
  Serial.begin(9600);

  // Initialize OLED display
  if (!display.begin(SSD1306_I2C_ADDRESS, 0x3C)) {
    Serial.println(F("SSD1306 allocation failed"));
    for (;;);
  }
  display.clearDisplay();
  display.setTextSize(1);
  display.setTextColor(SSD1306_WHITE);
  display.setCursor(0, 0);
  display.println("Initializing...");
  display.display();
  delay(1000);

  // Set up LED pins
  pinMode(RED_LED, OUTPUT);
  pinMode(BLUE_LED, OUTPUT);
  pinMode(GREEN_LED, OUTPUT);

  // Set up button pin
  pinMode(BUTTON1, INPUT);

  // Initial LED states
  digitalWrite(RED_LED, HIGH);  // Device is powered on
  digitalWrite(BLUE_LED, LOW);
  digitalWrite(GREEN_LED, LOW);

  display.clearDisplay();
  display.setCursor(0, 0);
  display.println("Setup complete!");
  display.display();
  delay(1000);
}

void loop() {
  // Button 1 handling to manually cycle through parameters
  bool reading1 = digitalRead(BUTTON1);
  if (reading1 != lastButton1State) {
    lastDebounceTime1 = millis();
  }
  if ((millis() - lastDebounceTime1) > debounceDelay) {
    if (reading1 == HIGH) {
      nextParameter(); // Cycle to the next parameter
    }
  }
  lastButton1State = reading1;

  // Automatically cycle through parameters every few seconds
  if (millis() - lastUpdateTime >= displayInterval) {
    lastUpdateTime = millis();
    nextParameter();
  }

  // Add code to read sensor data here if necessary
}

// Function to cycle to the next parameter and update display and LEDs
void nextParameter() {
  // Indicate data processing with blue LED
  digitalWrite(BLUE_LED, HIGH);
  digitalWrite(GREEN_LED, LOW);

  // Display the current parameter based on the index
  display.clearDisplay();
  display.setCursor(0, 0);
  switch (parameterIndex) {
    case 0:
      display.println("Nitrogen: " + String(nitrogen) + " mg/kg");
      break;
    case 1:
      display.println("Phosphorus: " + String(phosphorus) + " mg/kg");
      break;
    case 2:
      display.println("Potassium: " + String(potassium) + " mg/kg");
      break;
    case 3:
      display.println("pH: " + String(pH));
      break;
    case 4:
      display.println("Temperature: " + String(temperature) + " C");
      break;
    case 5:
      display.println("Humidity: " + String(humidity) + " %");
      break;
    case 6:
      display.println("EC: " + String(ec) + " mS/cm");
      break;
  }
  display.display();

  // Move to the next parameter or wrap around to the first one
  parameterIndex = (parameterIndex + 1) % totalParameters;

  // Indicate data ready with green LED
  digitalWrite(BLUE_LED, LOW);
  digitalWrite(GREEN_LED, HIGH);
}
12V Battery Code
void setup() {
  // put your setup code here, to run once:

}

void loop() {
  // put your main code here, to run repeatedly:

}