
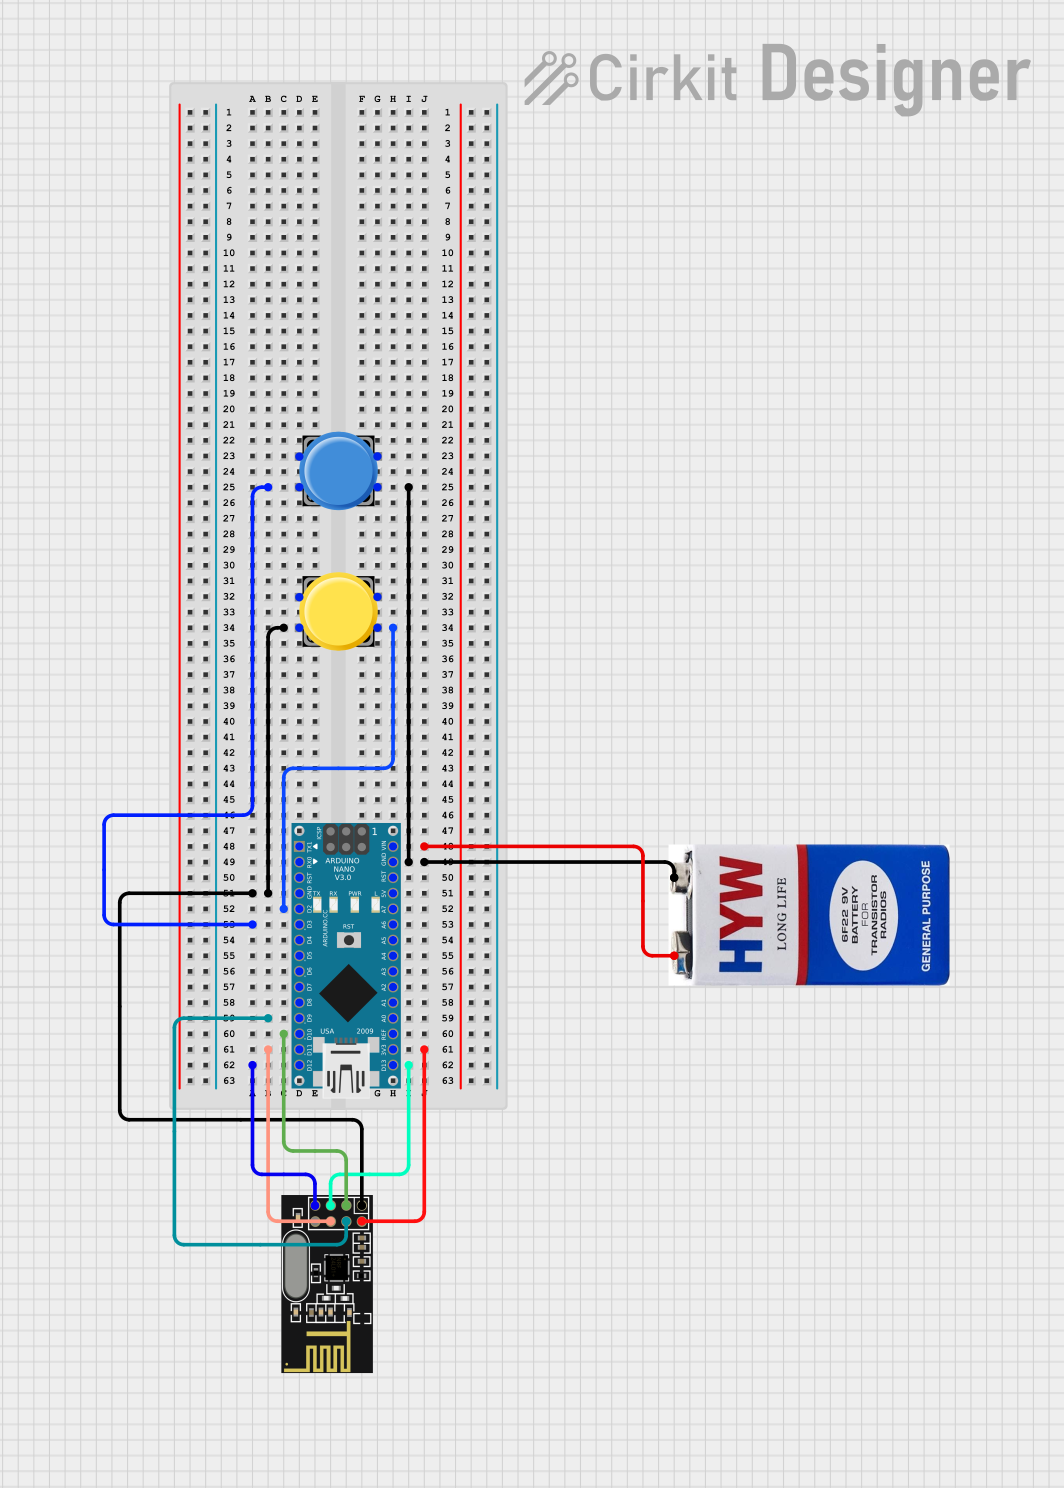
Circuit Documentation
Summary
This document provides a detailed overview of a circuit that includes an Arduino Nano, an NRF24L01 wireless module, two pushbuttons, and a 9V battery. The circuit is designed to interface the Arduino Nano with the NRF24L01 for wireless communication, and it includes pushbuttons for user input.
Component List
Arduino Nano
- Description: A small, complete, and breadboard-friendly board based on the ATmega328P.
- Pins: D1/TX, D0/RX, RESET, GND, D2, D3, D4, D5, D6, D7, D8, D9, D10, D11/MOSI, D12/MISO, VIN, 5V, A7, A6, A5, A4, A3, A2, A1, A0, AREF, 3V3, D13/SCK
NRF24L01
- Description: A wireless transceiver module for low-power, high-speed communication.
- Pins: IRQ (not used), MOSI, CSN, VCC (3V), GND, CE, SCK, MISO
Pushbutton (1)
- Description: A simple pushbutton for user input.
- Pins: Pin 2, Pin 1, Pin 3, Pin 4
Pushbutton (2)
- Description: Another simple pushbutton for user input.
- Pins: Pin 2, Pin 1, Pin 3, Pin 4
9V Battery
- Description: A standard 9V battery for powering the circuit.
- Pins: +, -
Wiring Details
Arduino Nano
- D11/MOSI connected to NRF24L01 MOSI
- D9 connected to NRF24L01 CSN
- 3V3 connected to NRF24L01 VCC (3V)
- GND connected to Pushbutton (1) Pin 1 and NRF24L01 GND
- D10 connected to NRF24L01 CE
- D13/SCK connected to NRF24L01 SCK
- D12/MISO connected to NRF24L01 MISO
- D3 connected to Pushbutton (2) Pin 1
- GND connected to Pushbutton (2) Pin 2 and 9V Battery -
- D2 connected to Pushbutton (1) Pin 2
- VIN connected to 9V Battery +
NRF24L01
- MOSI connected to Arduino Nano D11/MOSI
- CSN connected to Arduino Nano D9
- VCC (3V) connected to Arduino Nano 3V3
- GND connected to Arduino Nano GND
- CE connected to Arduino Nano D10
- SCK connected to Arduino Nano D13/SCK
- MISO connected to Arduino Nano D12/MISO
Pushbutton (1)
- Pin 1 connected to Arduino Nano GND
- Pin 2 connected to Arduino Nano D2
Pushbutton (2)
- Pin 1 connected to Arduino Nano D3
- Pin 2 connected to Arduino Nano GND
9V Battery
- + connected to Arduino Nano VIN
- - connected to Arduino Nano GND and Pushbutton (2) Pin 2
Documented Code
Arduino Nano Code (sketch.ino)
void setup() {
  // put your setup code here, to run once:

}

void loop() {
  // put your main code here, to run repeatedly:

}
Additional Documentation (documentation.txt)
This concludes the detailed documentation of the circuit.