
Arduino-Based Health Monitoring System with Heart Pulse, Temperature Sensors, and Wi-Fi Notification
View and Edit Project In Cirkit Designer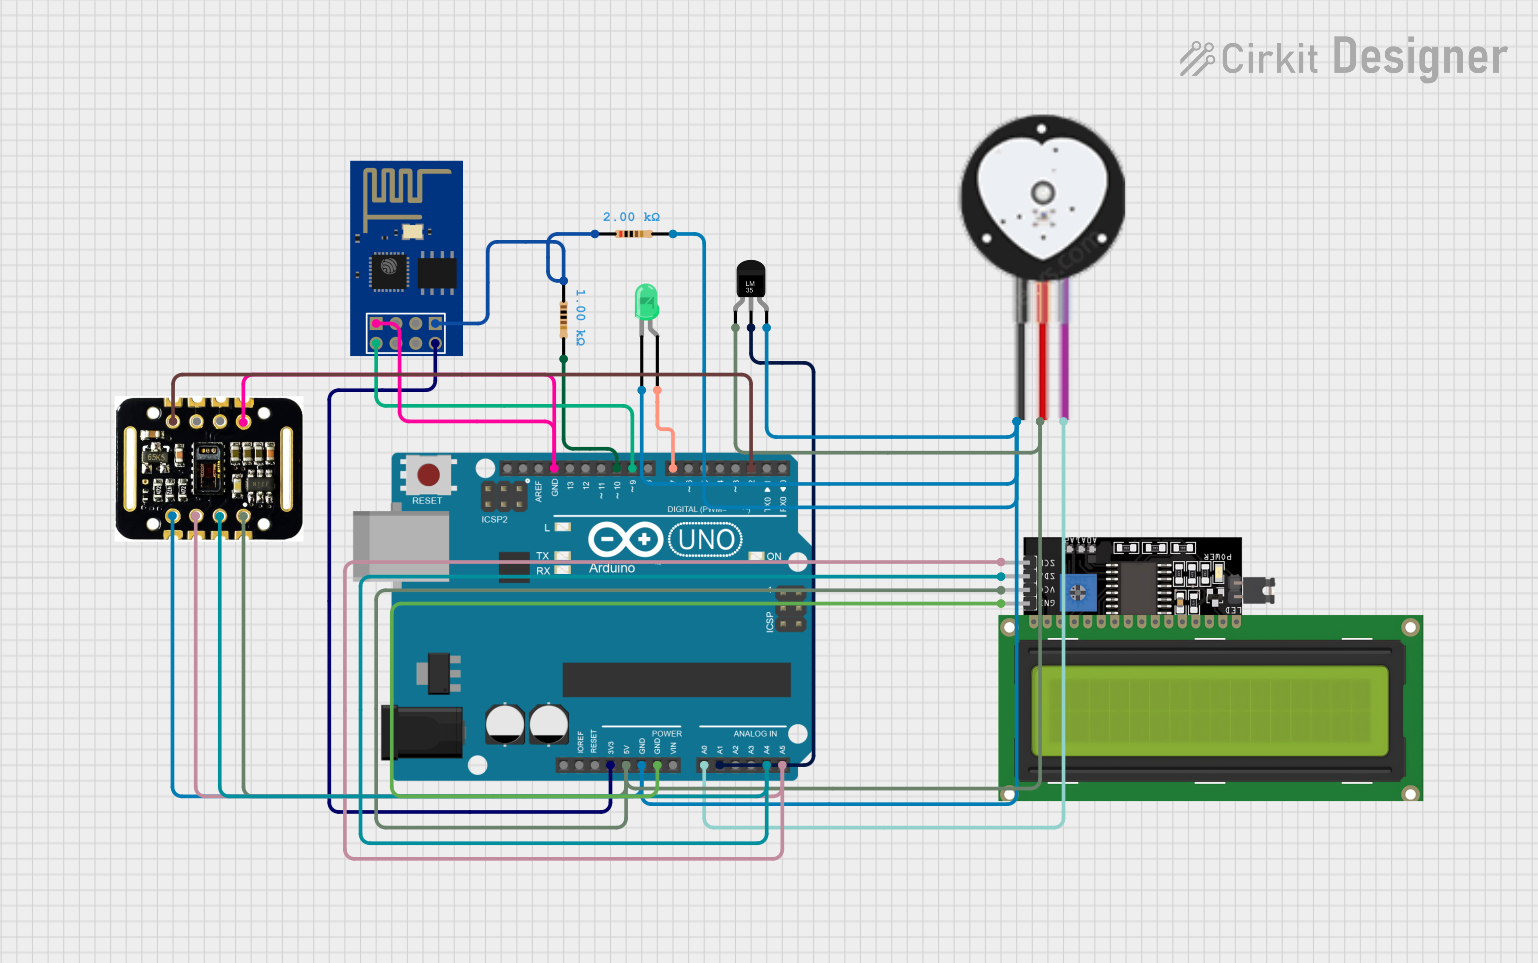
Circuit Documentation
Summary
This circuit is designed to monitor heart rate and body temperature using a heart pulse sensor and a temperature sensor (LM35). The data is displayed on an LCD screen and, if certain thresholds are exceeded, an SMS notification is sent via the ESP8266 WiFi module. The Arduino UNO microcontroller is used to read sensor data, control the display, and manage communication with the WiFi module.
Component List
Heart Pulse Sensor
- Pins: GND, VCC, SIGNAL
- Description: Measures the heart rate by detecting the pulse.
Arduino UNO
- Pins: UNUSED, IOREF, Reset, 3.3V, 5V, GND, Vin, A0, A1, A2, A3, A4, A5, SCL, SDA, AREF, D13, D12, D11, D10, D9, D8, D7, D6, D5, D4, D3, D2, D1, D0
- Description: Microcontroller used to read sensor data, control the display, and manage communication with the WiFi module.
Temperature Sensor (LM35)
- Pins: +Vs, Vout, GND
- Description: Measures the body temperature.
ESP8266 ESP-01 WiFi Module
- Pins: TXD, CH_PD, RST, VCC, GND, GPIO_2, GPIO_0, RXD
- Description: Sends SMS notifications when thresholds are exceeded.
LED: Two Pin (green)
- Pins: cathode, anode
- Description: Indicates when thresholds are exceeded.
LCD Display 16x4 I2C
- Pins: SCL, SDA, VCC, GND
- Description: Displays the heart rate and body temperature.
Resistor (1k Ohms)
- Pins: pin1, pin2
- Description: Used in the circuit to limit current.
Resistor (2k Ohms)
- Pins: pin1, pin2
- Description: Used in the circuit to limit current.
MAX30102 HR + SpO2 sensor
- Pins: INT, IRD, RD, GND, SCL, SDA, VIN
- Description: Measures heart rate and oxygen saturation.
Wiring Details
Heart Pulse Sensor
- GND connected to GND of Arduino UNO.
- VCC connected to 5V of Arduino UNO.
- SIGNAL connected to A0 of Arduino UNO.
Arduino UNO
- GND connected to:
- GND of Temperature Sensor (LM35)
- GND of MAX30102 HR + SpO2 sensor
- pin2 of 2k Ohms Resistor
- GND of Heart Pulse Sensor
- cathode of LED
- GND of LCD Display 16x4 I2C
- GND of ESP8266 ESP-01 WiFi Module
- 5V connected to:
- +Vs of Temperature Sensor (LM35)
- VIN of MAX30102 HR + SpO2 sensor
- VCC of Heart Pulse Sensor
- VCC of LCD Display 16x4 I2C
- 3.3V connected to VCC of ESP8266 ESP-01 WiFi Module.
- A0 connected to SIGNAL of Heart Pulse Sensor.
- A1 connected to Vout of Temperature Sensor (LM35).
- A4 connected to SDA of MAX30102 HR + SpO2 sensor and SDA of LCD Display 16x4 I2C.
- A5 connected to SCL of MAX30102 HR + SpO2 sensor and SCL of LCD Display 16x4 I2C.
- D2 connected to INT of MAX30102 HR + SpO2 sensor.
- D7 connected to anode of LED.
- D9 connected to TXD of ESP8266 ESP-01 WiFi Module.
- D10 connected to pin2 of 1k Ohms Resistor.
Temperature Sensor (LM35)
- GND connected to GND of Arduino UNO.
- +Vs connected to 5V of Arduino UNO.
- Vout connected to A1 of Arduino UNO.
ESP8266 ESP-01 WiFi Module
- VCC connected to 3.3V of Arduino UNO.
- GND connected to GND of Arduino UNO.
- TXD connected to D9 of Arduino UNO.
- RXD connected to pin1 of 2k Ohms Resistor.
LED: Two Pin (green)
- cathode connected to GND of Arduino UNO.
- anode connected to D7 of Arduino UNO.
LCD Display 16x4 I2C
- SCL connected to A5 of Arduino UNO.
- SDA connected to A4 of Arduino UNO.
- VCC connected to 5V of Arduino UNO.
- GND connected to GND of Arduino UNO.
Resistor (1k Ohms)
- pin1 connected to pin1 of 2k Ohms Resistor.
- pin2 connected to D10 of Arduino UNO.
Resistor (2k Ohms)
- pin1 connected to RXD of ESP8266 ESP-01 WiFi Module and pin1 of 1k Ohms Resistor.
- pin2 connected to GND of Arduino UNO.
MAX30102 HR + SpO2 sensor
- INT connected to D2 of Arduino UNO.
- GND connected to GND of Arduino UNO.
- SCL connected to A5 of Arduino UNO.
- SDA connected to A4 of Arduino UNO.
- VIN connected to 5V of Arduino UNO.
Code Documentation
/*
 * Pulse Oximeter and Temperature Sensor with SMS Notification
 * This code reads data from a heart pulse sensor and a temperature sensor.
 * If the body temperature exceeds a threshold or the oxygen level drops
 * below a threshold, an SMS notification is sent via the ESP8266 WiFi module.
 */

#include <Wire.h>
#include <LiquidCrystal_I2C.h>
#include <SoftwareSerial.h>

// Pin definitions
const int pulsePin = A0;
const int tempPin = A1;
const int ledPin = 7;
const int espTx = 9;
const int espRx = 10;

// Thresholds
const float tempThreshold = 37.5; // Celsius
const int pulseThreshold = 60; // BPM

// LCD setup
LiquidCrystal_I2C lcd(0x27, 16, 4);

// ESP8266 setup
SoftwareSerial espSerial(espRx, espTx);

void setup() {
  // Initialize serial communication
  Serial.begin(9600);
  espSerial.begin(115200);

  // Initialize LCD
  lcd.begin();
  lcd.backlight();

  // Initialize LED pin
  pinMode(ledPin, OUTPUT);
  digitalWrite(ledPin, LOW);

  // Initialize ESP8266
  sendCommand("AT", 1000);
  sendCommand("AT+CWMODE=1", 1000);
  sendCommand("AT+CWJAP=\"yourSSID\",\"yourPASSWORD\"", 5000);
}

void loop() {
  // Read pulse sensor data
  int pulseValue = analogRead(pulsePin);
  int pulseBPM = map(pulseValue, 0, 1023, 0, 150); // Example mapping

  // Read temperature sensor data
  int tempValue = analogRead(tempPin);
  float temperature = (tempValue / 1024.0) * 5.0 * 100.0;

  // Display data on LCD
  lcd.setCursor(0, 0);
  lcd.print("Temp: ");
  lcd.print(temperature);
  lcd.print(" C");
  lcd.setCursor(0, 1);
  lcd.print("Pulse: ");
  lcd.print(pulseBPM);
  lcd.print(" BPM");

  // Check thresholds and send SMS if needed
  if (temperature > tempThreshold || pulseBPM < pulseThreshold) {
    digitalWrite(ledPin, HIGH);
    sendSMS("Alert! Temp: " + String(temperature) + " C, Pulse: " + String(pulseBPM) + " BPM");
  } else {
    digitalWrite(ledPin, LOW);
  }

  delay(1000); // Wait for 1 second before next reading
}

void sendCommand(String command, int timeout) {
  espSerial.println(command);
  long int time = millis();
  while ((time + timeout) > millis()) {
    while (espSerial.available()) {
      char c = espSerial.read();
      Serial.print(c);
    }
  }
}

void sendSMS(String message) {
  sendCommand("AT+CMGF=1", 1000); // Set SMS mode
  sendCommand("AT+CMGS=\"+1234567890\"", 1000); // Replace with your phone number
  espSerial.print