
Arduino UNO-Based Temperature-Controlled Actuator System with LCD Display
View and Edit Project In Cirkit Designer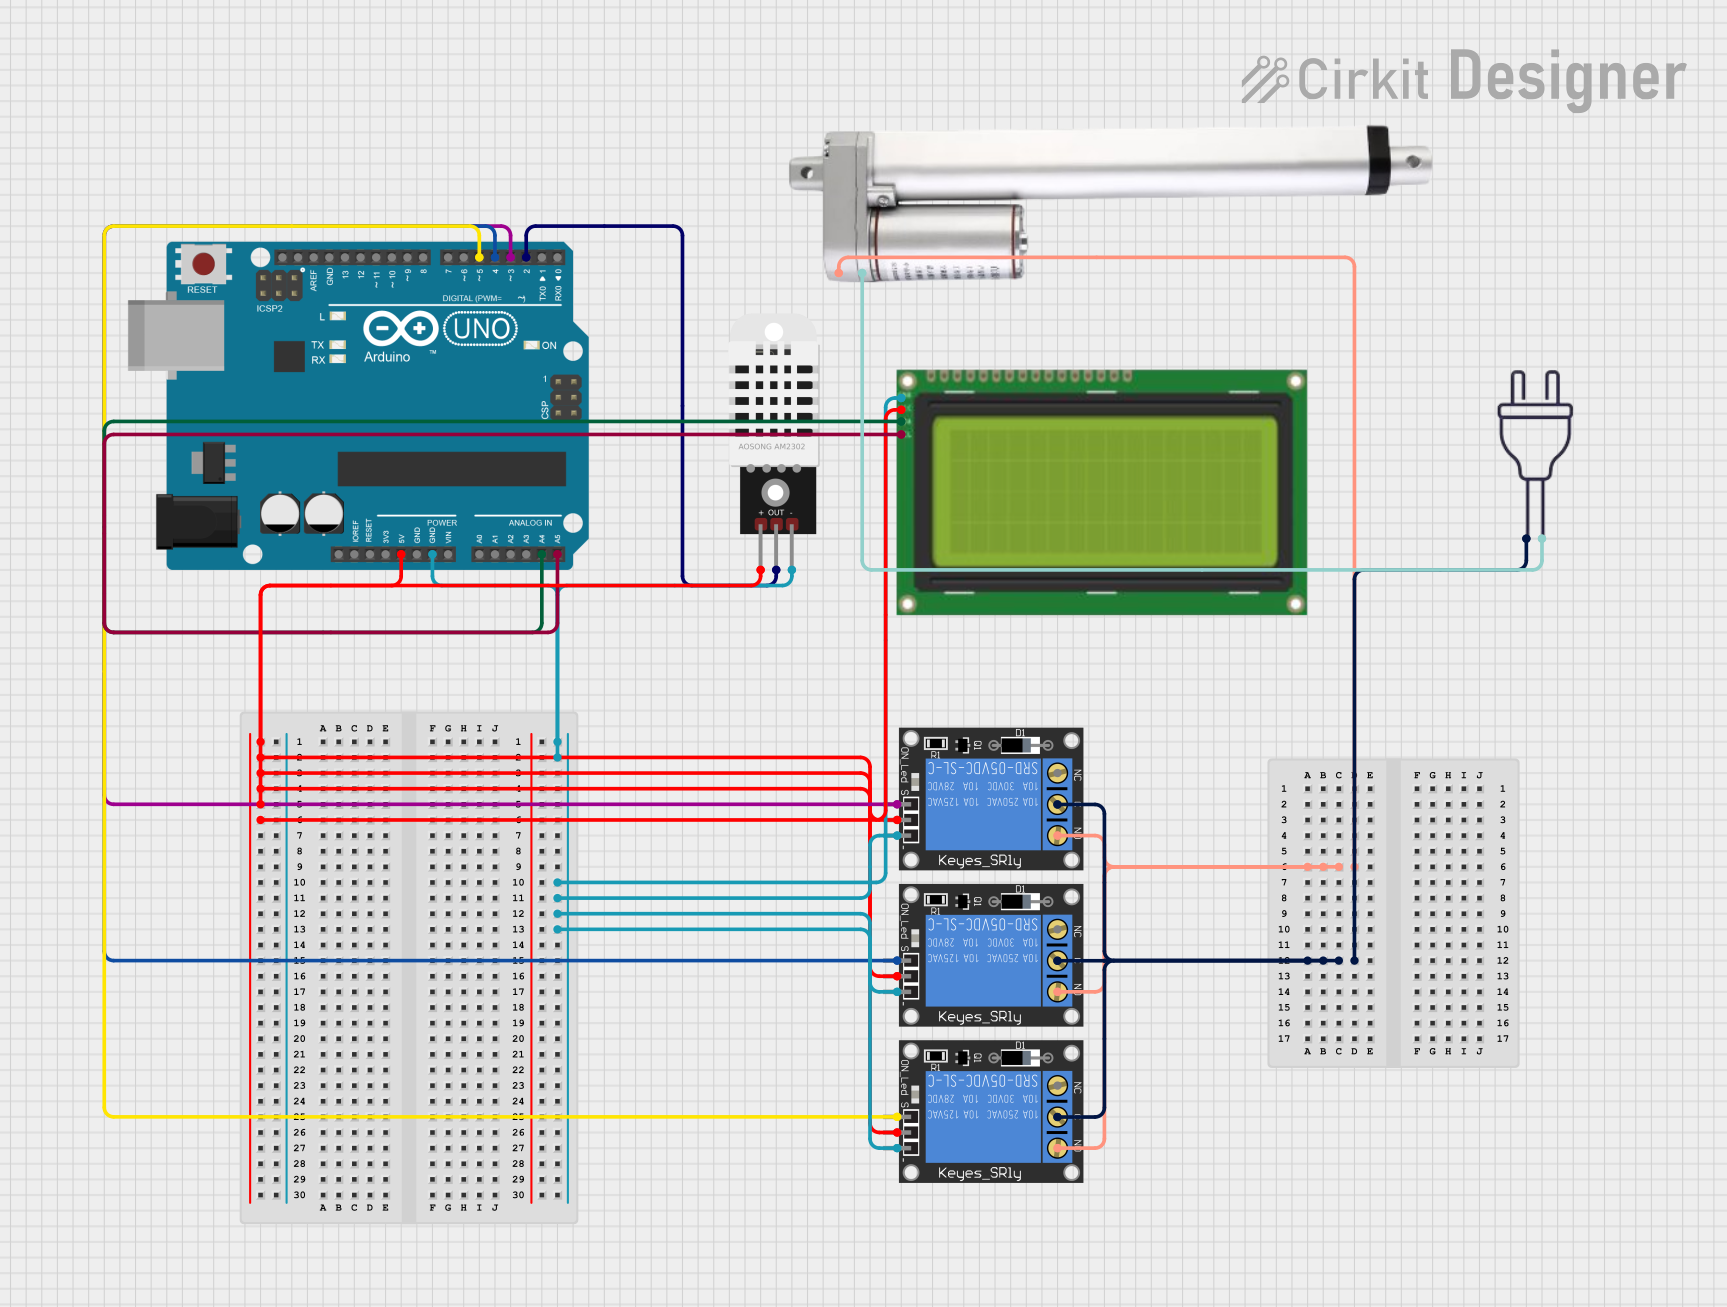
Circuit Documentation
Summary
This circuit involves an Arduino UNO microcontroller interfacing with multiple components including three 1-Channel Relays, an LCD display, a DHT22 temperature and humidity sensor, and an actuator motor. The Arduino UNO reads temperature and humidity data from the DHT22 sensor and displays it on the LCD. Based on the temperature readings, the Arduino controls the relays to activate or deactivate the actuator motor.
Component List
Arduino UNO
- Description: Microcontroller board based on the ATmega328P.
- Pins: UNUSED, IOREF, Reset, 3.3V, 5V, GND, Vin, A0, A1, A2, A3, A4, A5, SCL, SDA, AREF, D13, D12, D11, D10, D9, D8, D7, D6, D5, D4, D3, D2, D1, D0
1-Channel Relay (5V 10A)
- Description: Relay module for switching high voltage devices.
- Pins: NC, signal, C, power, NO, ground
Lcd 20x4 i2c
- Description: 20x4 character LCD display with I2C interface.
- Pins: GND, 5v, SCA, SCL
Actuator Motor
- Description: Motor for actuation purposes.
- Pins: 12 V, Ground
DHT22
- Description: Temperature and humidity sensor.
- Pins: +, Out, -
Power 220v
- Description: 220V power supply.
- Pins: hot wire, neutral wire
Wiring Details
Arduino UNO
5V connected to:
- 1-Channel Relay (5V 10A) power
- 1-Channel Relay (5V 10A) power
- 1-Channel Relay (5V 10A) power
- DHT22 +
- Lcd 20x4 i2c 5v
GND connected to:
- DHT22 -
- Lcd 20x4 i2c GND
- 1-Channel Relay (5V 10A) ground
- 1-Channel Relay (5V 10A) ground
- 1-Channel Relay (5V 10A) ground
A4 connected to:
- Lcd 20x4 i2c SCA
A5 connected to:
- Lcd 20x4 i2c SCL
D5 connected to:
- 1-Channel Relay (5V 10A) signal
D4 connected to:
- 1-Channel Relay (5V 10A) signal
D3 connected to:
- 1-Channel Relay (5V 10A) signal
D2 connected to:
- DHT22 Out
1-Channel Relay (5V 10A)
Power connected to:
- Arduino UNO 5V
Ground connected to:
- Arduino UNO GND
Signal connected to:
- Arduino UNO D5
- Arduino UNO D4
- Arduino UNO D3
C connected to:
- 1-Channel Relay (5V 10A) C
- Power 220v hot wire
- 1-Channel Relay (5V 10A) C
NO connected to:
- 1-Channel Relay (5V 10A) NO
- Actuator Motor 12 V
- 1-Channel Relay (5V 10A) NO
Lcd 20x4 i2c
5v connected to:
- Arduino UNO 5V
GND connected to:
- Arduino UNO GND
SCA connected to:
- Arduino UNO A4
SCL connected to:
- Arduino UNO A5
Actuator Motor
12 V connected to:
- 1-Channel Relay (5V 10A) NO
Ground connected to:
- Power 220v neutral wire
DHT22
+ connected to:
- Arduino UNO 5V
Out connected to:
- Arduino UNO D2
- connected to:
- Arduino UNO GND
Power 220v
Hot wire connected to:
- 1-Channel Relay (5V 10A) C
Neutral wire connected to:
- Actuator Motor Ground
Code Documentation
Arduino UNO Code
#include <Wire.h>               // Untuk komunikasi I2C
#include <LiquidCrystal_I2C.h>   // Untuk mengendalikan LCD
#include <DHT.h>                 // Untuk mengendalikan sensor DHT22

// Deklarasi pin untuk DHT22 dan relay
#define DHTPIN 2                // Pin untuk DHT22
#define DHTTYPE DHT22           // Jenis sensor DHT (DHT22)
DHT dht(DHTPIN, DHTTYPE);       // Inisialisasi sensor DHT

// Inisialisasi LCD (alamat I2C: 0x27, 20 kolom dan 4 baris)
LiquidCrystal_I2C lcd(0x27, 20, 4);

// Pin untuk relay
int relay1 = 3;               // Relay 1
int relay2 = 4;               // Relay 2
int relay3 = 5;               // Relay 3

void setup() {
  // Mulakan komunikasi serial
  Serial.begin(9600);

  // Mulakan DHT sensor
  dht.begin();

  // Mulakan LCD
  lcd.begin(20, 4);
  lcd.setBacklight(1); // Nyalakan lampu latar LCD

  // Set pin relay sebagai output
  pinMode(relay1, OUTPUT);
  pinMode(relay2, OUTPUT);
  pinMode(relay3, OUTPUT);

  // Paparkan mesej "Selamat Datang Ke Bengkel PPU"
  lcd.clear();
  lcd.setCursor(0, 0);
  lcd.print("Selamat Datang Ke");
  lcd.setCursor(0, 1);
  lcd.print("Bengkel PPU");
  delay(3000);  // Paparkan mesej selama 3 saat
}

void loop() {
  // Baca suhu dan kelembapan dari sensor DHT22
  float suhu = dht.readTemperature(); // Suhu dalam Celsius
  float kelembapan = dht.readHumidity(); // Kelembapan dalam %

  // Periksa jika pembacaan gagal
  if (isnan(suhu) || isnan(kelembapan)) {
    lcd.clear();
    lcd.setCursor(0, 0);
    lcd.print("Pembacaan gagal!");
    delay(2000);
    return;
  }

  // Paparkan suhu dan kelembapan pada LCD
  lcd.clear();
  lcd.setCursor(0, 0);
  lcd.print("Suhu: ");
  lcd.print(suhu);
  lcd.print(" C");

  lcd.setCursor(0, 1);
  lcd.print("Kelembapan: ");
  lcd.print(kelembapan);
  lcd.print(" %");

  // Logik untuk mengawal relay berdasarkan suhu
  if (suhu > 30.0) {       // Jika suhu lebih besar dari 30°C
    digitalWrite(relay1, HIGH); // Hidupkan relay1 (actuator)
    digitalWrite(relay2, LOW);  // Matikan relay2
    digitalWrite(relay3, LOW);  // Matikan relay3
  }
  else if (suhu > 25.0) {  // Jika suhu lebih besar dari 25°C tetapi kurang dari 30°C
    digitalWrite(relay1, LOW);  // Matikan relay1
    digitalWrite(relay2, HIGH); // Hidupkan relay2 (actuator)
    digitalWrite(relay3, LOW);  // Matikan relay3
  }
  else {                   // Jika suhu kurang dari 25°C
    digitalWrite(relay1, LOW);  // Matikan relay1
    digitalWrite(relay2, LOW);  // Matikan relay2
    digitalWrite(relay3, HIGH); // Hidupkan relay3 (actuator)
  }

  delay(2000);  // Tunggu 2 saat sebelum membaca semula
}
1-Channel Relay Code
void setup() {
  // put your setup code here, to run once:

}

void loop() {
  // put your main code here, to run repeatedly:

}
This documentation provides a comprehensive overview of