
Circuit Documentation
Summary of the Circuit
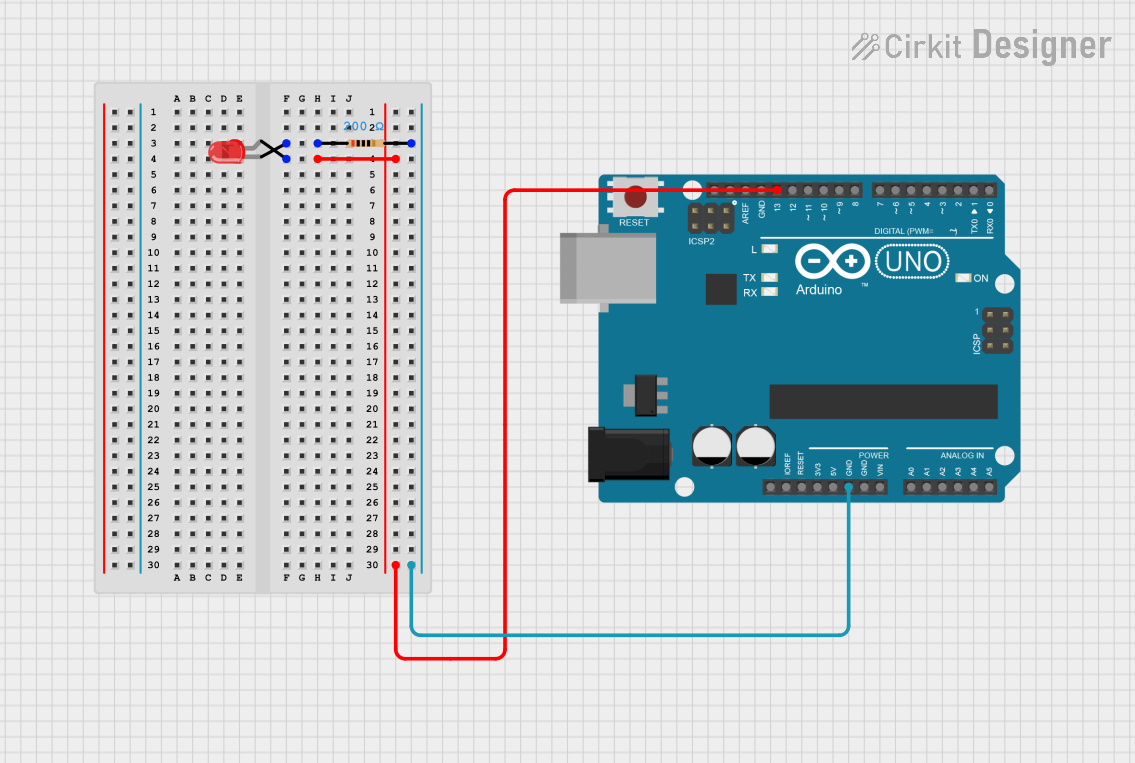
This circuit is designed to control an LED using an Arduino UNO microcontroller. The LED is connected to one of the digital pins of the Arduino (D13) and is turned on and off in an alternating pattern to create a blinking effect. A resistor is included in series with the LED to limit the current and protect the LED from damage.
Component List
Resistor
- Description: A passive two-terminal electrical component that implements electrical resistance as a circuit element.
- Purpose: To limit the current flowing through the LED, preventing it from burning out.
- Properties:
- Resistance: 200 Ohms
LED: Two Pin (red)
- Description: A two-pin light-emitting diode that emits red light when a forward current passes through it.
- Purpose: To emit light when powered, serving as an indicator or for illumination.
- Properties: None specified.
Arduino UNO
- Description: A microcontroller board based on the ATmega328P, with a variety of digital and analog I/O pins.
- Purpose: To control the blinking of the LED by providing the necessary logic and power.
- Properties: None specified.
Wiring Details
Resistor
- Connections:
- One pin connected to the cathode of the LED.
- The other pin connected to the GND pin of the Arduino UNO.
LED: Two Pin (red)
- Connections:
- Anode connected to digital pin D13 of the Arduino UNO.
- Cathode connected to one pin of the resistor.
Arduino UNO
- Connections:
- Digital pin D13 connected to the anode of the LED.
- GND pin connected to one pin of the resistor.
Documented Code
The following code is written for the Arduino UNO microcontroller to control the blinking of the LED:
// Define the LED pin
const int kPinLed = 13;

// The setup function runs once when you press reset or power the board
void setup() {
  // Initialize digital pin D13 as an output.
  pinMode(kPinLed, OUTPUT);
}

// The loop function runs over and over again forever
void loop() {
  // Turn the LED on (HIGH is the voltage level)
  digitalWrite(kPinLed, HIGH);
  // Wait for a half second (500 milliseconds)
  delay(500);
  // Turn the LED off by making the voltage LOW
  digitalWrite(kPinLed, LOW);
  // Wait for a half second
  delay(500);
}
This code sets up the Arduino UNO to output a high voltage to pin D13, turning the LED on, and then a low voltage, turning the LED off, with a 500-millisecond delay between each state change, creating a blinking effect.