
Arduino UNO-Based Smart Control System with RFID and LCD Display
View and Edit Project In Cirkit Designer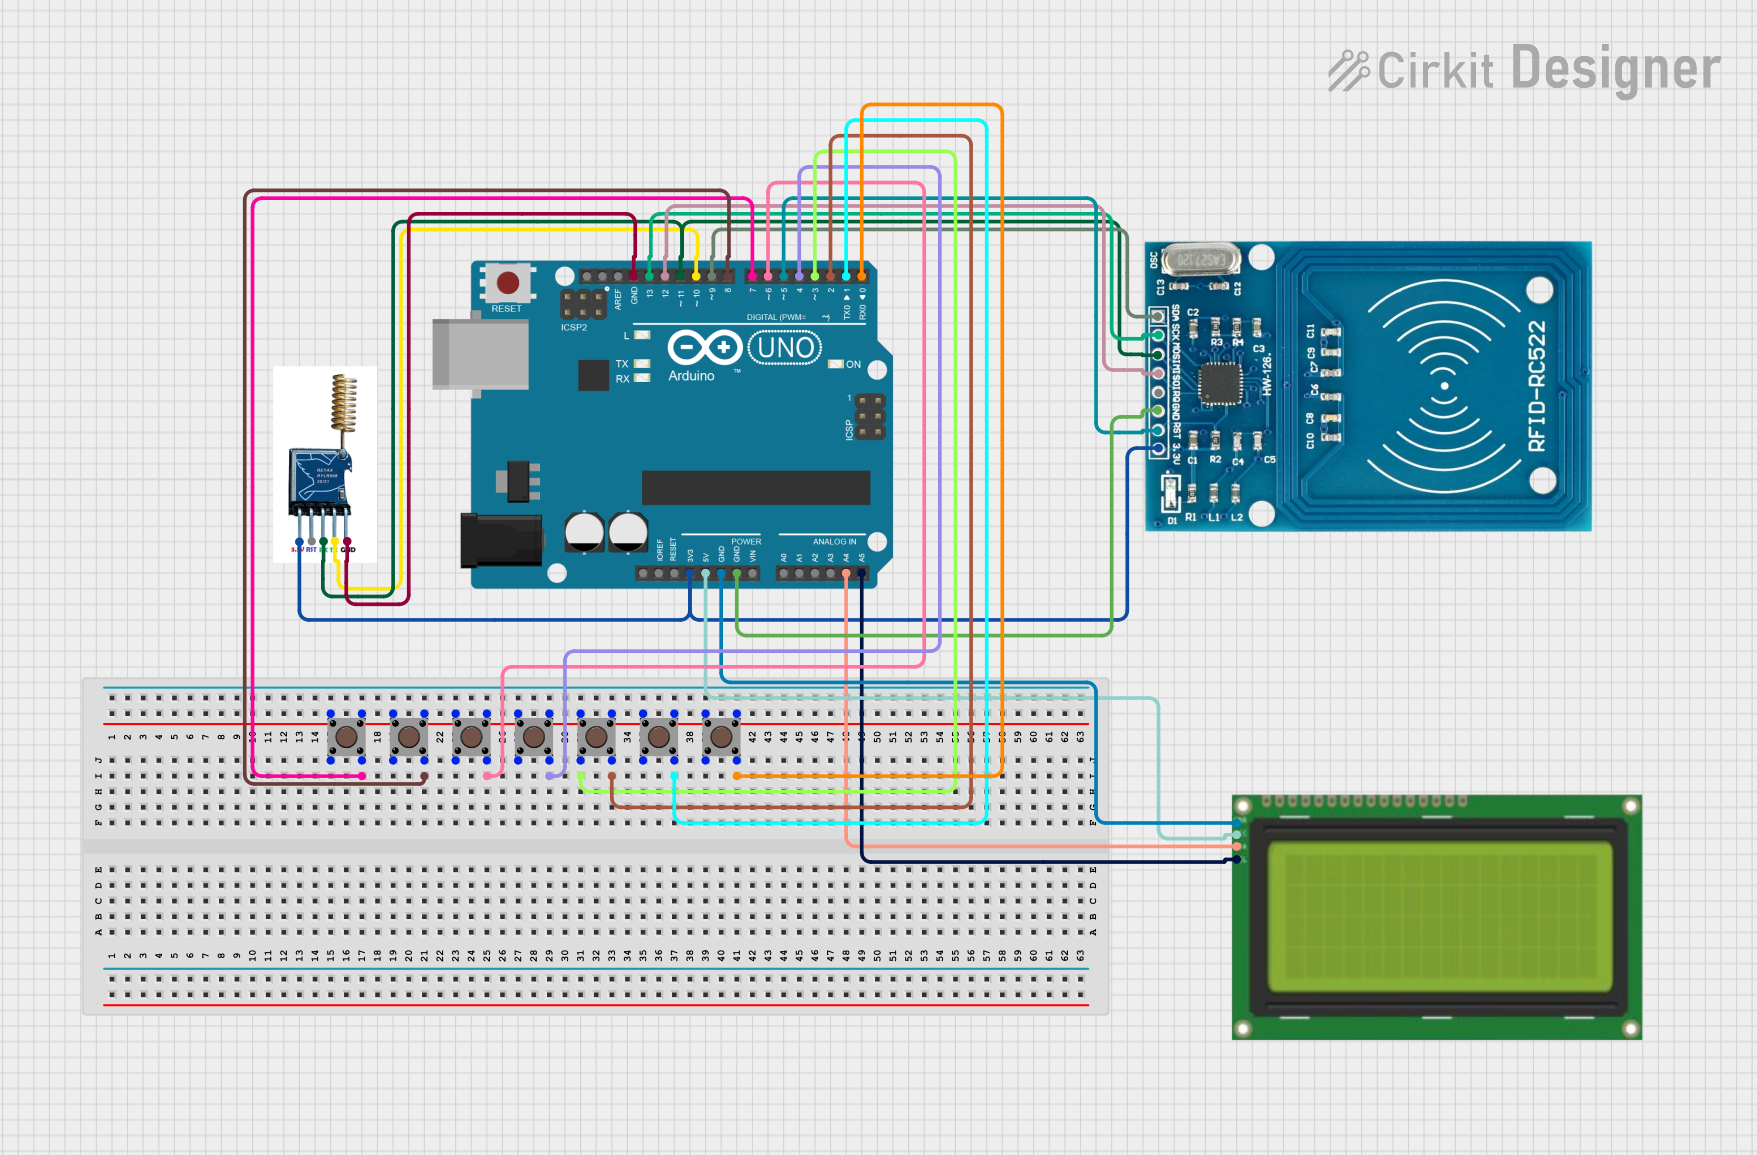
Circuit Documentation
Summary
This document provides a detailed overview of a circuit that includes an Arduino UNO microcontroller, an RYLR998 LoRa module, an LCD 20x4 I2C display, an RFID-RC522 module, and multiple pushbuttons. The circuit is designed to interface these components with the Arduino UNO for various input and output operations.
Component List
Arduino UNO
- Description: A microcontroller board based on the ATmega328P.
- Pins: UNUSED, IOREF, Reset, 3.3V, 5V, GND, Vin, A0, A1, A2, A3, A4, A5, SCL, SDA, AREF, D13, D12, D11, D10, D9, D8, D7, D6, D5, D4, D3, D2, D1, D0
RYLR998
- Description: A LoRa module for long-range communication.
- Pins: 3.3V, RST, RX, TX, GND
LCD 20x4 I2C
- Description: A 20x4 character LCD display with I2C interface.
- Pins: GND, 5V, SCA, SCL
RFID-RC522
- Description: An RFID module for reading and writing RFID tags.
- Pins: VCC (3.3V), RST, GND, IRQ, MISO, MOSI, SCK, SDA
Pushbutton
- Description: A simple pushbutton switch.
- Pins: Pin 3 (out), Pin 4 (out), Pin 1 (in), Pin 2 (in)
Wiring Details
Arduino UNO
- D7 connected to Pushbutton Pin 4 (out)
- D8 connected to Pushbutton Pin 4 (out)
- D6 connected to Pushbutton Pin 4 (out)
- D4 connected to Pushbutton Pin 4 (out)
- D3 connected to Pushbutton Pin 2 (in)
- D2 connected to Pushbutton Pin 4 (out)
- D1 connected to Pushbutton Pin 4 (out)
- D0 connected to Pushbutton Pin 4 (out)
- 3.3V connected to RYLR998 3.3V, RFID-RC522 VCC (3.3V)
- 5V connected to LCD 20x4 I2C 5V
- GND connected to LCD 20x4 I2C GND, RFID-RC522 GND, RYLR998 GND
- A4 connected to LCD 20x4 I2C SCA
- A5 connected to LCD 20x4 I2C SCL
- D13 connected to RFID-RC522 SCK
- D12 connected to RFID-RC522 MISO
- D11 connected to RYLR998 RX, RFID-RC522 MOSI
- D10 connected to RYLR998 TX
- D9 connected to RFID-RC522 SDA
- D5 connected to RFID-RC522 RST
RYLR998
- 3.3V connected to Arduino UNO 3.3V
- GND connected to Arduino UNO GND
- RX connected to Arduino UNO D11
- TX connected to Arduino UNO D10
LCD 20x4 I2C
- 5V connected to Arduino UNO 5V
- GND connected to Arduino UNO GND
- SCA connected to Arduino UNO A4
- SCL connected to Arduino UNO A5
RFID-RC522
- VCC (3.3V) connected to Arduino UNO 3.3V
- GND connected to Arduino UNO GND
- SCK connected to Arduino UNO D13
- MISO connected to Arduino UNO D12
- MOSI connected to Arduino UNO D11
- SDA connected to Arduino UNO D9
- RST connected to Arduino UNO D5
Pushbutton
- Pin 4 (out) connected to Arduino UNO D7
- Pin 4 (out) connected to Arduino UNO D8
- Pin 4 (out) connected to Arduino UNO D6
- Pin 4 (out) connected to Arduino UNO D4
- Pin 2 (in) connected to Arduino UNO D3
- Pin 4 (out) connected to Arduino UNO D2
- Pin 4 (out) connected to Arduino UNO D1
- Pin 4 (out) connected to Arduino UNO D0
- Pin 3 (out) connected to Pin 1 (in) of the same pushbutton
Documented Code
Arduino UNO Code (sketch.ino)
void setup() {
  // put your setup code here, to run once:

}

void loop() {
  // put your main code here, to run repeatedly:

}
Additional Documentation (documentation.txt)
This document provides a comprehensive overview of the circuit, including the components used, their wiring details, and the code for the Arduino UNO microcontroller.